Store Connections & Catalog Management
This guide provides step-by-step instructions for managing your WhatsApp Commerce Catalogs, integrating external stores (WooCommerce), configuring Payment Gateways (Stripe, Website Checkout, Manual Payments), managing Product Variants, and creating Collections within the Utter AI platform.
Create Catalog
To create a catalog, follow these steps:
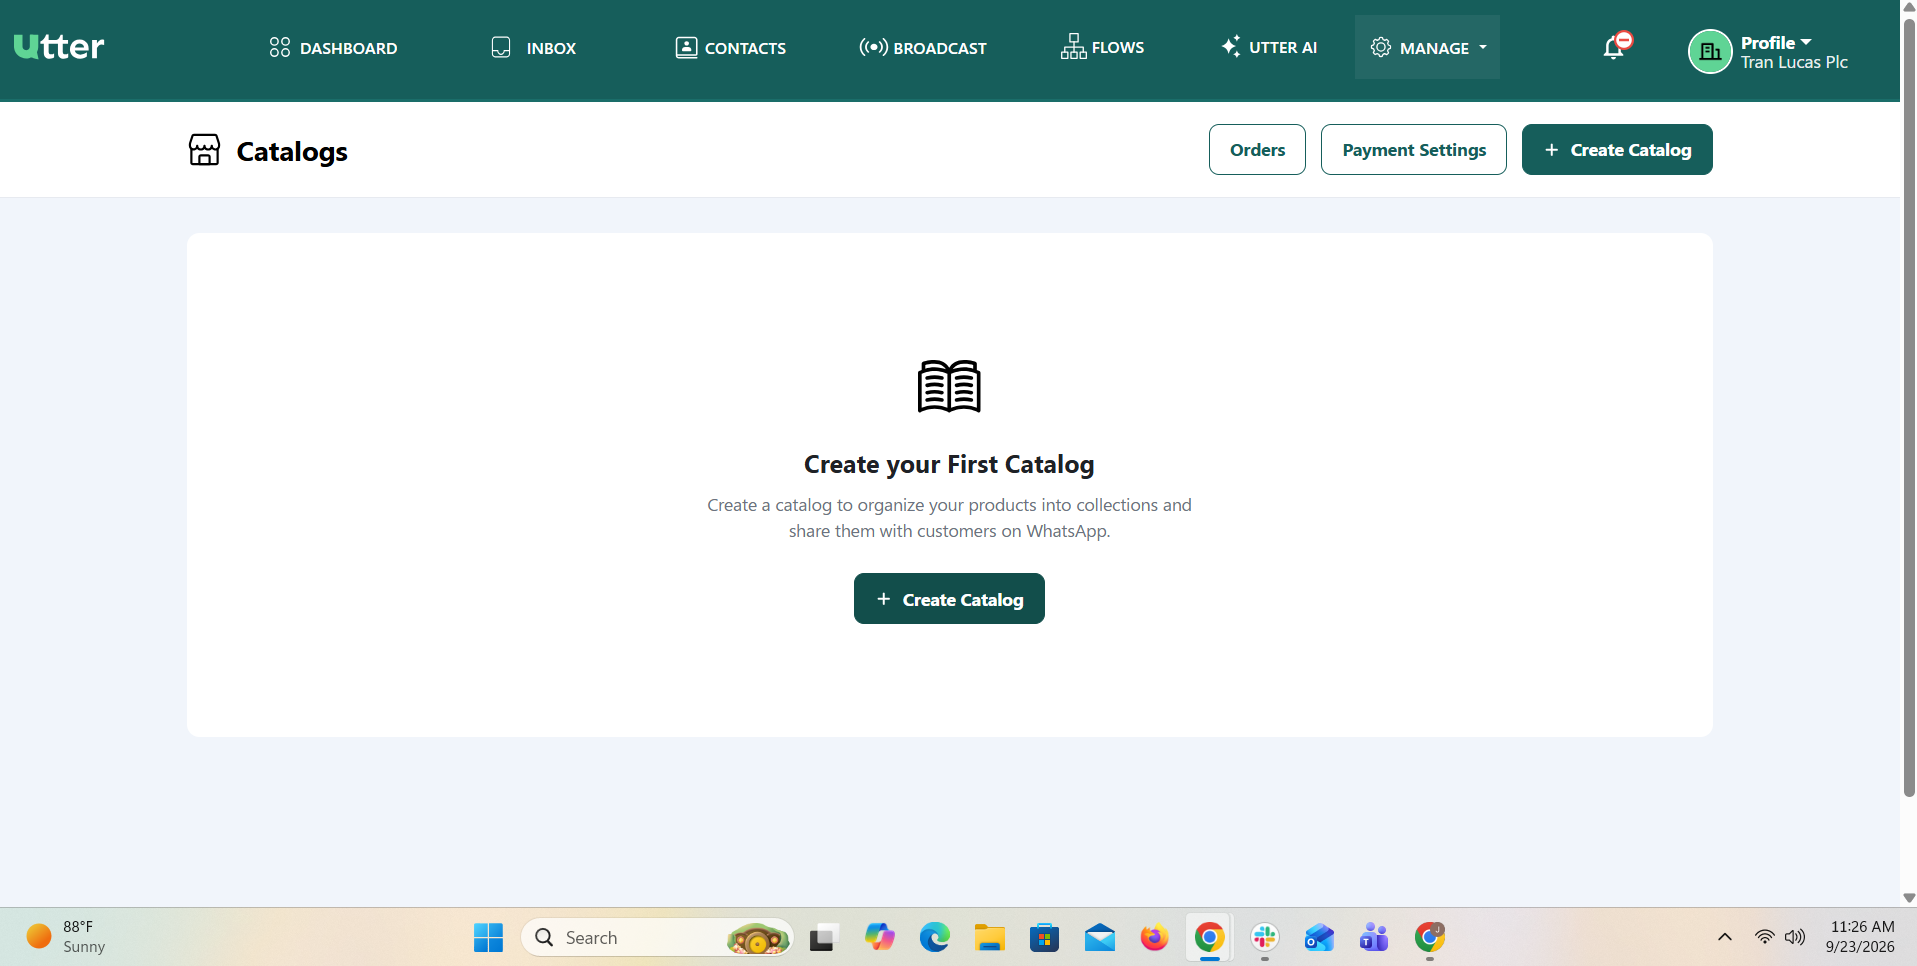
- Click on the + Create Catalog button available on the Catalogs page.
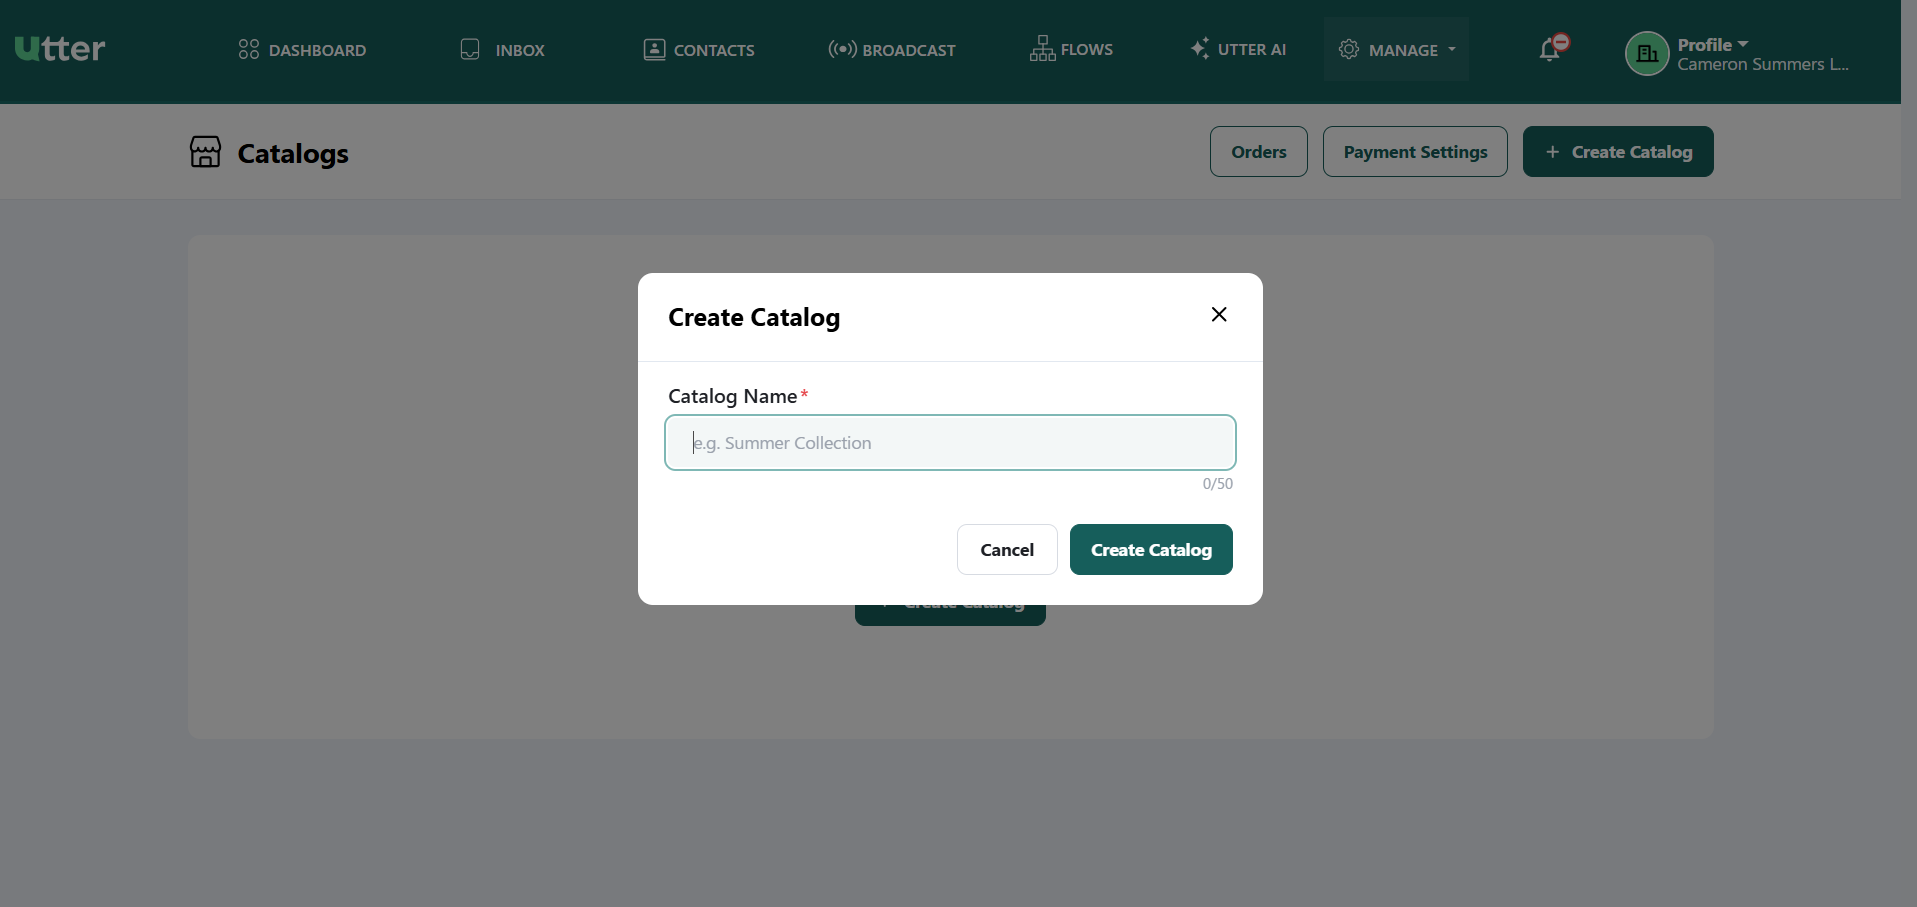
- Upon clicking, a Create Catalog pop-up modal will appear on the screen.
- Catalog Name: Enter the desired name for your catalog in this input field (e.g., "Summer Collection"). It supports a character limit of up to 50 characters (0/50).
Catalog Dashboard Overview
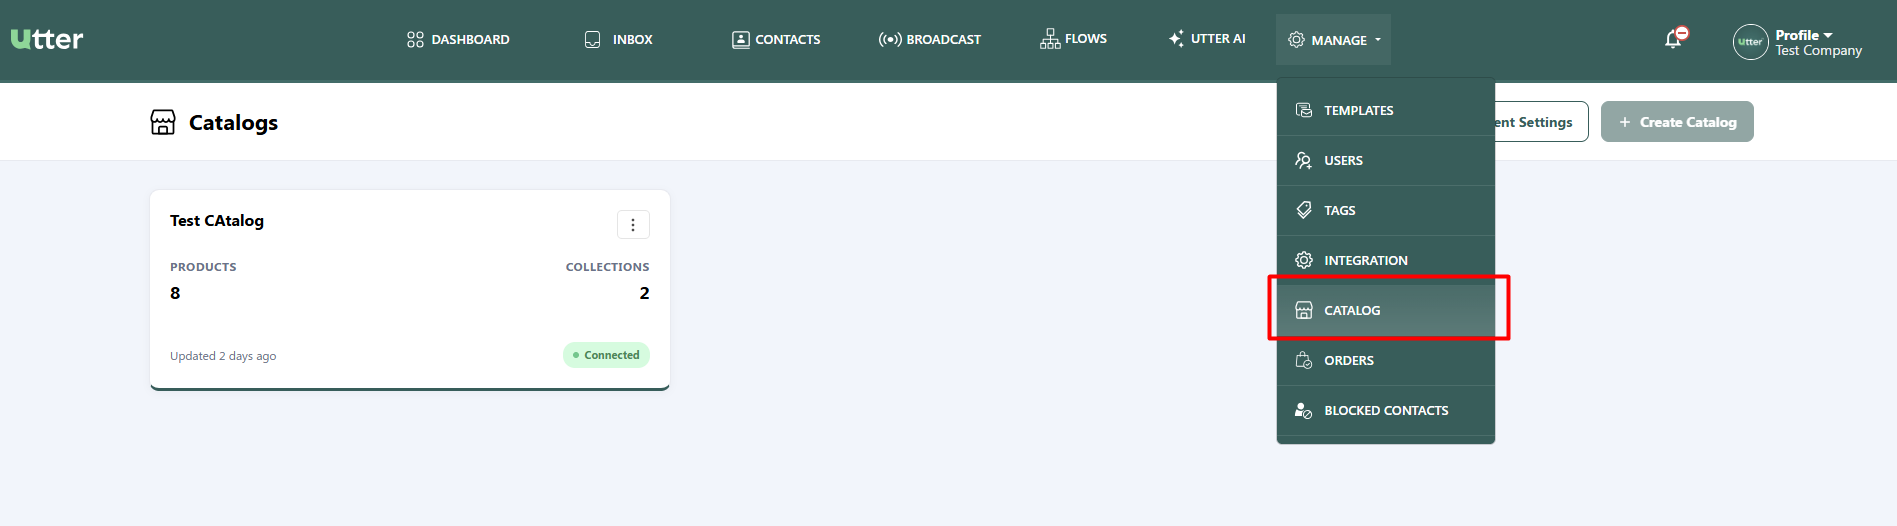
Navigate to Manage > Catalogs from the top header menu to access the Catalogs Dashboard.
Dashboard Capabilities
- View Connected Catalogs: Monitor active WhatsApp catalogs along with total Products count and Collections count.
- Sync Status: Verify live status (e.g.,
Connectedbadge and last updated timestamp). - Payment Settings Access: Configure global payment options across all catalogs.
- Create Catalog: Initialize a new WhatsApp catalog directly from the platform.
Managing Catalogs (View, Edit & Delete)
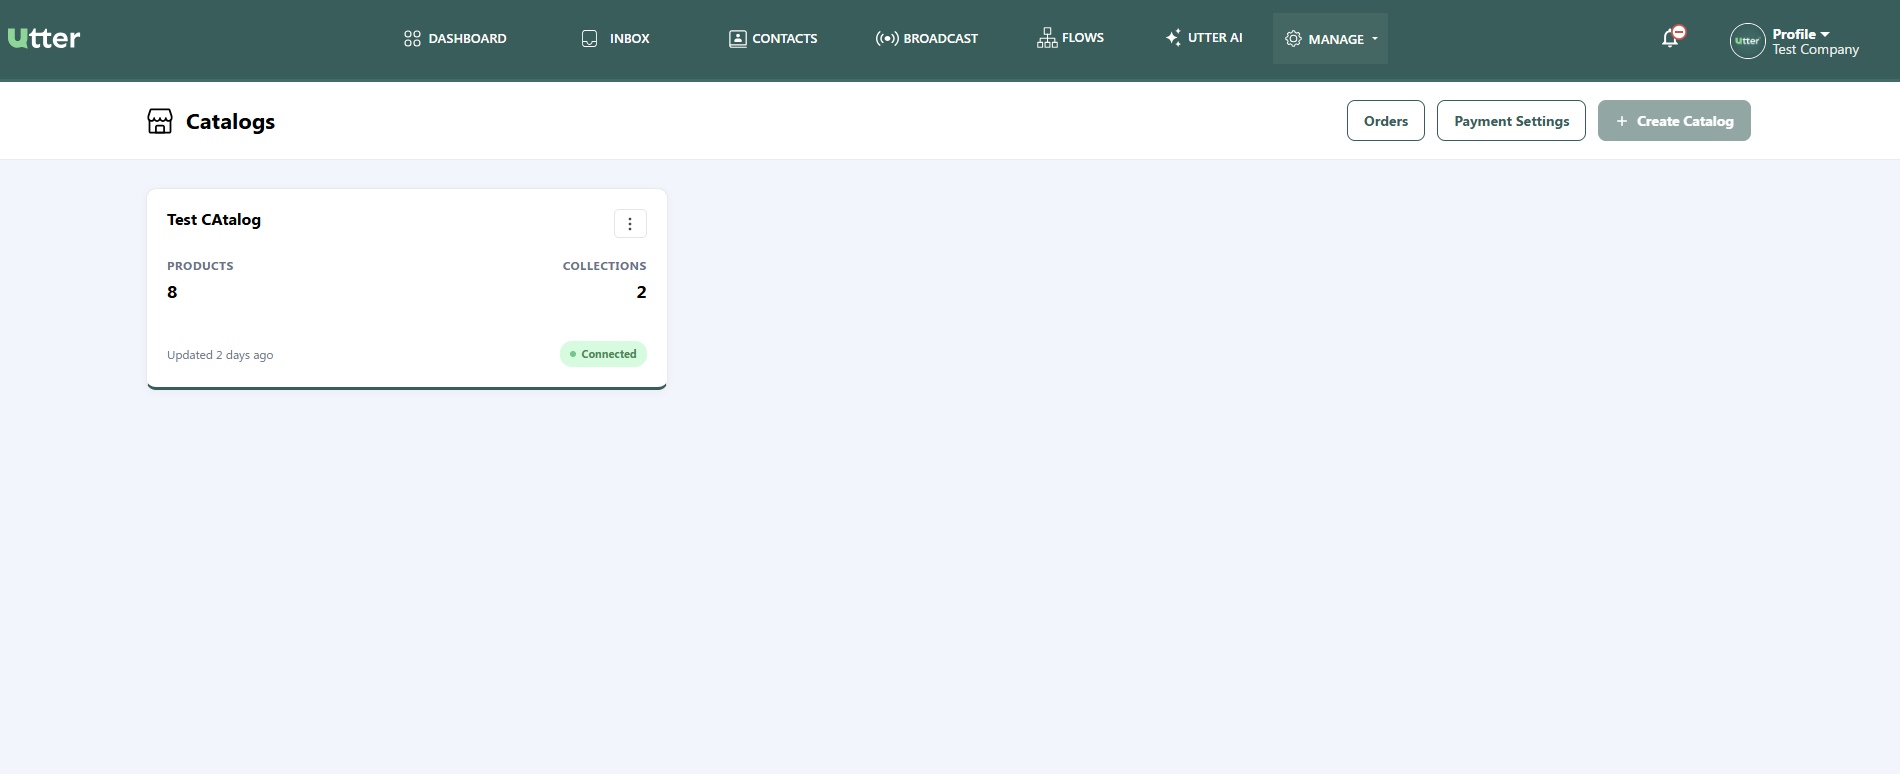
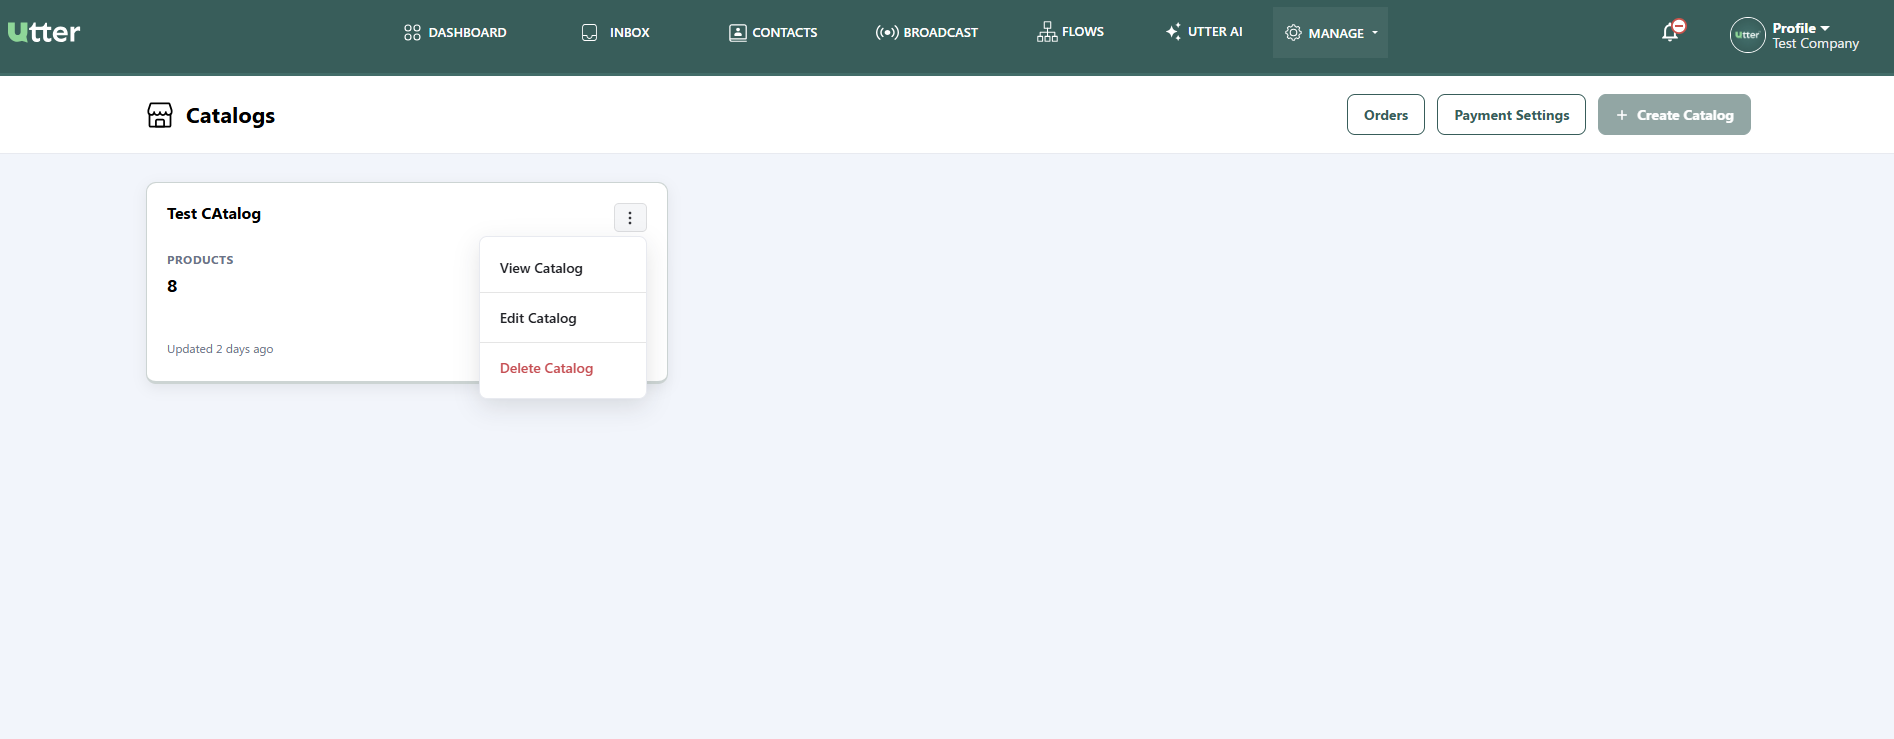
Click on the three-dot menu (⋮) located at the top-right corner of any catalog card to perform administrative actions:
- View Catalog: Opens the catalog detail page containing the Products and Collections tabs.
- Edit Catalog: Opens the drawer to modify the Catalog Name or review metadata (Products, Collections, Variants, Created/Updated dates).
- Delete Catalog: Permanently disassociates all product listings from the WhatsApp Commerce environment.
Configuring Payment Settings
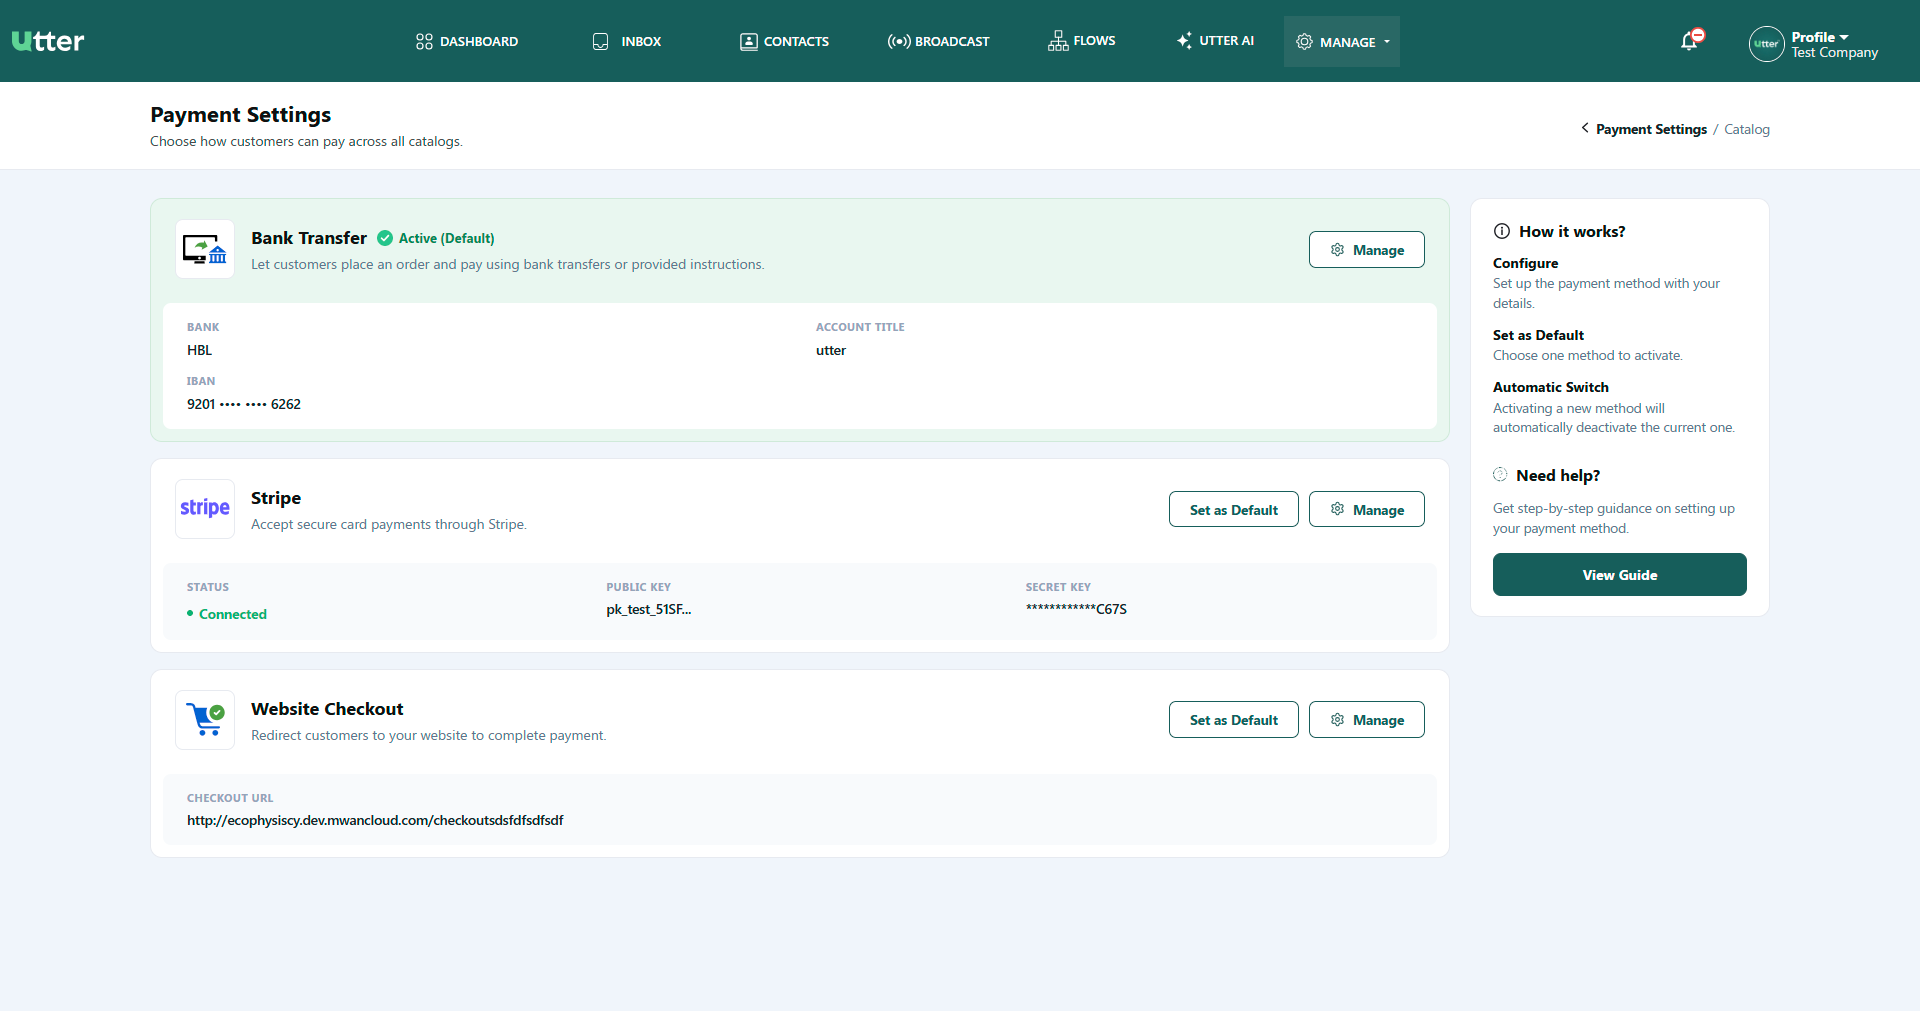
Click Payment Settings on the main Catalogs page to set up transaction handling for WhatsApp orders.
Payment Gateway Options
| Payment Gateway | Type | Description |
|---|---|---|
| Stripe | Direct Credit/Debit Card | Native automated card processing inside WhatsApp. |
| Website Checkout | Web Redirect | Redirects customers to your e-commerce website checkout page. |
| Manual Payment | Bank Transfer / Offline | Custom instructions for manual bank transfers or Cash on Delivery. |
Setting Up Stripe Integration
Before configuring Stripe in the plugin, make sure you have a Stripe account. If you do not have one, create an account on Stripe and complete the required account setup.
1. Create or Access Your Stripe Account
Log in to your Stripe account and open the Stripe Dashboard.
2. Get Your API Keys
- In the Stripe Dashboard, go to Developers > API keys.
- Locate the Publishable key and Secret key.
- Copy the required keys.
- Keep your Secret key secure and do not share it publicly.
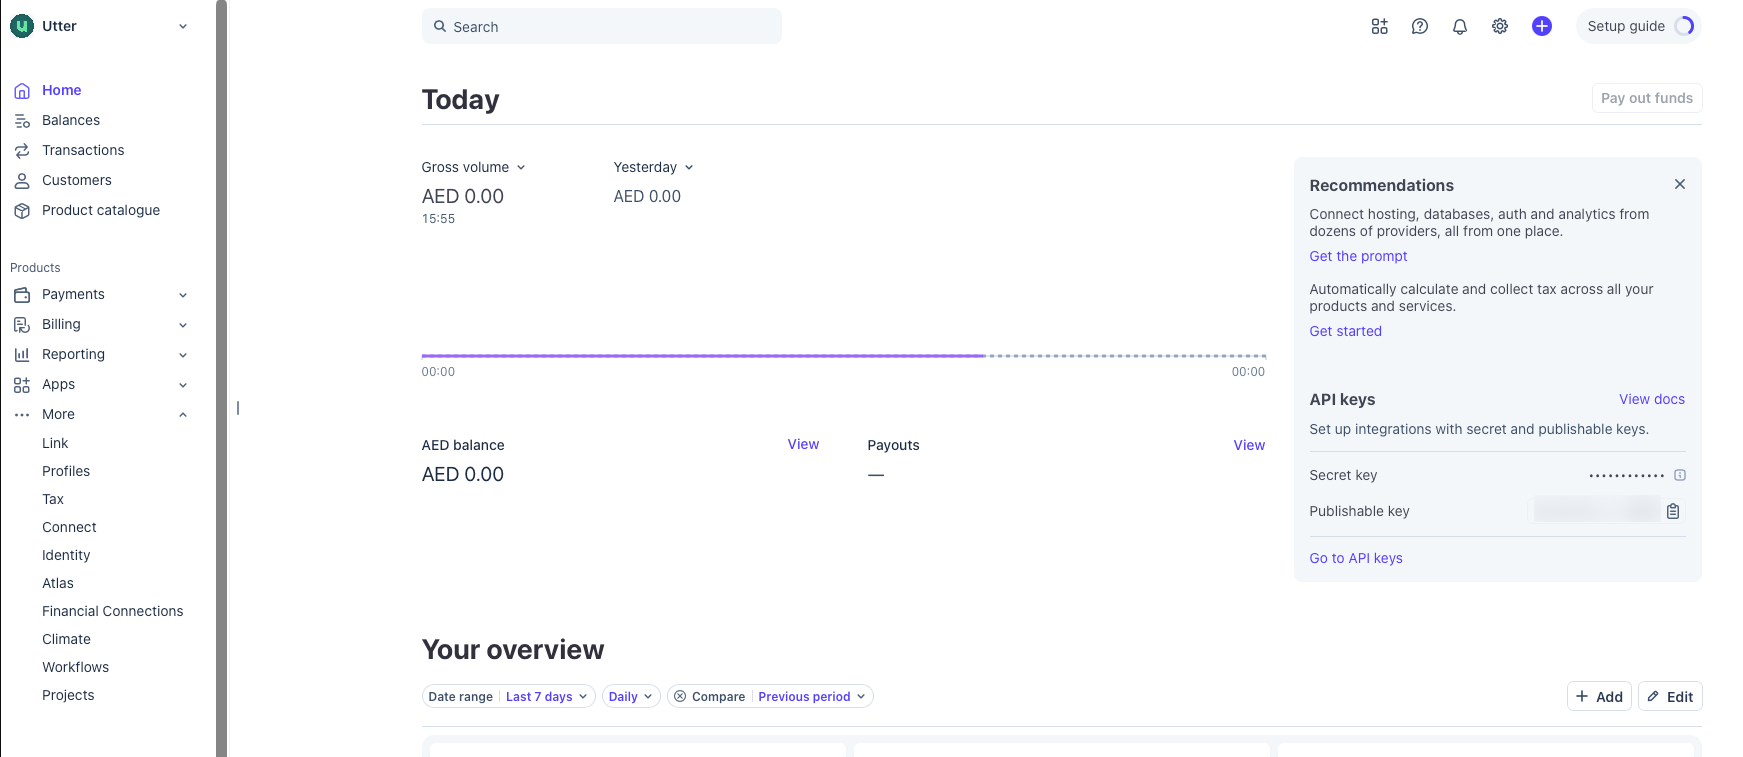
Depending on your Stripe account and environment, you may need to switch between Test mode and Live mode. Make sure you use the keys that correspond to the environment you are configuring.
3. Create a Webhook Endpoint
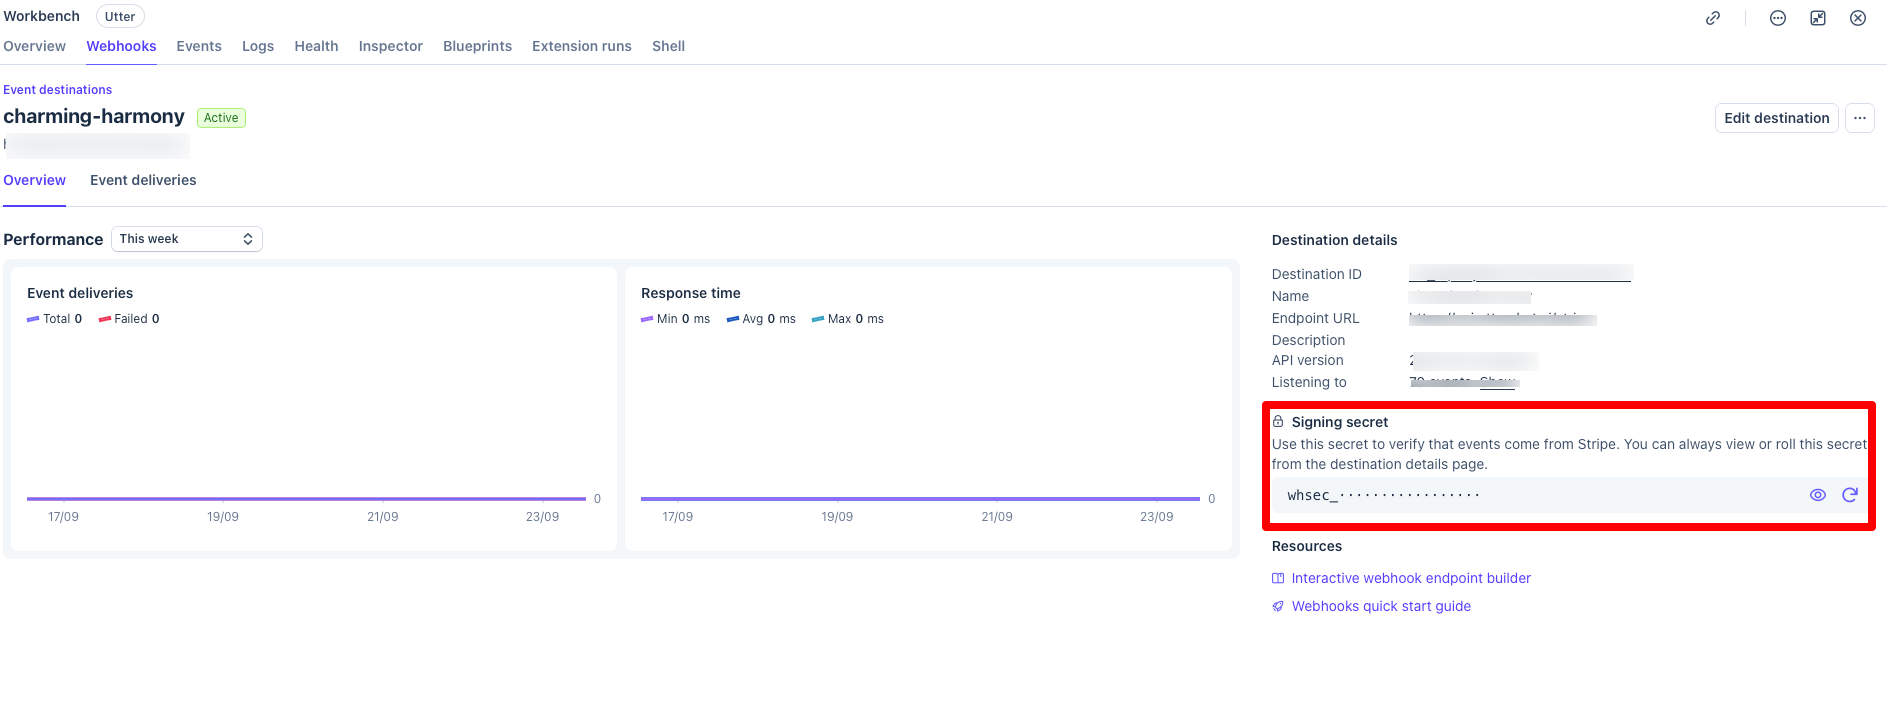
- In the Stripe Dashboard, go to Developers > Webhooks. Click Add endpoint.
- Copy the Webhook URL provided in the utter platform under Stripe > Manage.
- Paste the URL into Stripe's Endpoint URL field.
- Select the events required by the integration.
- Click Add endpoint to create the webhook.
4. Get the Webhook Signing Secret
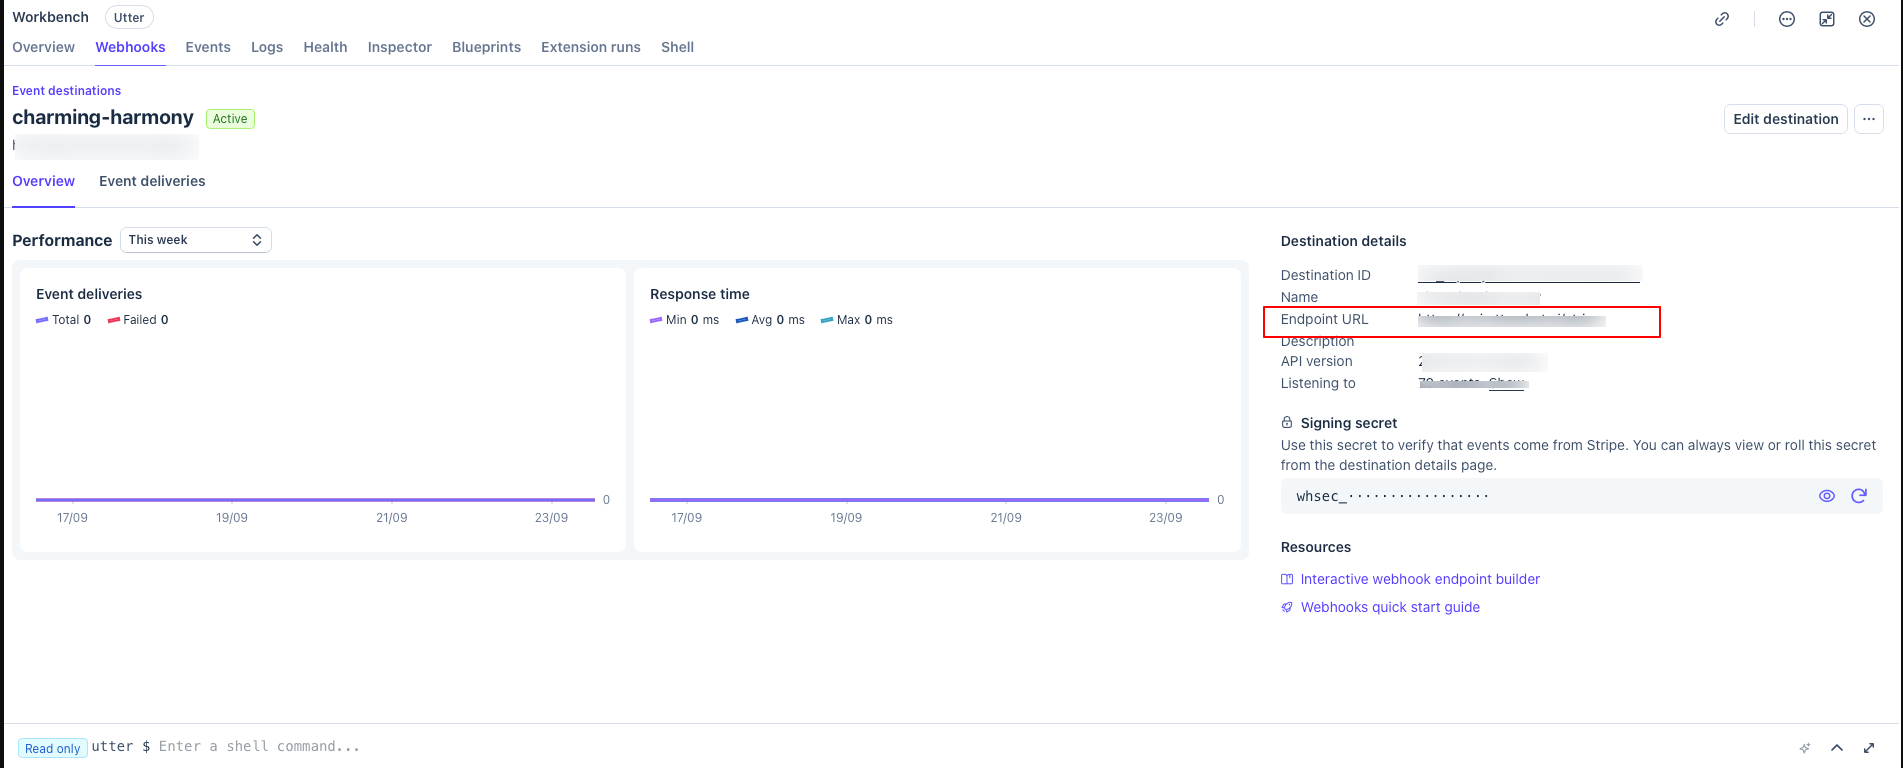
- Open the webhook endpoint you just created.
- Locate the Signing secret section.
- Click Reveal to view the signing secret.
- Copy the signing secret and keep it secure.
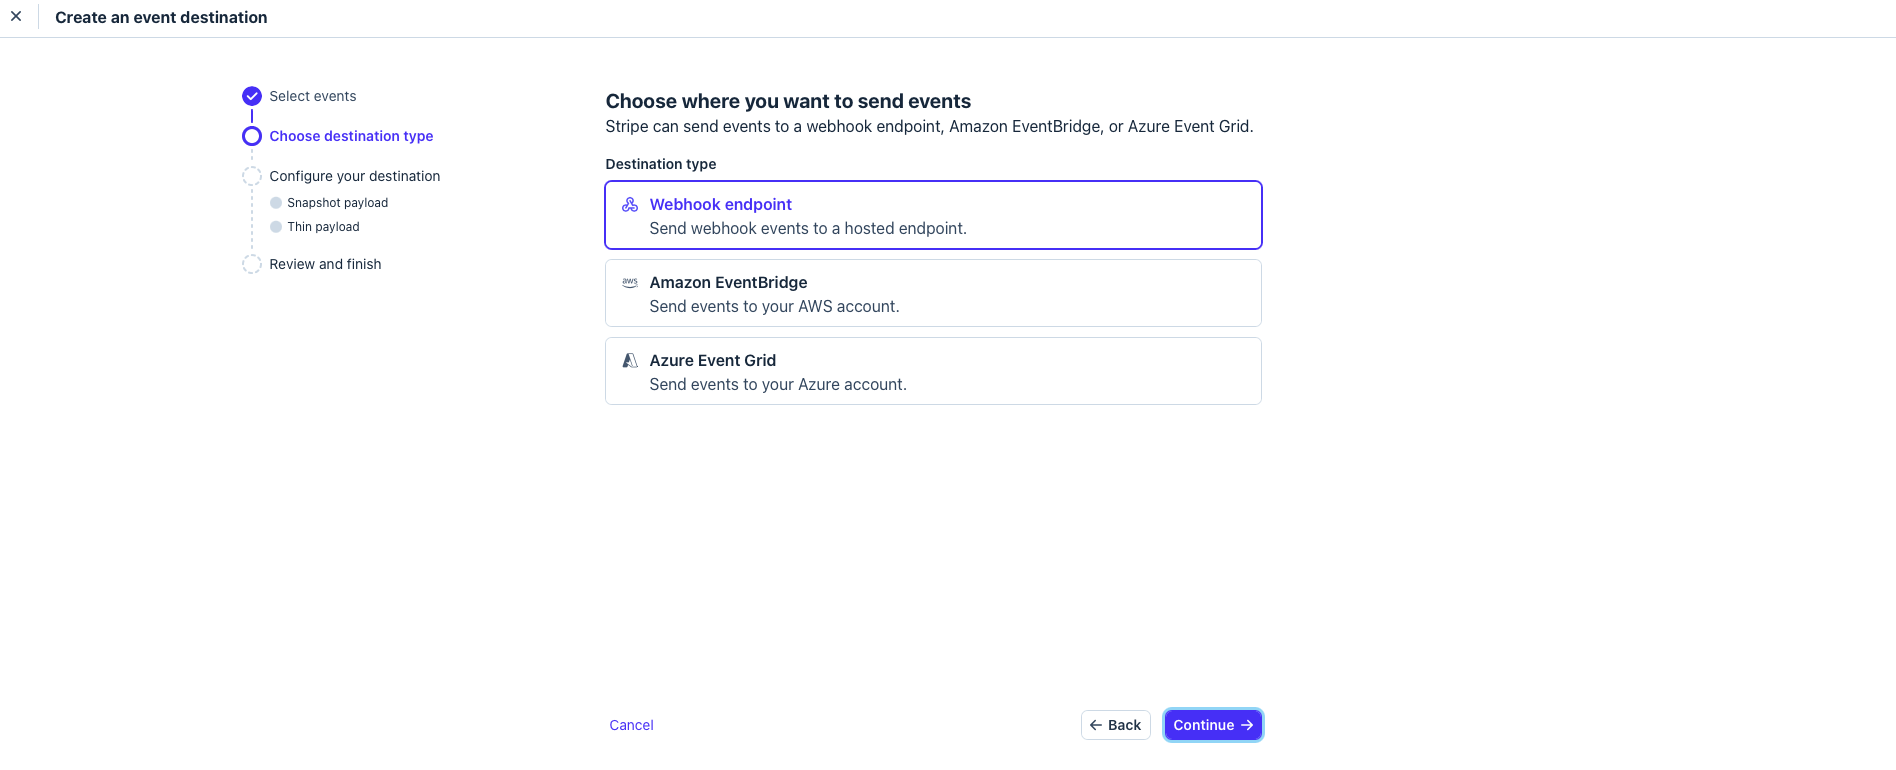
The signing secret is used by the plugin to verify that webhook requests received from Stripe are authentic.
5. Configure Stripe
Return to your utter catalog dashboard > Payment settings > Stripe > Manage settings and enter the following:
- Select Stripe > Manage.
- Copy the provided Webhook URL into your Stripe Dashboard > Webhooks.
- Input your Public Key, Secret Key, and Webhook Secret.
- Click Update Changes.
Website Checkout Setup
Redirect customers seamlessly from WhatsApp to your external web checkout page to complete their payment securely.
info Why set up Website Checkout? Setting up a Website Checkout allows you to connect your WhatsApp conversations directly to your website's secure payment infrastructure.
Why you need this: Collecting payments or sensitive data manually inside a chat can cause customer drop-offs and trust issues. By redirecting buyers to an external checkout page, you utilize established payment gateways, ensure end-to-end security compliance, and create a professional buying experience that speeds up order completion.
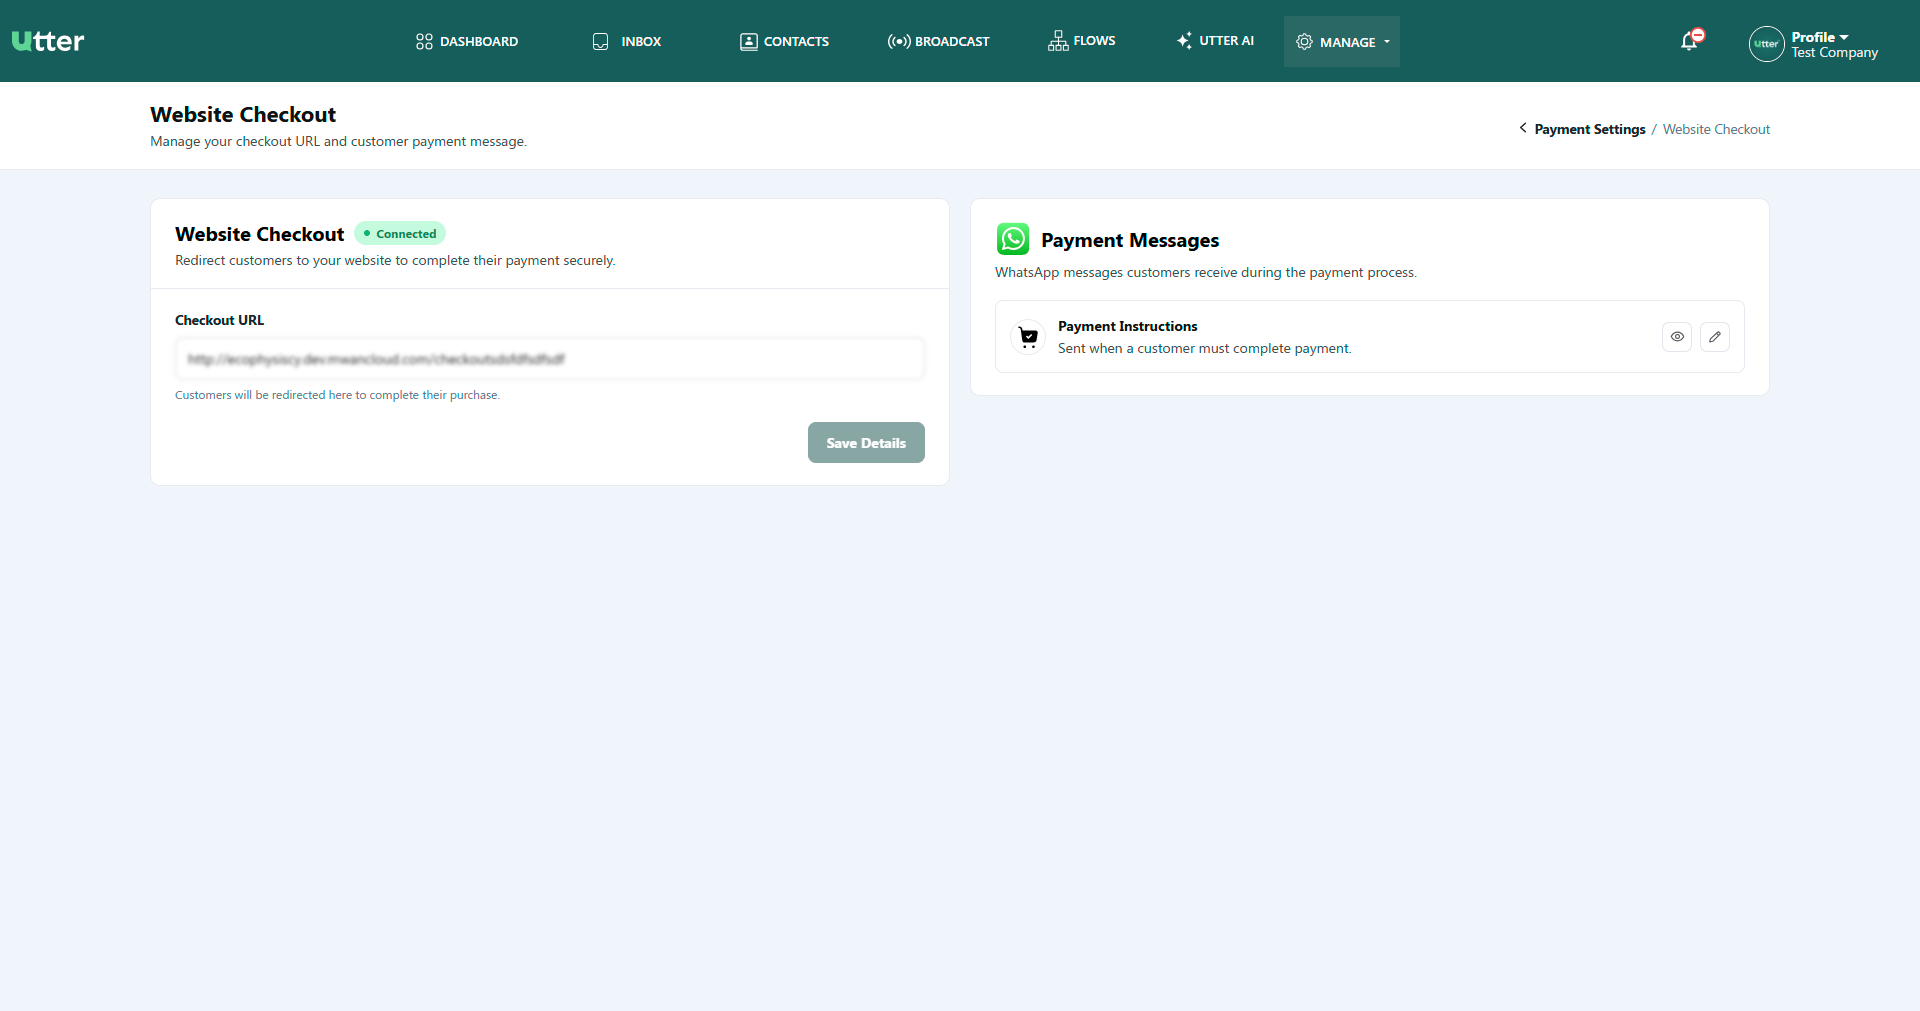
- On the Payment Settings page, locate Website Checkout and click Manage.
- Checkout URL: Enter your complete web store checkout link (e.g.,
http://you-website-name.com/checkout). - Click Save Details.
Note: When customers select Website Checkout in WhatsApp, they will receive a direct link redirecting them to this URL to finish their purchase.
Manual Payment Details (Bank Transfer / Offline)
Allow customers to place orders on WhatsApp and complete payment via manual bank transfer or provided offline payment instructions.
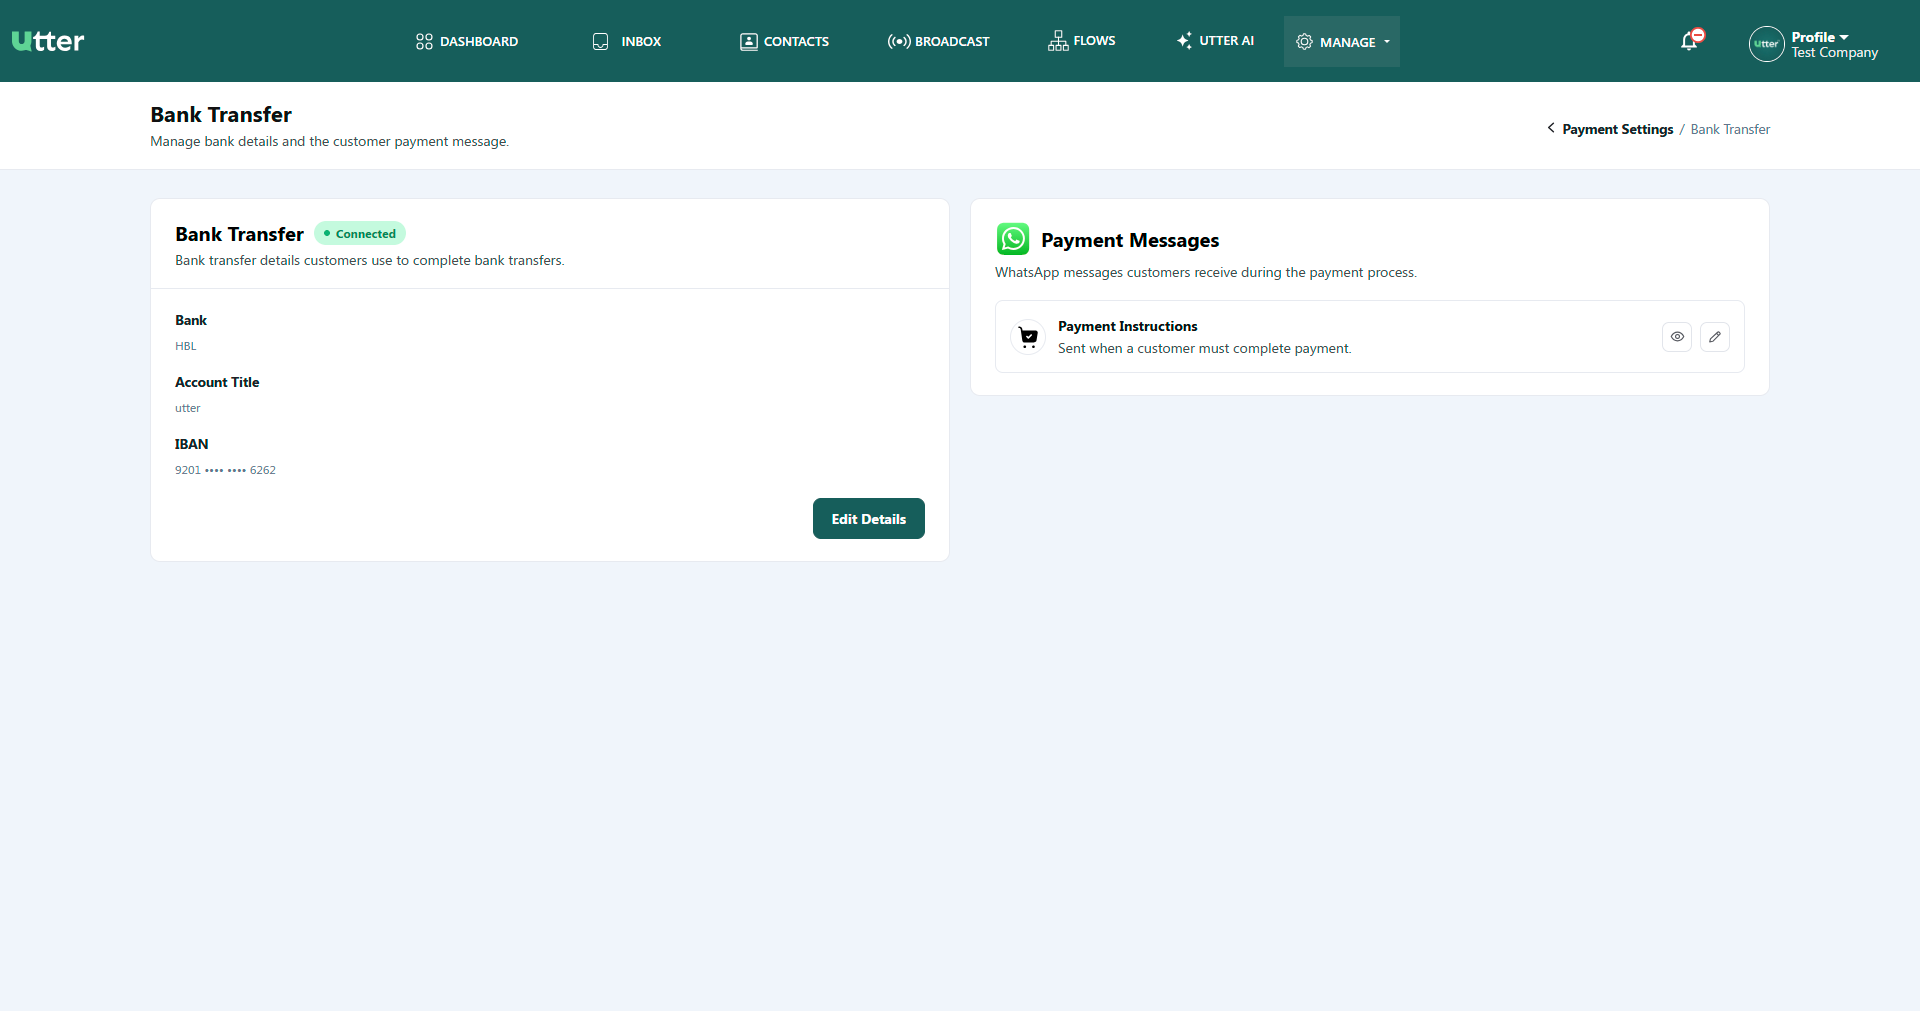
- On the Payment Settings page, locate Manual Payment and click Manage.
- Configure your bank account details in the Manual Payment Details modal:
- Bank Name: Enter the financial institution name (e.g.,
HBL,Meezan Bank). - Account Title: Account holder name (e.g.,
Utter). - Account Number / IBAN: Enter full bank account number or IBAN.
- SWIFT / BIC Code (Optional): Enter SWIFT/BIC code for international wire transfers.
- Bank Name: Enter the financial institution name (e.g.,
- Click Save Details.
Automated WhatsApp Flow Messages
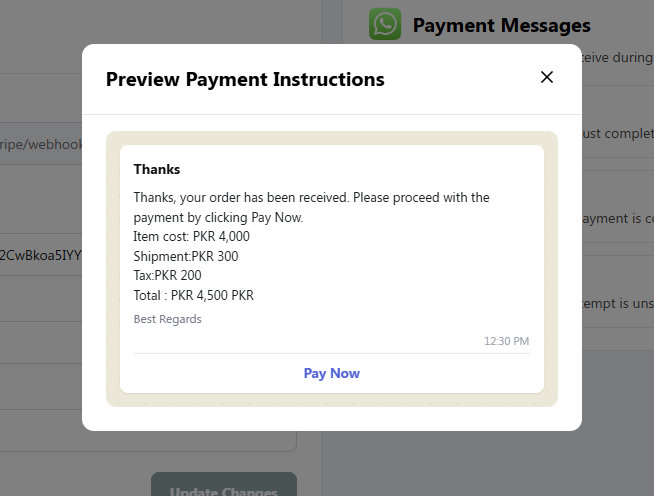
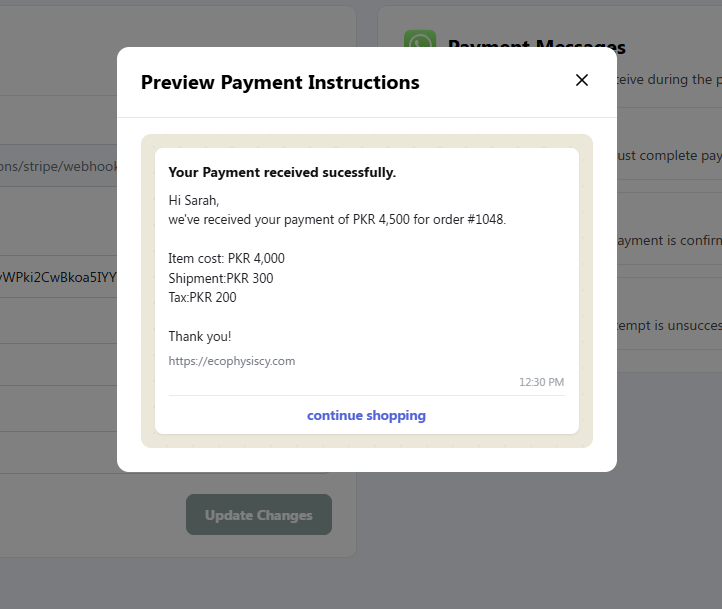
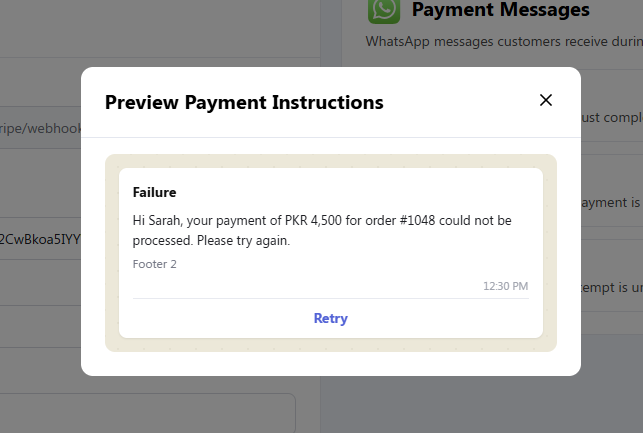
Configure response templates for transaction events:
- 🛒 Payment Instructions
- ✅ Payment Successful
- ❌ Payment Failed
Edit Payment Instructions
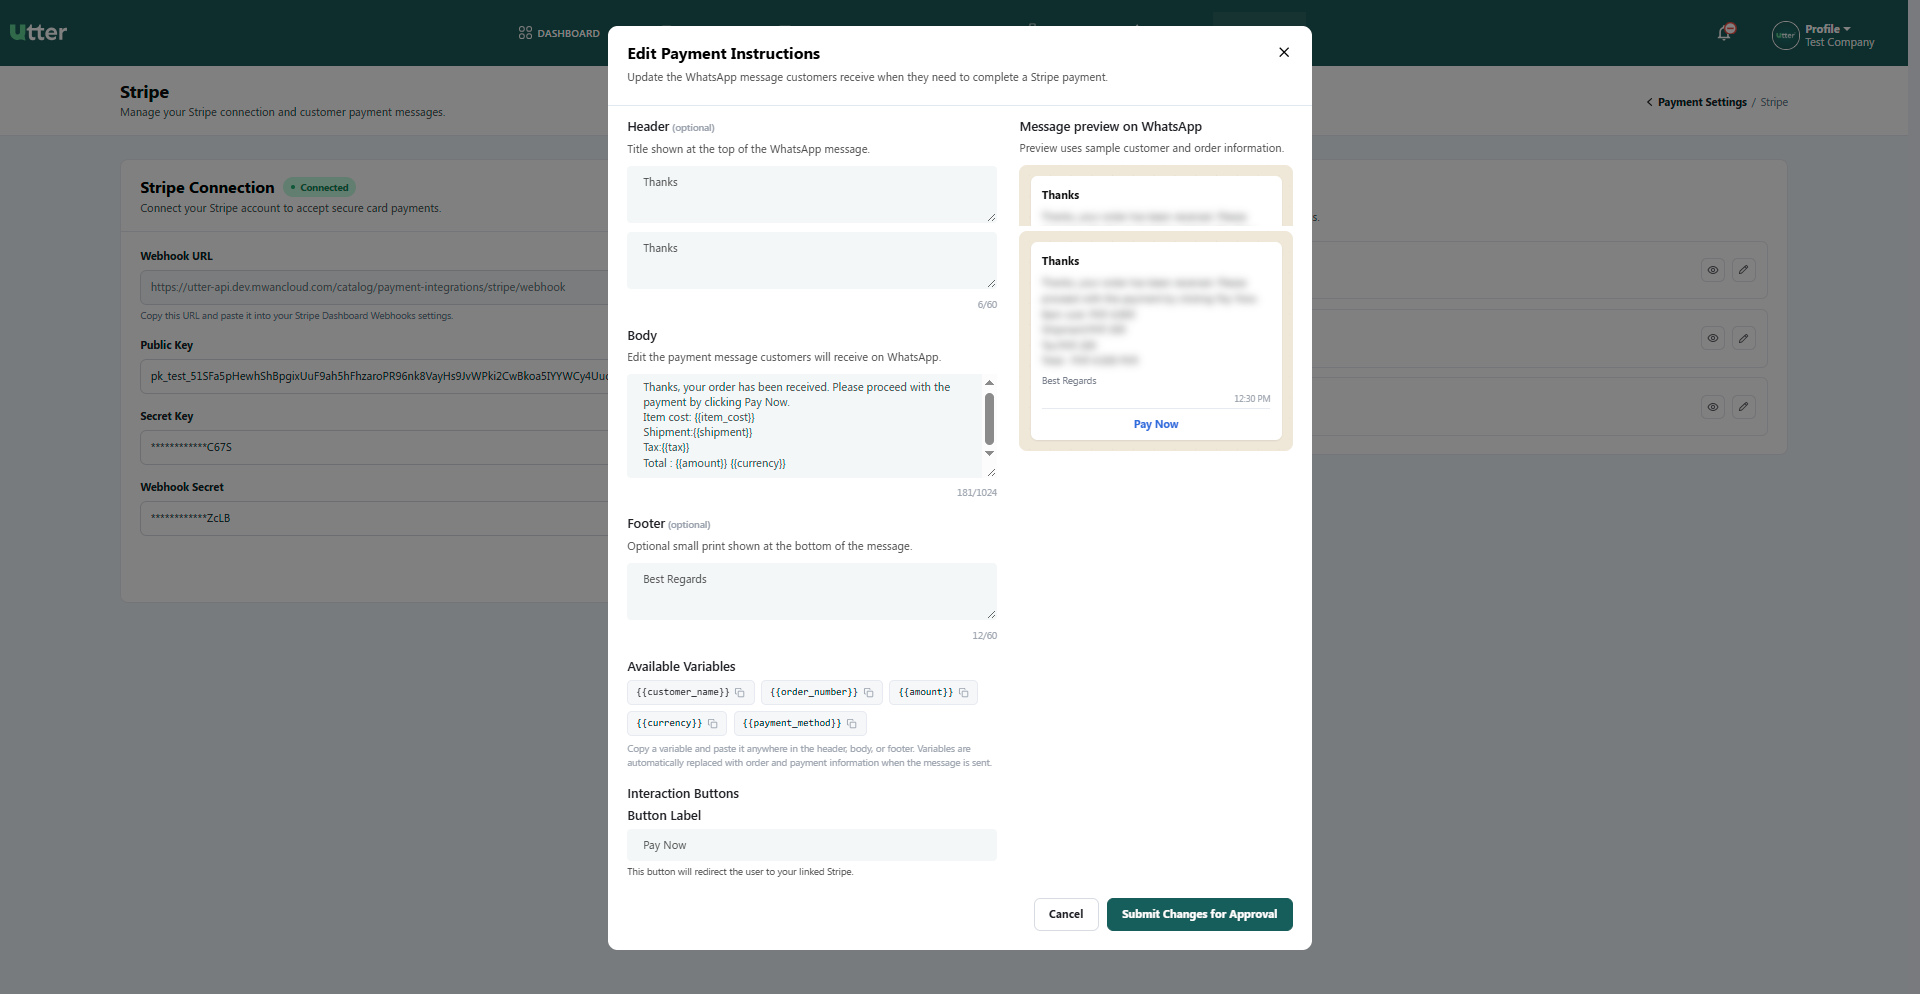
Clicking the Edit (pencil) icon opens the Edit Payment Message modal:
-
Header (Optional):
- Main title text displayed at the top of the WhatsApp message card (e.g.,
Thanks). - Limit: Up to 60 characters.
- Main title text displayed at the top of the WhatsApp message card (e.g.,
-
Body (*):
- The core message content sent to the customer explaining the order breakdown, dynamic pricing tags, or next steps.
- Limit: Up to 1,024 characters.
-
Footer (Optional):
- Optional small print text displayed at the bottom of the WhatsApp message (e.g.,
Best Regards). - Limit: Up to 60 characters.
- Optional small print text displayed at the bottom of the WhatsApp message (e.g.,
-
Available Variables (Dynamic Tags):
- Click any tag to copy and insert dynamic variables anywhere in your Header, Body, or Footer fields. These auto-populate with live order data upon sending:
{{customer_name}}— Customer's display name.{{order_number}}— Unique order ID.{{amount}}— Total calculated transaction amount.{{currency}}— Transaction currency code (e.g.,PKR,USD).{{payment_method}}— Active checkout method selected.
- Click any tag to copy and insert dynamic variables anywhere in your Header, Body, or Footer fields. These auto-populate with live order data upon sending:
-
Interaction Buttons:
- Button Label: Customize the call-to-action button text displayed inside WhatsApp (e.g.,
Pay Now). This button redirects users directly to the secure Stripe payment gateway.
- Button Label: Customize the call-to-action button text displayed inside WhatsApp (e.g.,
-
Live Message Preview (Right Panel):
- Displays a real-time Message preview on WhatsApp showing exact formatting, dynamic text placement, and button layout using sample customer data.
-
Saving Changes:
- Click Submit Changes for Approval to submit the updated template to Meta WhatsApp for template validation.
- Click Cancel to discard edits.
Product Management & Filtering
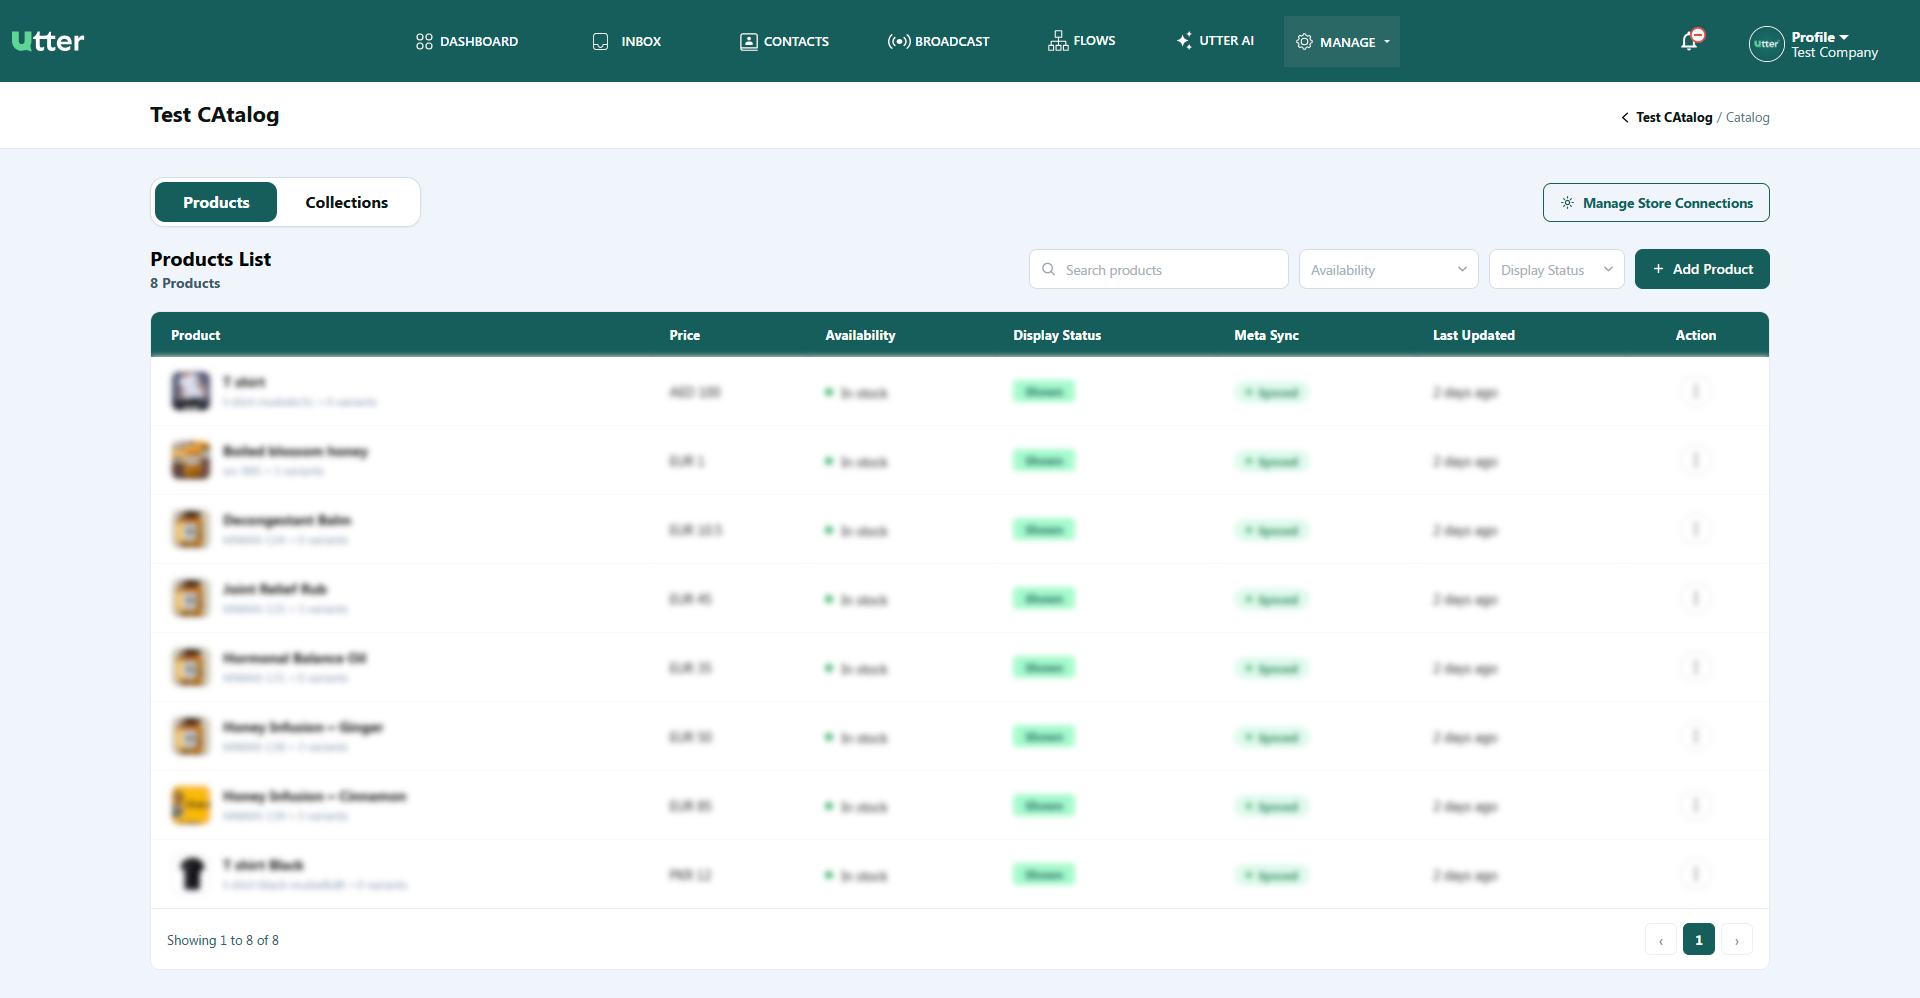
On the View Catalogs page under the Products tab, all imported and manually created items are displayed in the Products List table.
List Controls & Filtering Options
- Search Input: Search products by title or Content ID (SKU).
- Availability Filter: Filter items by stock status:
- All
- In stock
- Out of stock
- Preorder
- Available for order
- Discontinued
- Status Filter: Filter by catalog visibility:
- All
- Shown (Visible in WhatsApp shop)
- Hidden (Hidden from WhatsApp shop)

Products List Table Columns & Detailed Structure
The Products List table provides a real-time summary of all inventory items associated with the selected catalog. Below is a detailed breakdown of what each column represents and how it operates:
| Column Name | Field Data & Description | Functional Behavior |
|---|---|---|
| Product | • Thumbnail Image: Small preview of the product visual. • Product Name: Bold main title (e.g., Mountain Thyme Honey). • SKU / Content ID: Identifier below title (e.g., MWAN-102).• Variants Count: Total variant options (e.g., 0 variants). | Displays core product identity. Clicking the row or name opens the detailed product view page. |
| Price | • Currency & Base Price: Shows active currency code and price amount (e.g., EUR 8.8). | Reflects current selling price synchronized with Meta Commerce. |
| Availability | • Stock Status Indicator: Color-coded status badge with dot indicator. • Examples: • In stock (Green), • Available for order (Orange/Yellow). | Indicates whether customers can place orders for this item inside WhatsApp. |
| Status | • Visibility Badge: Displays catalog exposure. • Shown (Green Badge): Visible to customers on WhatsApp.• Hidden (Red/Grey Badge): Hidden from WhatsApp catalog view. | Controls product visibility in the storefront without deleting the product. |
| Meta Sync | • Synchronization Badge: Real-time state with Meta WhatsApp servers. • • Synced (Green): Successfully updated on Meta servers. | Confirms that changes made locally are actively live on WhatsApp Business Catalog. |
| Last Updated | • Relative Timestamp: Shows time elapsed since last modification (e.g., 38 min ago, 2 hours ago). | Tracks inventory activity and sync freshness. |
| Action | • Three-Dots Menu (⋮): Contextual drop-down menu per row. | Provides administrative product actions (see details below). |
Product Action Menu Options
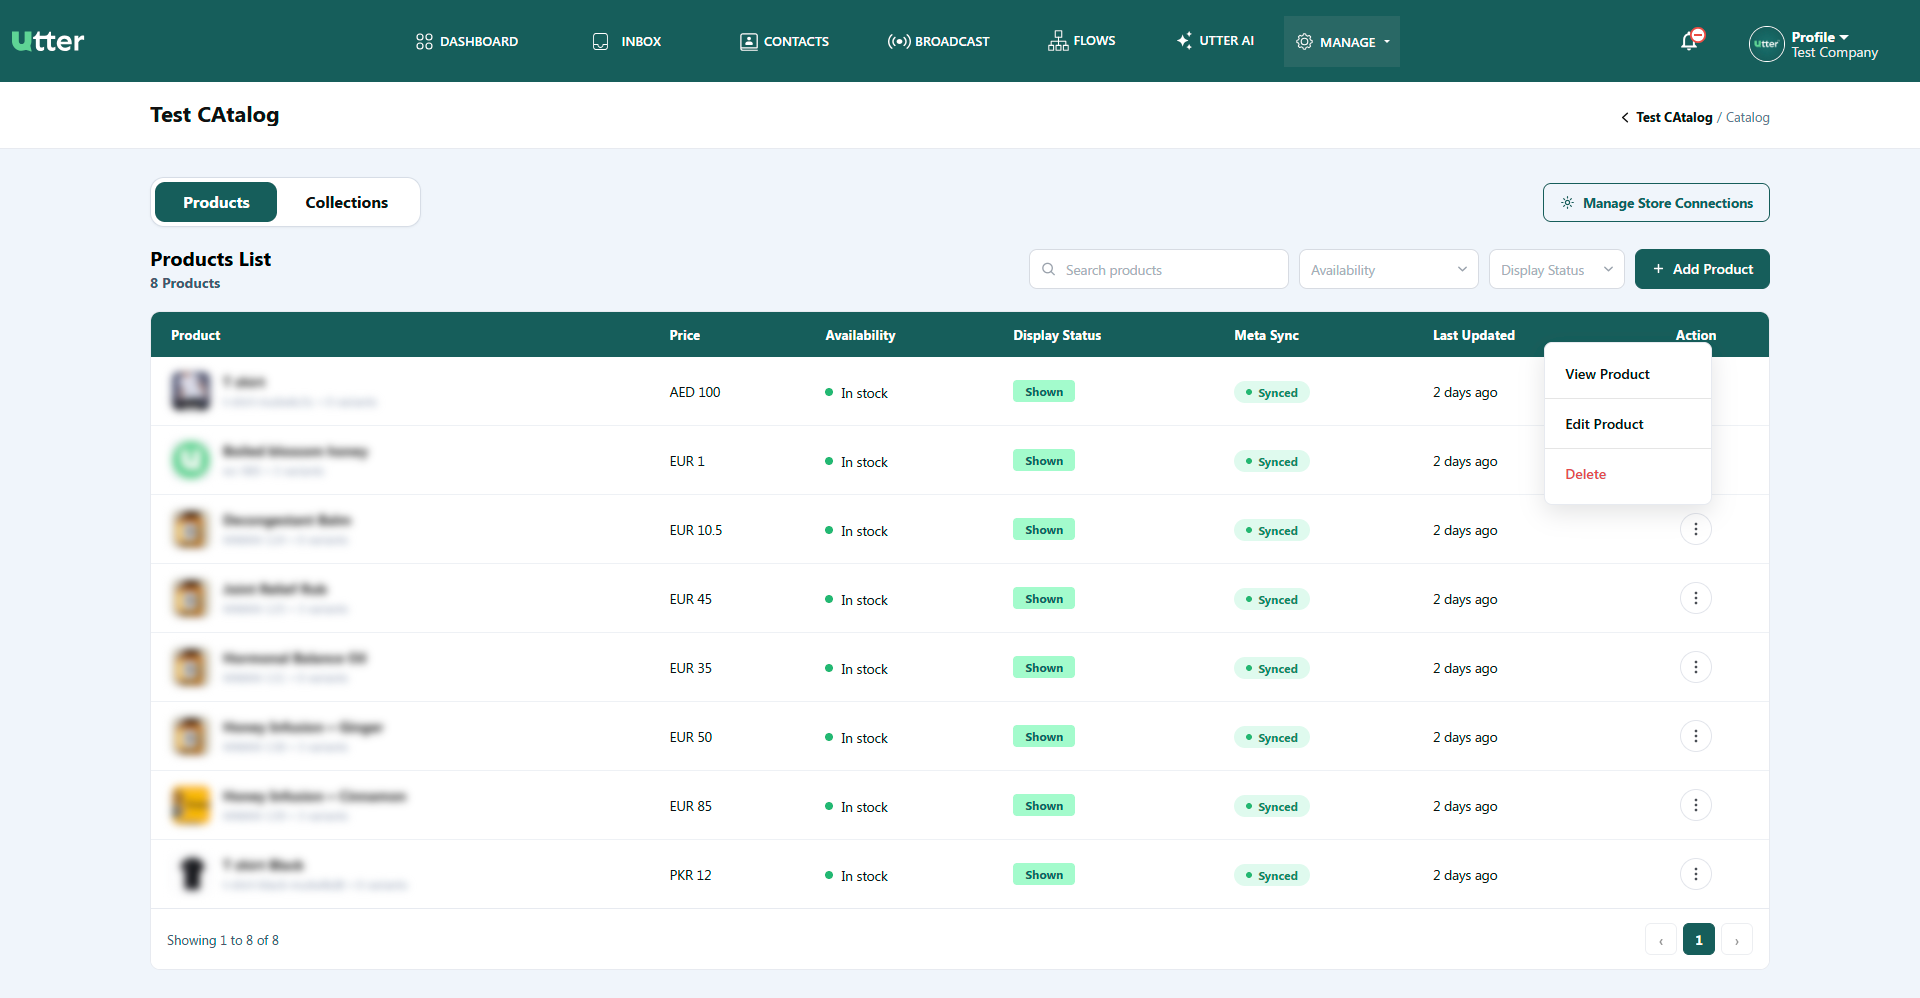
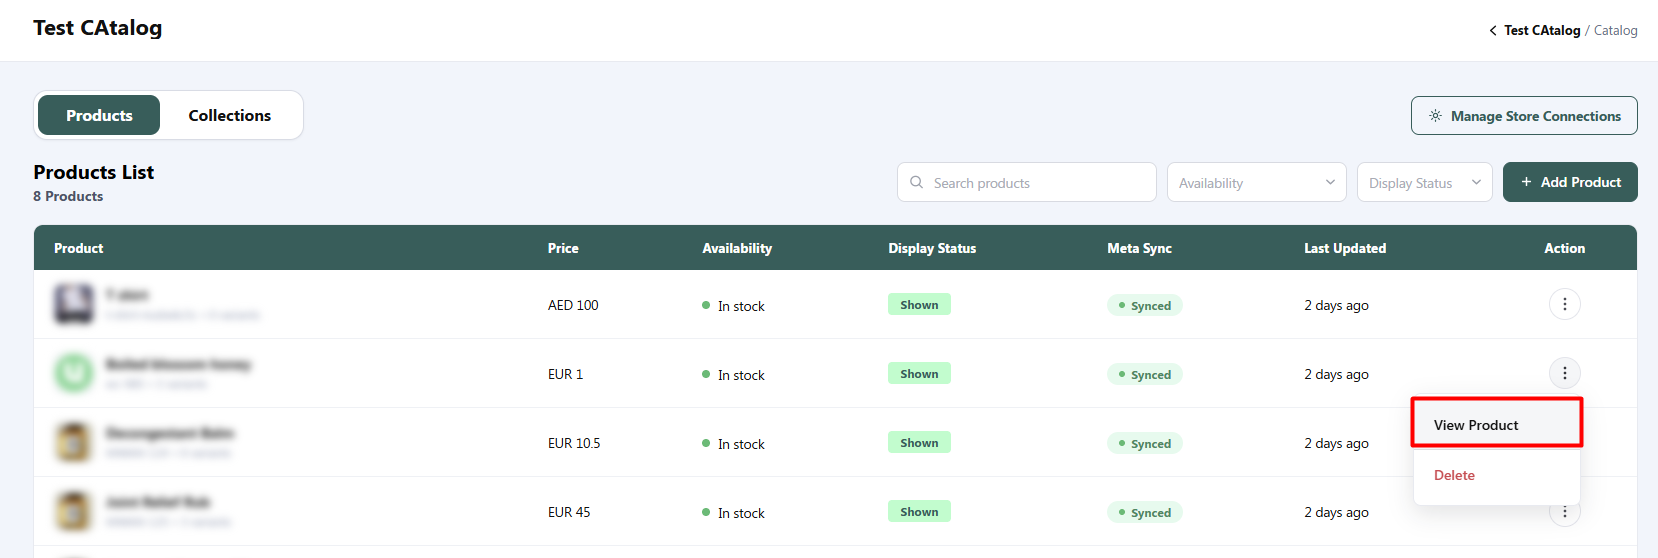
Clicking the three-dots (⋮) icon under the Action column opens a drop-down menu with the following options:
-
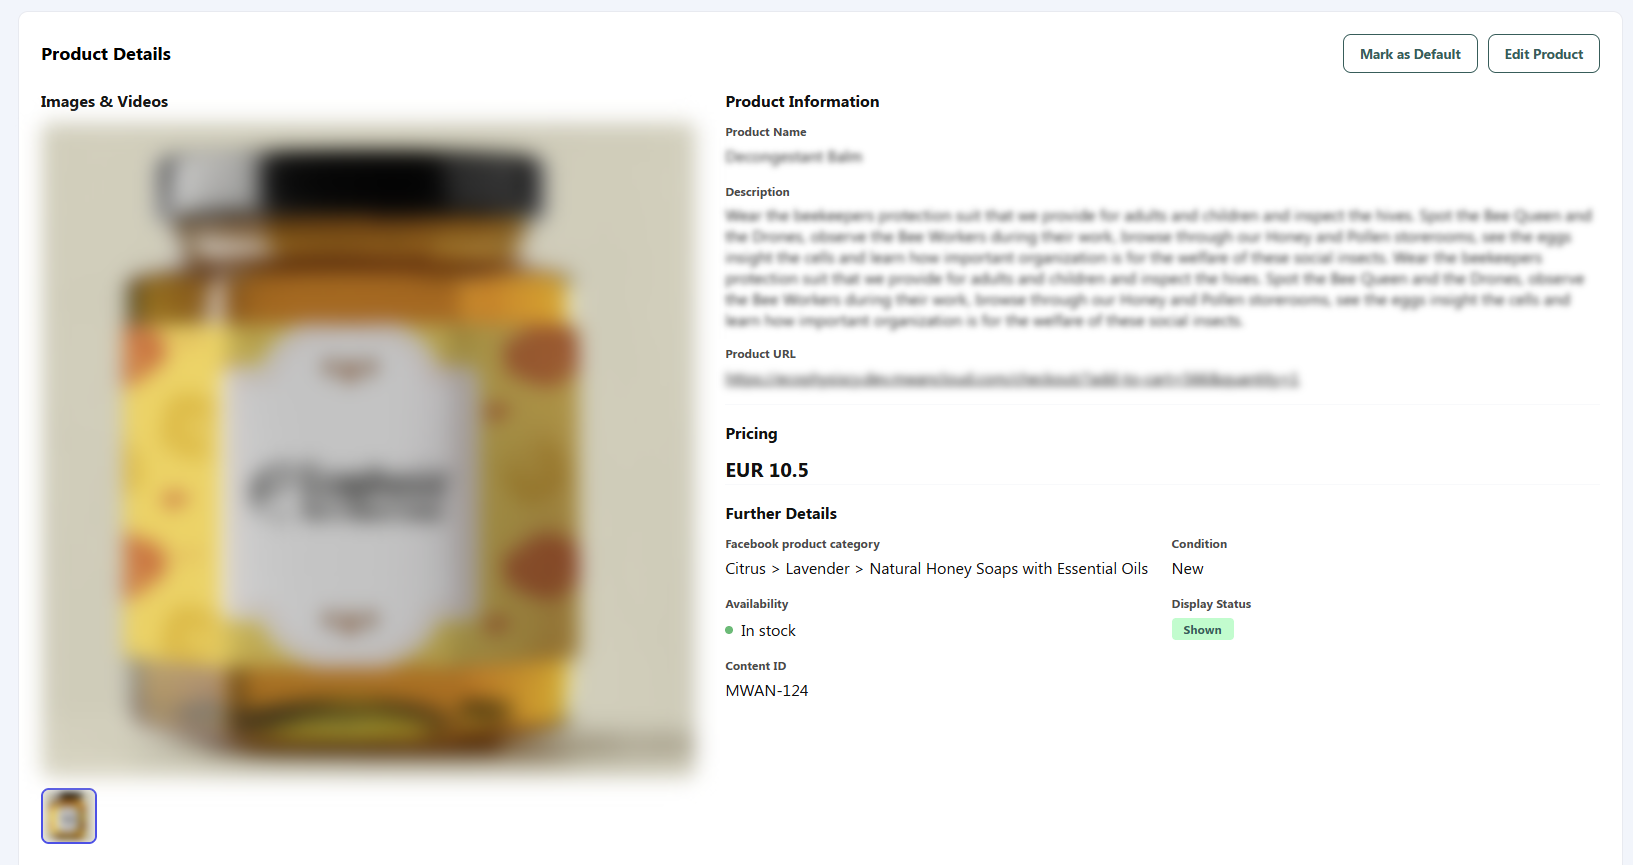
View Product:
- Redirects to the Product Details view.
- Allows managing product media, comprehensive description, variant options, pricing, and individual variant SKUs.
-
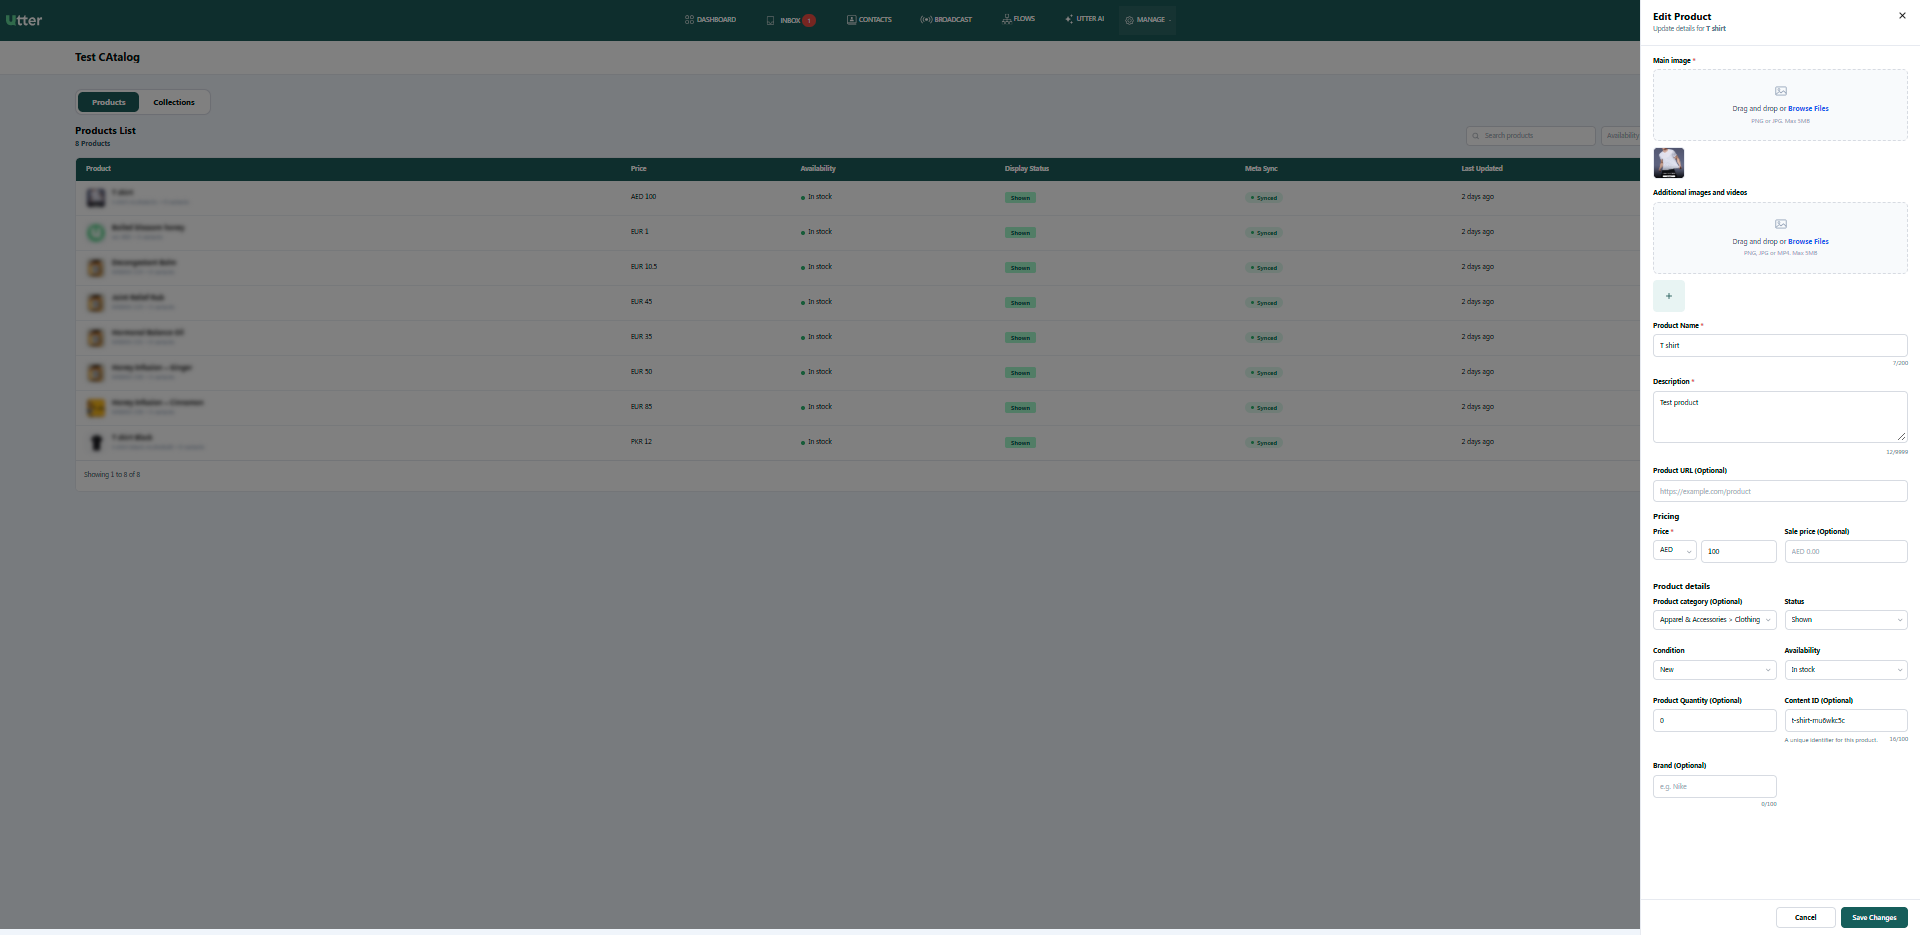
Edit Product:
- Opens the product drawer/modal to perform quick inline edits to metadata, name, price, stock availability, and visibility status.
-
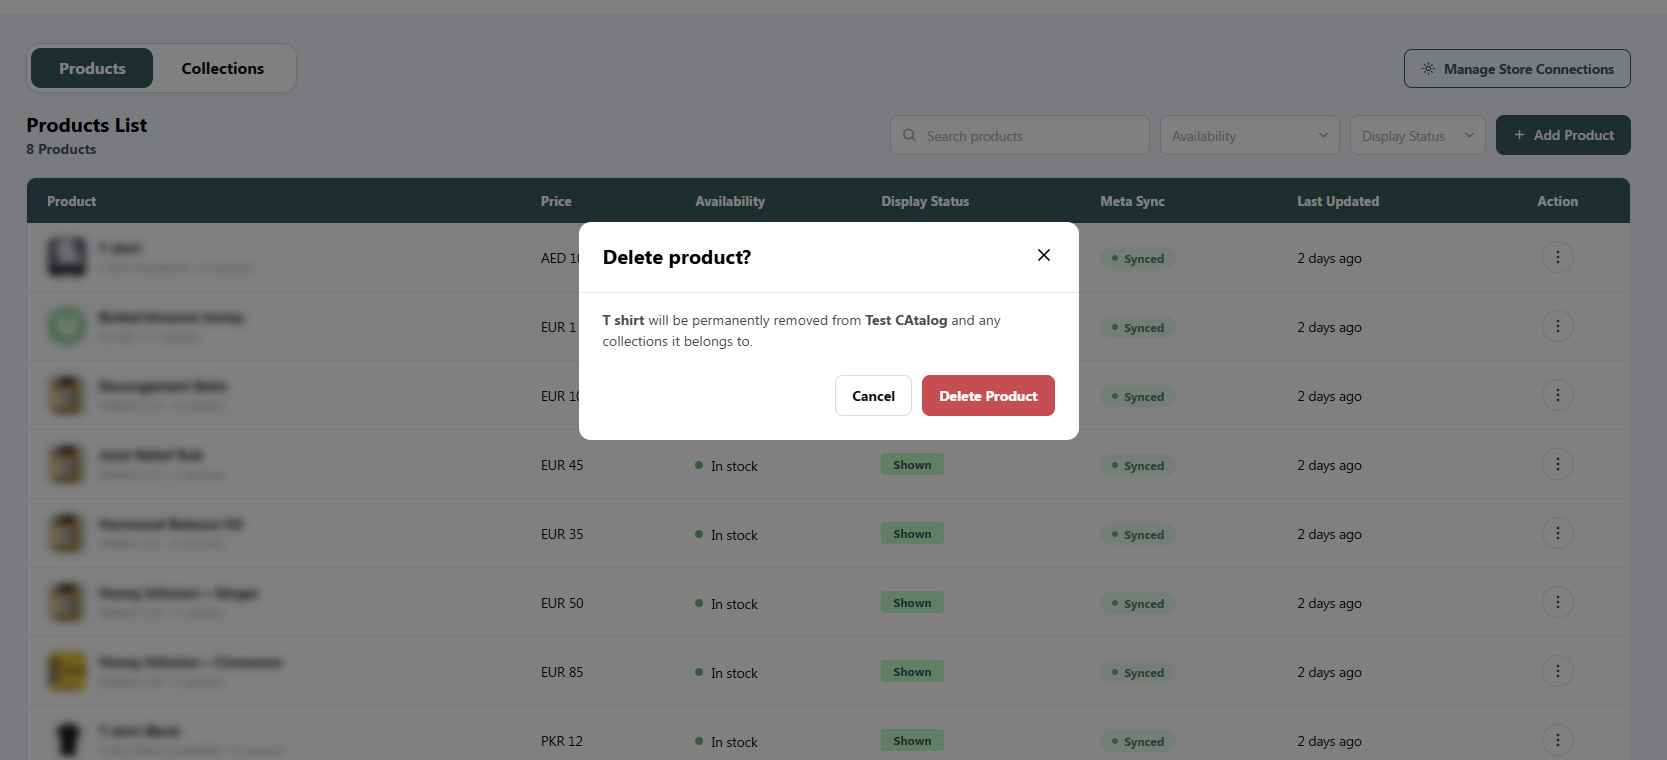
Delete:
- Permanently removes the selected product from both the Utter AI platform and the synchronized Meta WhatsApp Catalog.
Creating a New Product
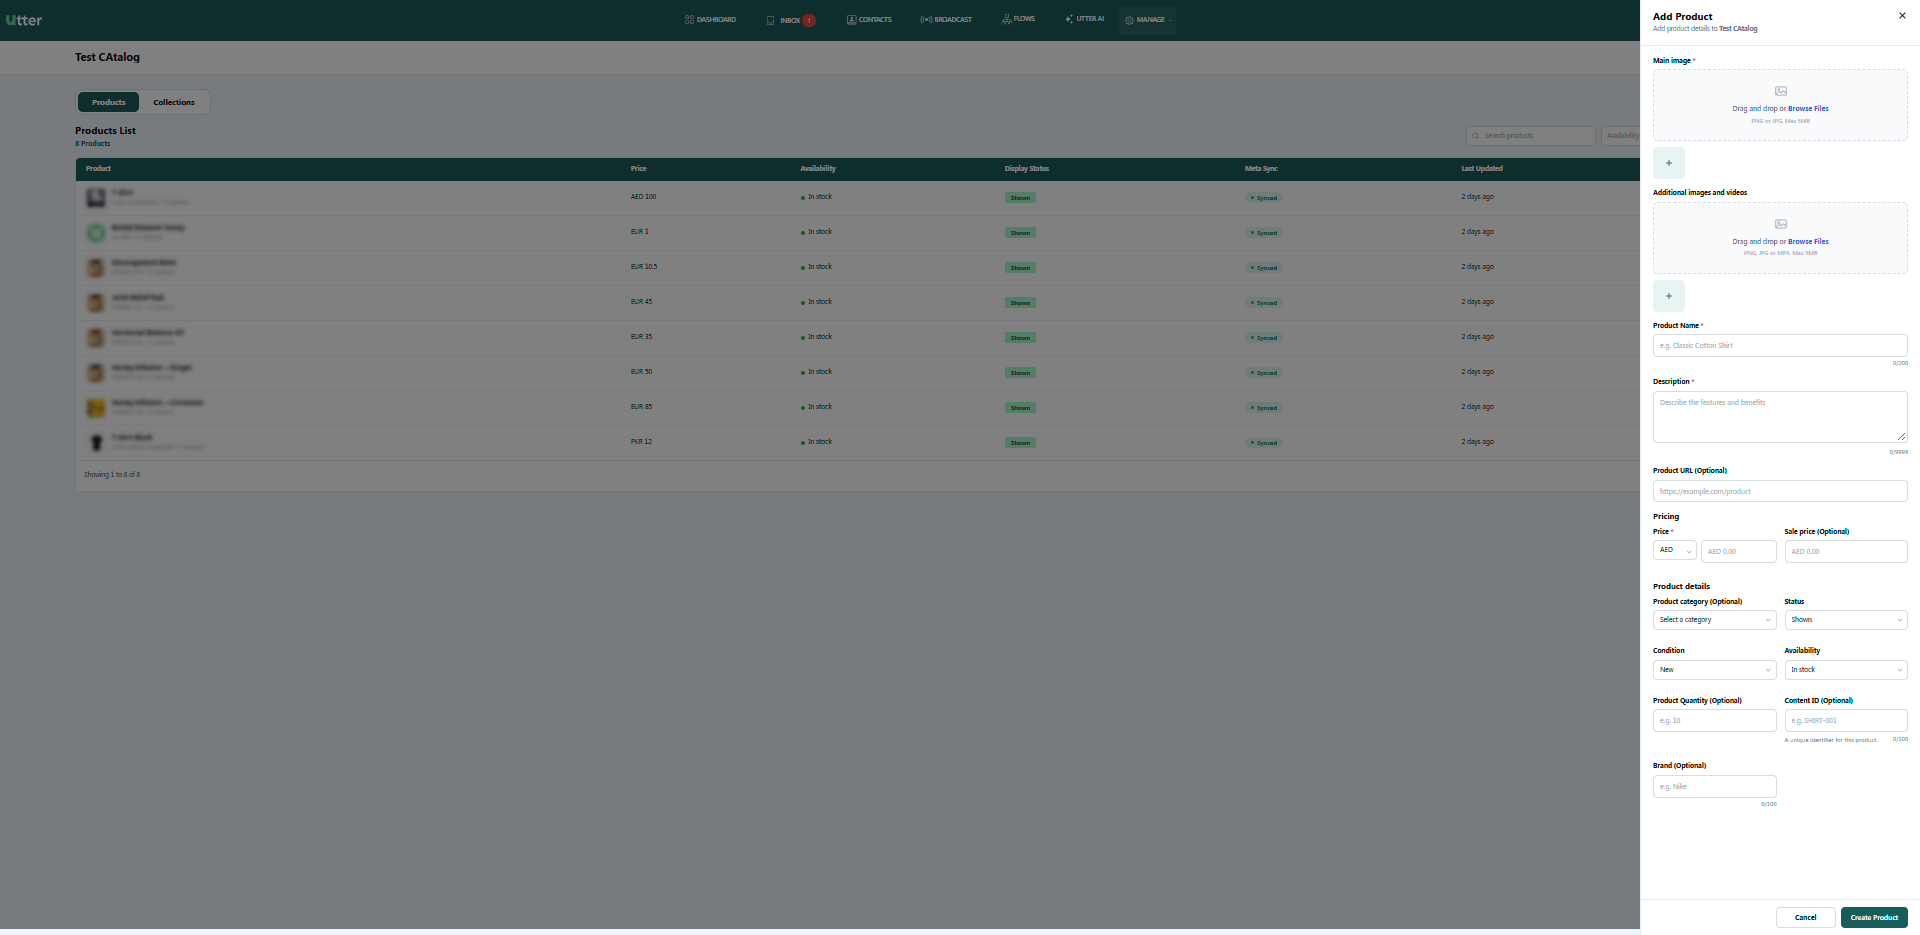
To manually list a new item in your WhatsApp catalog, click the + Add Product button on the Products List header. This opens the Add Product side-drawer form.
Media Uploads
- Product Images and videos (*): Drag and drop media or click Browse Files.
- Supported Formats: PNG, JPG, or MP4.
- File Size Limit: Maximum 10MB per file.
- Multi-Media Support: Click the + tile to upload additional images/videos.
Basic Product Information
- Product Name (*): Enter the official product title (Up to 200 characters).
- Description (*): Provide detailed features, specifications, and benefits of the item (Up to 9,999 characters).
- Product URL (Optional): Add a direct web link to the product on your e-commerce site (Up to 1,024 characters).
Pricing Configuration
- Price (*): Select currency code from the drop-down menu (e.g.,
PKR,EUR,USD) and enter the base amount. - Sale price (Optional): Specify a discounted price point if the product is on promotion.
Product Details & Catalog Controls
| Field | Type / Input | Options & Description |
|---|---|---|
| Product category | Dropdown (Optional) | Assign official Meta/Facebook product categories to aid discovery. |
| Status | Dropdown | • Shown (Visible to buyers on WhatsApp)• Hidden (Unpublished from catalog) |
| Condition | Dropdown | • New• Refurbished• Used |
| Availability | Dropdown | • In stock• Out of stock• Preorder• Available for order• Discontinued |
Product Attributes (Optional Specifications)
- Color: Specify primary item color (e.g.,
Royal Blue, Max 200 characters). - Size: Define item dimension or scale (e.g.,
Medium, Max 200 characters). - Content ID: Enter a unique SKU / product identifier (e.g.,
SHIRT-001, Max 100 characters). - Brand: Enter the manufacturer or brand name (e.g.,
Nike, Max 100 characters).
Finalizing Creation
- Click Create Product at the bottom-right corner to save and publish the item to your catalog.
- Click Cancel to discard inputs and exit the drawer.
Product Details & Variant Management Page
When you select View Product from the Action (⋮) menu on any row in the Products List table, you are redirected to the dedicated Product Details view page.
Product Details Overview Page
This page displays full specification metrics and media for the selected item:
- Product Header: Displays the product name along with the total count of associated variants (e.g., Hormonal Balance Oil - 5 Products • 3 Variations).
- Edit Product Button: Located at the top-right of the Product Information card to edit primary product details.
- Images & Videos Panel: High-resolution preview gallery of all uploaded product media.
- Product Information: Displays the main Product Name, detailed Description, and Product URL link.
- Pricing & Metadata: Displays base currency price, Facebook Product Category, Condition, Availability Status, Visibility Status, and Content ID (SKU).
Variants Section & Actions
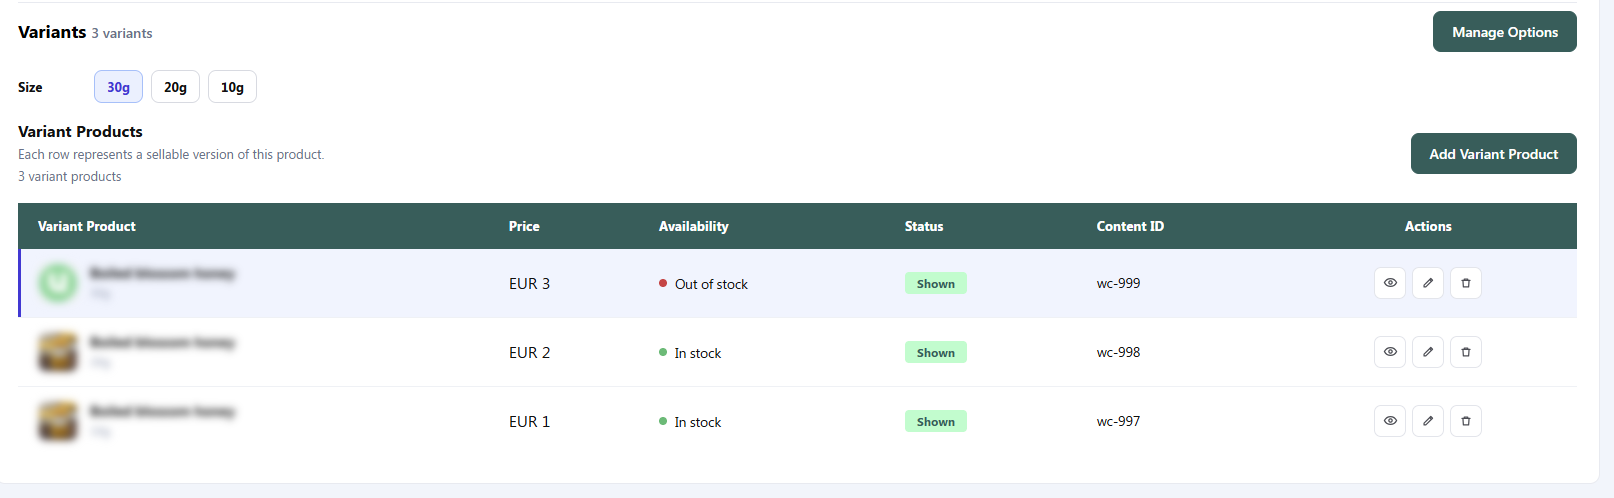
Located below the primary details, the Variants section manages individual sellable combinations (e.g., sizes, volumes, colors) of the main item.
Action Controls
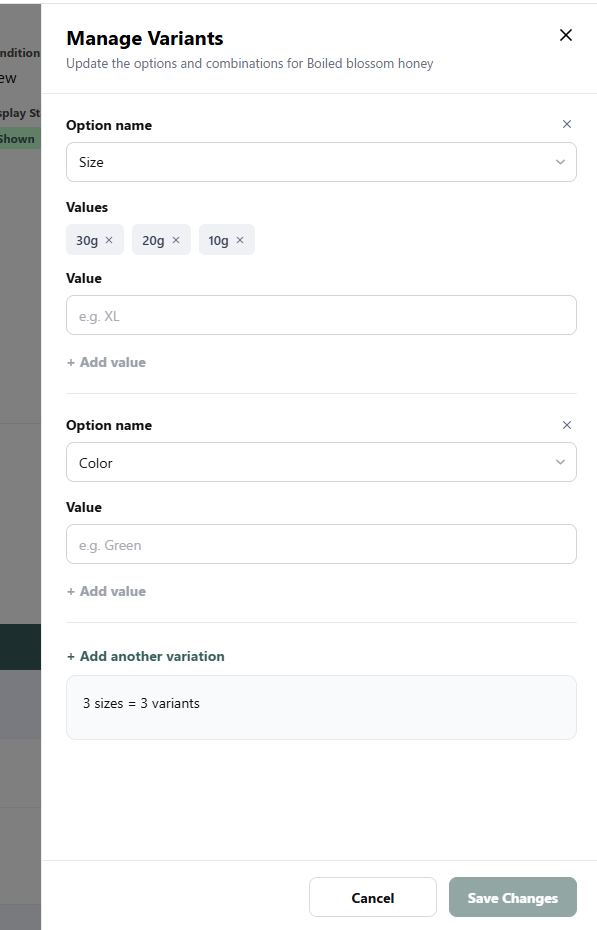
- Manage Options Button: Opens the Manage Variants side-drawer to define global option types (such as Size, Color, or Weight) and their corresponding values.
- Add Variant Product Button: Opens the form to manually append an individual sellable variant with specific price points and unique Content IDs.
Variant Products Table Breakdown
| Column | Field Data & Description | Functional Behavior |
|---|---|---|
| Variant Product | • Thumbnail image preview. • Variant label (e.g., 100mg, 1000mg, 500mg).• Variant index (e.g., Variant 1, Variant 2). | Identifies the specific variation item. |
| Price | Base selling price per variant (e.g., € 8, € 19, € 12). | Overrides or sets individual variant pricing. |
| Availability | Stock status indicator badge (e.g., • In stock). | Controls stock state per variation. |
| Status | Visibility state badge (Shown / Hidden). | Toggles WhatsApp catalog display for individual variants. |
| Content ID | Unique variant SKU (e.g., MWAN-131-733). | Unique identifier used for Meta Catalog inventory mapping. |
| Actions | Quick action icons: • Eye Icon: View individual variant details. • Pencil Icon: Edit variant details and price. • Trash Icon: Remove variant item. | Direct inline management of specific variants. |
Managing Variant Options (Manage Options Drawer)
Clicking Manage Options opens the side-drawer to configure variant structural dimensions:
-
Option Name Selection: Select standard option types from the drop-down menu (e.g.,
Size,Color) or define custom options. -
Values & Content ID Configuration:
- Value: Input specific variation values (e.g.,
100mg,Small,Red). - Content ID (Optional): Define custom unique SKUs for each value combination (e.g.,
SHIRT-001).
- Value: Input specific variation values (e.g.,
-
+ Add value: Click to insert additional values under the active option attribute.
-
+ Add another option: Click to layer multiple option dimensions (e.g., combining Size AND Color).
-
Click Save Changes to save structural changes or Cancel to exit without saving.
Orders Management & Settings
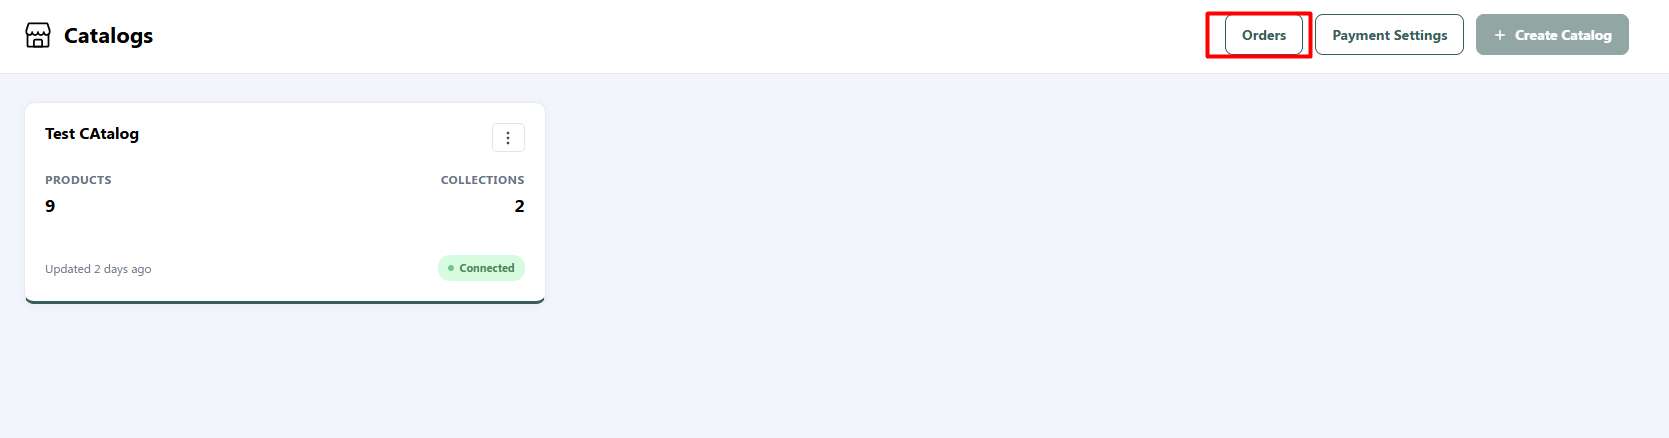
On catalog page the top right corner you can see the Orders button. Click this button to open orders page. On Orders page you can see orders, tracking performance metrics, applying filters, exporting data, configuring shipping and tax settings, customizing notification templates, and handling individual order details on the Utter AI platform.
Orders Dashboard
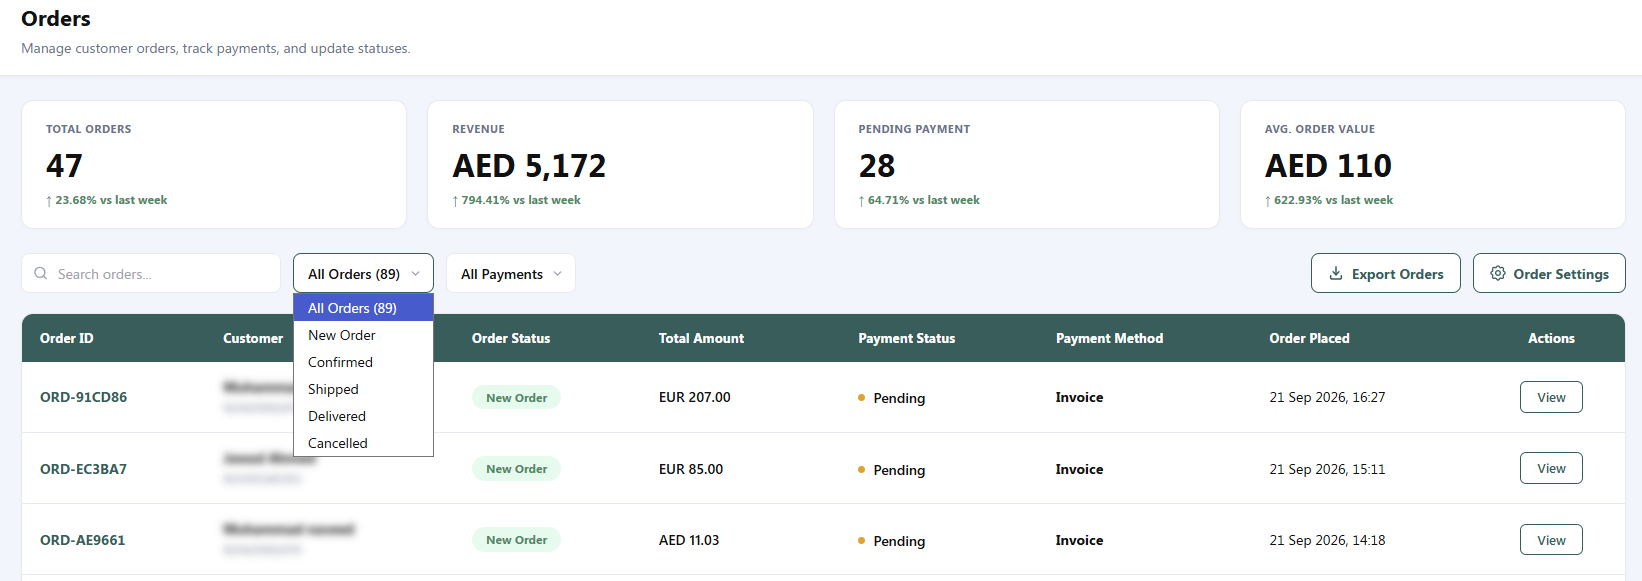
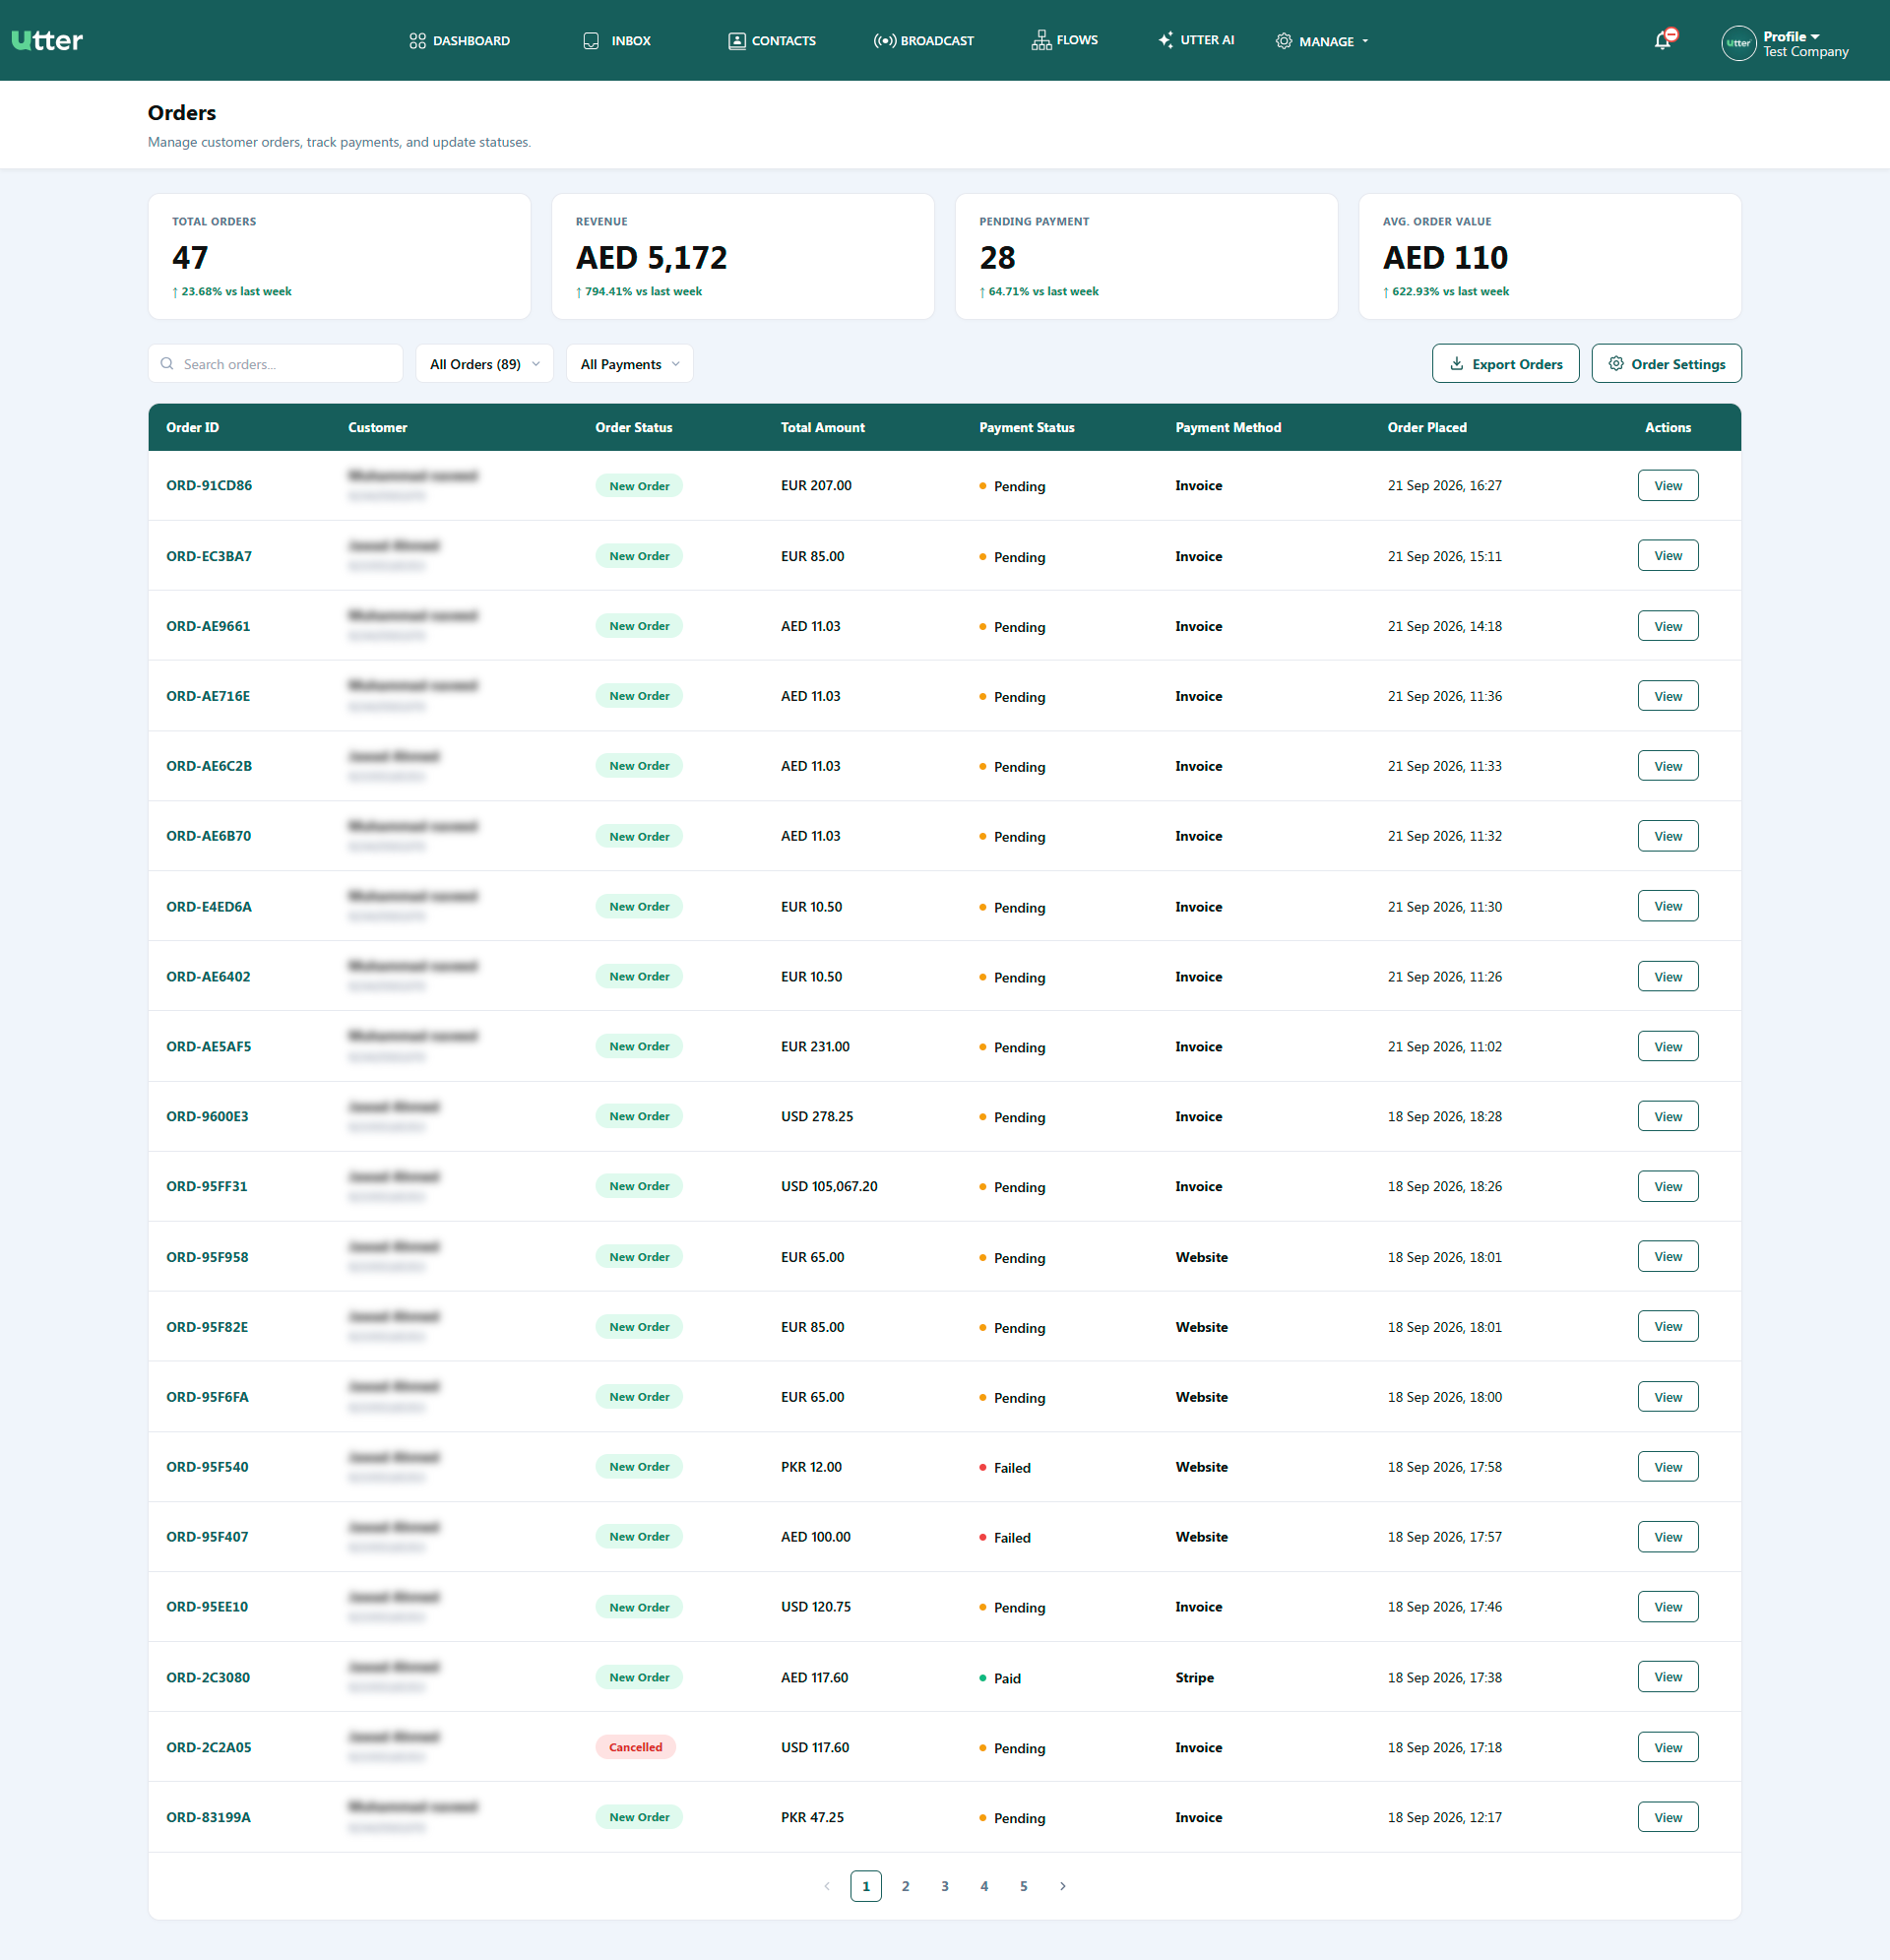
Navigate to Manage > Orders to access the main Orders Management dashboard. High-level performance metrics are displayed at the top of the page:
- Total Orders: Count of total customer orders received along with percentage growth compared to the previous week.
- Revenue: Total gross revenue generated through the platform.
- Pending Payment: Total count of orders currently in an unprocessed or pending payment state.
- Avg. Order Value: The average monetary value per order/cart.

Order Listing, Filtering & Export
The orders dashboard presents real-time customer transactions structured in an interactive data table.
Filters & Controls
- Search Orders Input: Instantly search orders by Order ID or Customer Name.
- Order Status Filter: Filter orders by their lifecycle status:
- All Orders
- New Order
- Confirmed
- Shipped
- Delivered
- Cancelled
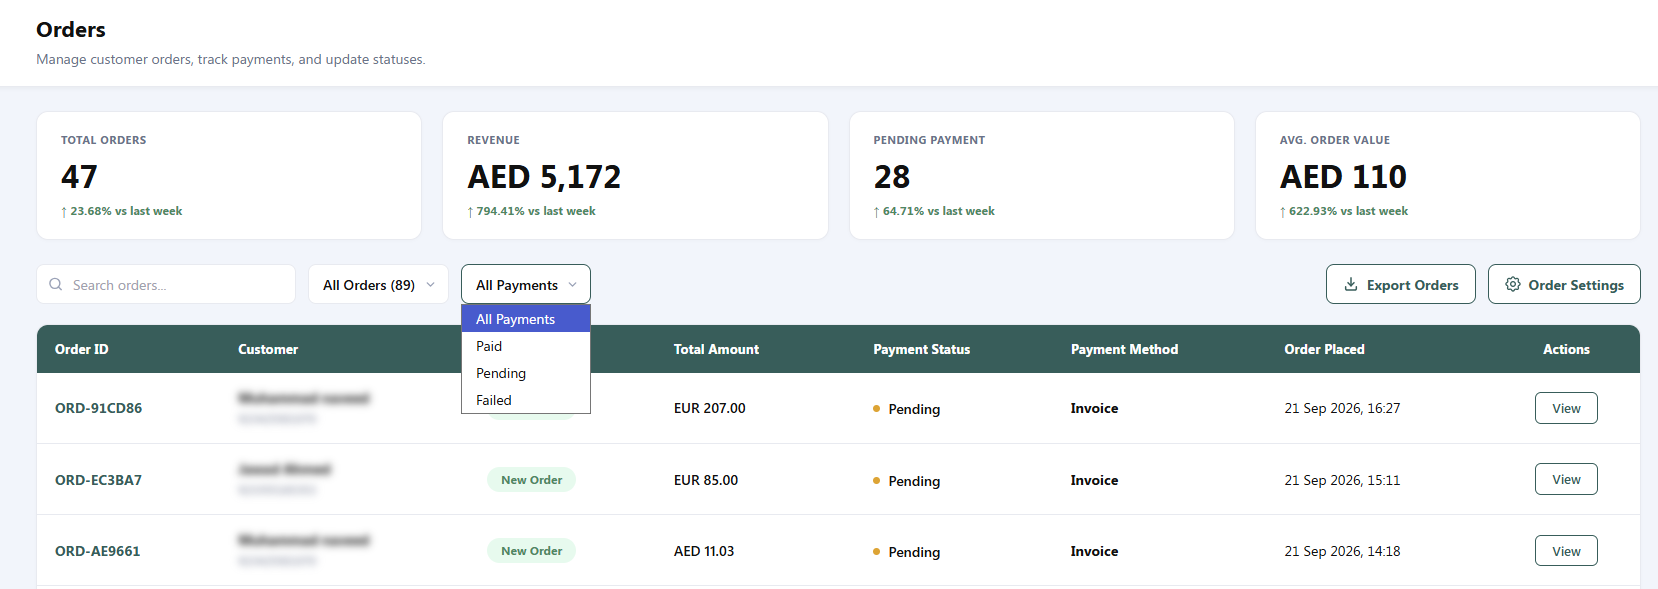
- Payment Status Filter: Filter items by financial settlement state:
- All Payments
- Paid
- Pending
- Failed
Export Orders
Click the Export Orders button in the top-right corner to download filtered or complete order records in .csv or .xlsx format.
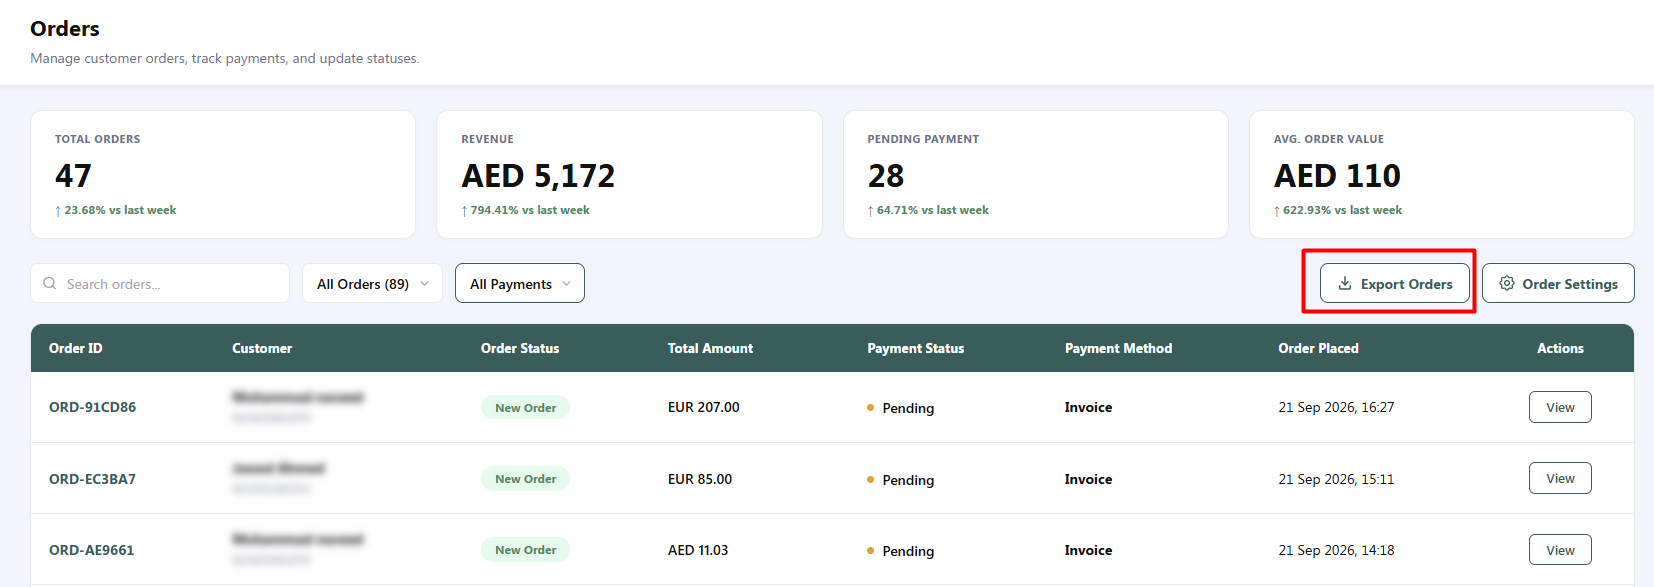
Orders List Table Structure
| Column | Description & Data Points |
|---|---|
| Order ID | Unique transaction identifier (e.g., ORD-91CD86). |
| Customer | Registered display name of the customer. |
| Order Status | Color-coded status badge (New Order, Confirmed, Shipped, Delivered, Cancelled). |
| Total Amount | Total order monetary value with currency (e.g., EUR 207.00, AED 11.03). |
| Payment Status | Financial status indicator (• Pending, • Paid, • Failed). |
| Payment Method | Checkout channel used (Invoice, Website, Stripe, Manual). |
| Order Placed | Timestamp of order creation (e.g., 21 Sep 2026, 16:27). |
| Actions | View button to open the detailed management page for the selected order. |
Order Settings Management
Clicking the Order Settings button in the top-right corner opens the dedicated portal for logistics and message configuration.
---Displays current shipping rate rules (e.g., UAE • Abu Dhabi, Price: AED 0).
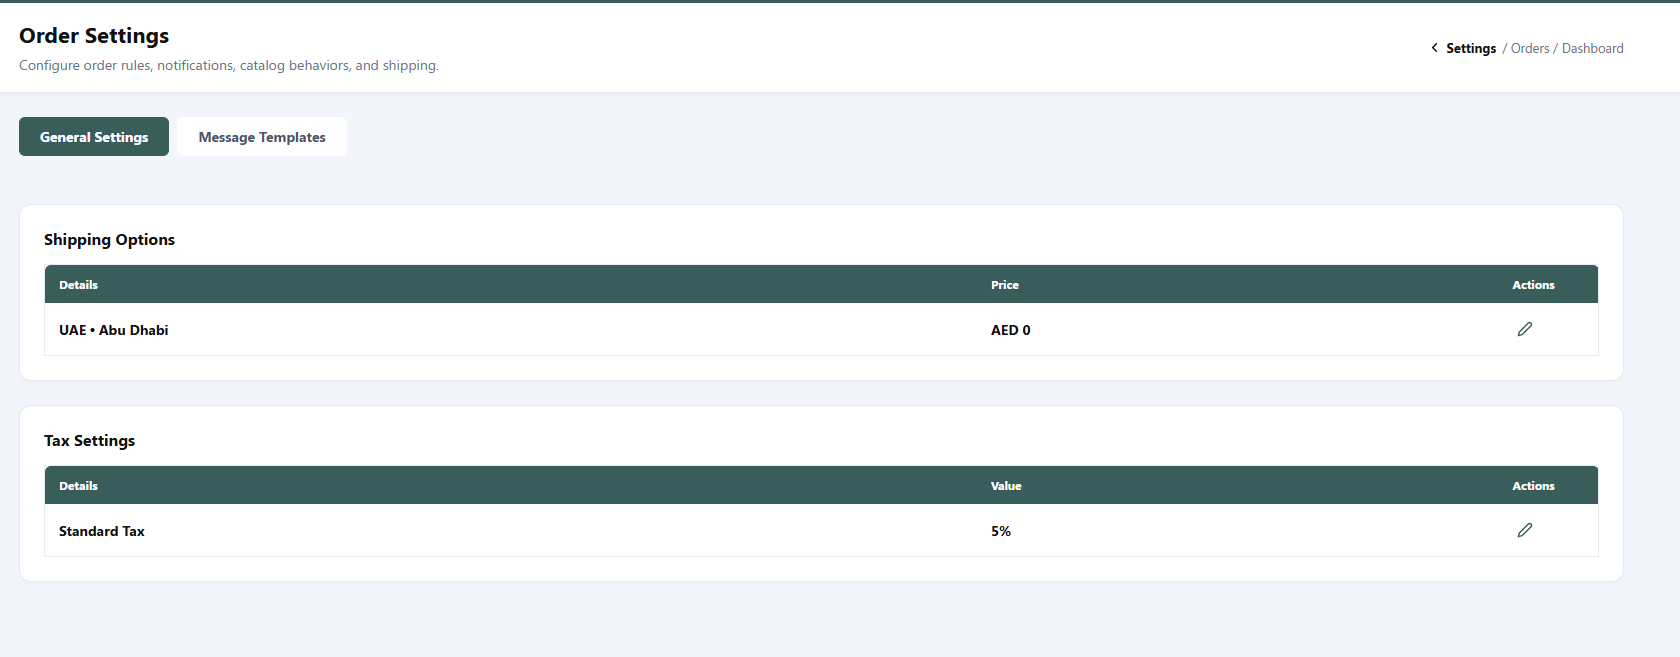
General Settings Tab
Configure fulfillment logistics and global tax rules under this tab:
A. Shipping Options
Displays current shipping rate rules (e.g., UAE • Abu Dhabi, Price: AED 0).
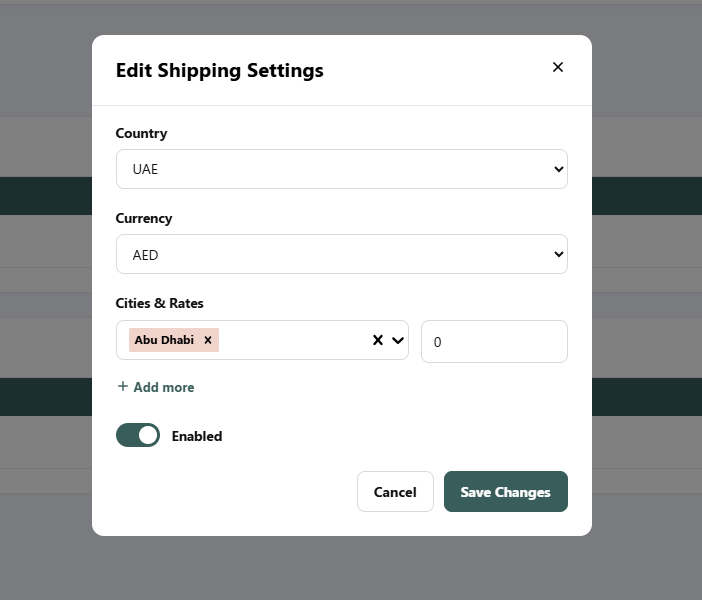
:::note Shipping Edit Modal Clicking the Edit Icon (✏️) opens the Edit Shipping Settings Modal:
- Country Dropdown: Select the destination country (e.g.,
UAE). - Currency Dropdown: Assign the active currency (e.g.,
AED). - Cities & Rates Input: Define target delivery cities (e.g.,
Abu Dhabi) and assign specific shipping charges. - + Add more: Append additional city delivery zones.
- Enabled Toggle Switch: Toggle switch to enable or disable shipping fee application.
- Save Changes: Commits and applies logistics updates. :::
B. Tax Settings
Displays global order tax configurations (e.g., Standard Tax, Value: 5%).
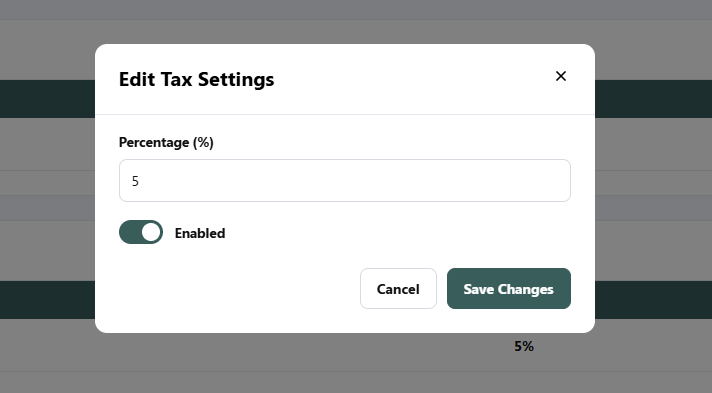
:::note Tax Edit Modal Clicking the Edit Icon (✏️) opens the Edit Tax Settings Modal:
- Percentage (%): Input the applicable tax rate percentage (e.g.,
5). - Enabled Toggle Switch: Enable or disable automatic tax calculation at checkout.
- Save Changes: Saves global tax configurations. :::
Message Templates Tab
Manage and edit automated WhatsApp notification messages that are sent to customers when their order status updates.
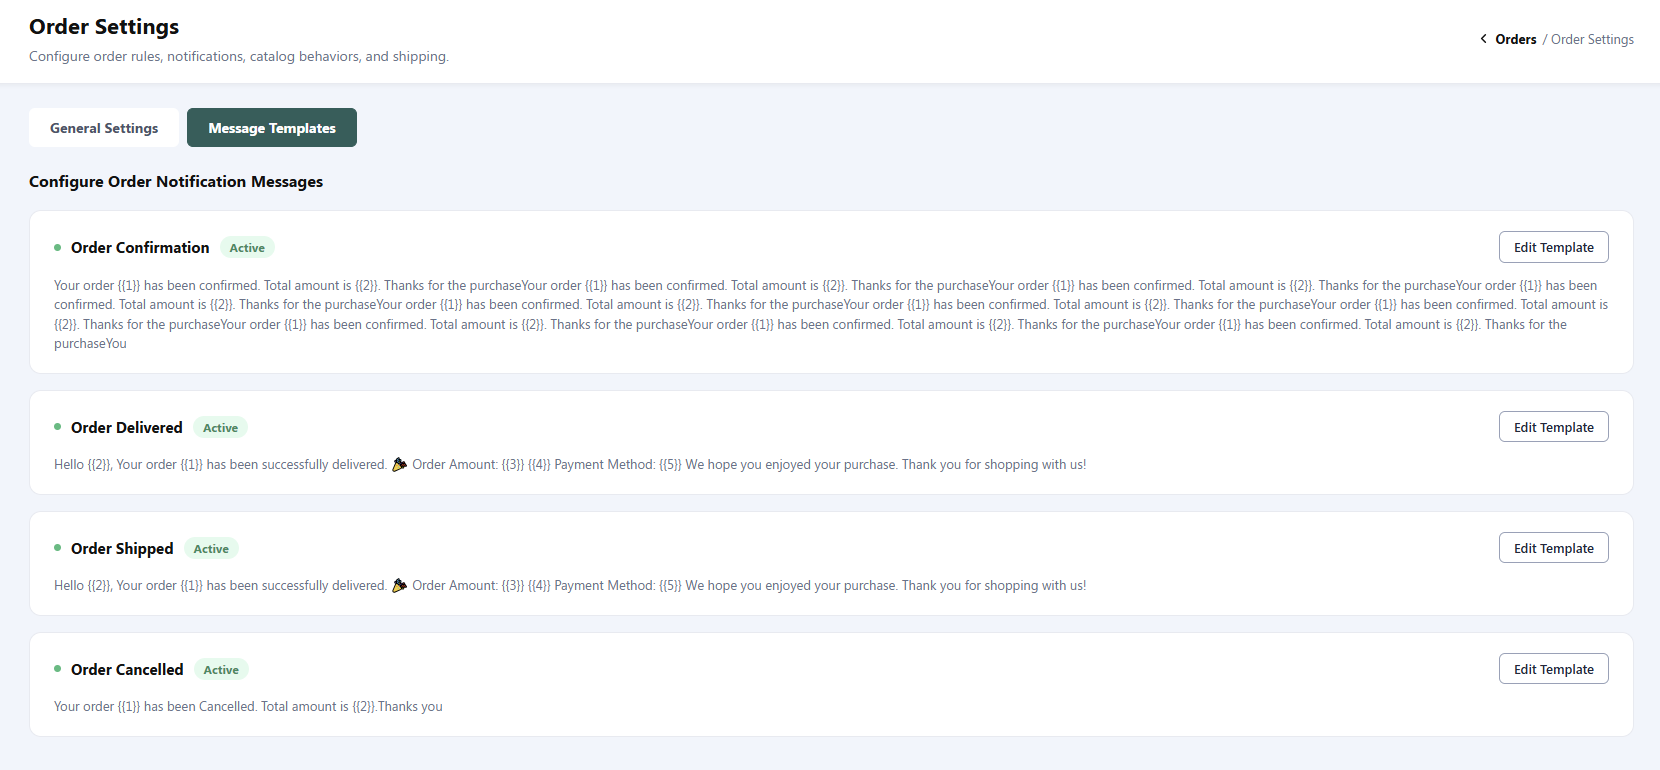
Active Templates List:
- Order Confirmation: Triggered upon new order creation.
- Order Delivered: Triggered when an order is marked as delivered.
- Order Shipped: Triggered when an order is dispatched.
- Order Cancelled: Triggered when an order is voided or cancelled.
Inline Message Template Editing
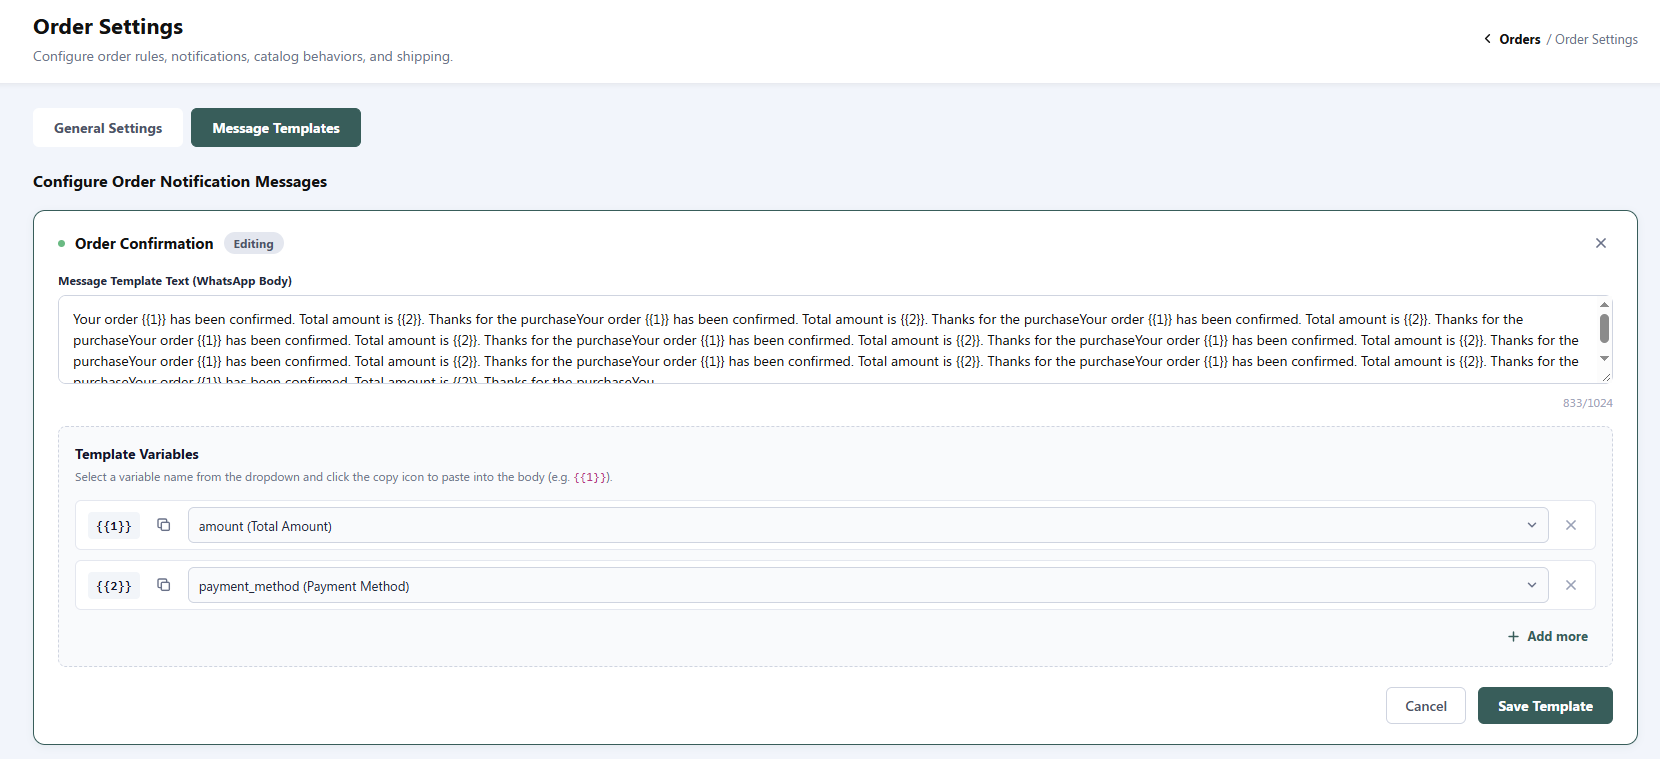
Clicking Edit Template on any template card expands an Inline Edit Form directly inside the container:
- Message Template Text (WhatsApp Body): Edit the text message content sent to customers via WhatsApp (Character limit: 1,024).
- Template Variables Mapping:
- Map dynamic placeholder parameters to system variables (e.g.,
{{1}}mapped toamount (Total Amount),{{2}}mapped topayment_method (Payment Method)). - + Add more: Insert additional contextual data tags into the message body.
- Map dynamic placeholder parameters to system variables (e.g.,
- Save Template: Commits updated content and parameters for active dispatch.
- Cancel: Exits inline editing mode without saving changes.
Detailed Order View Page
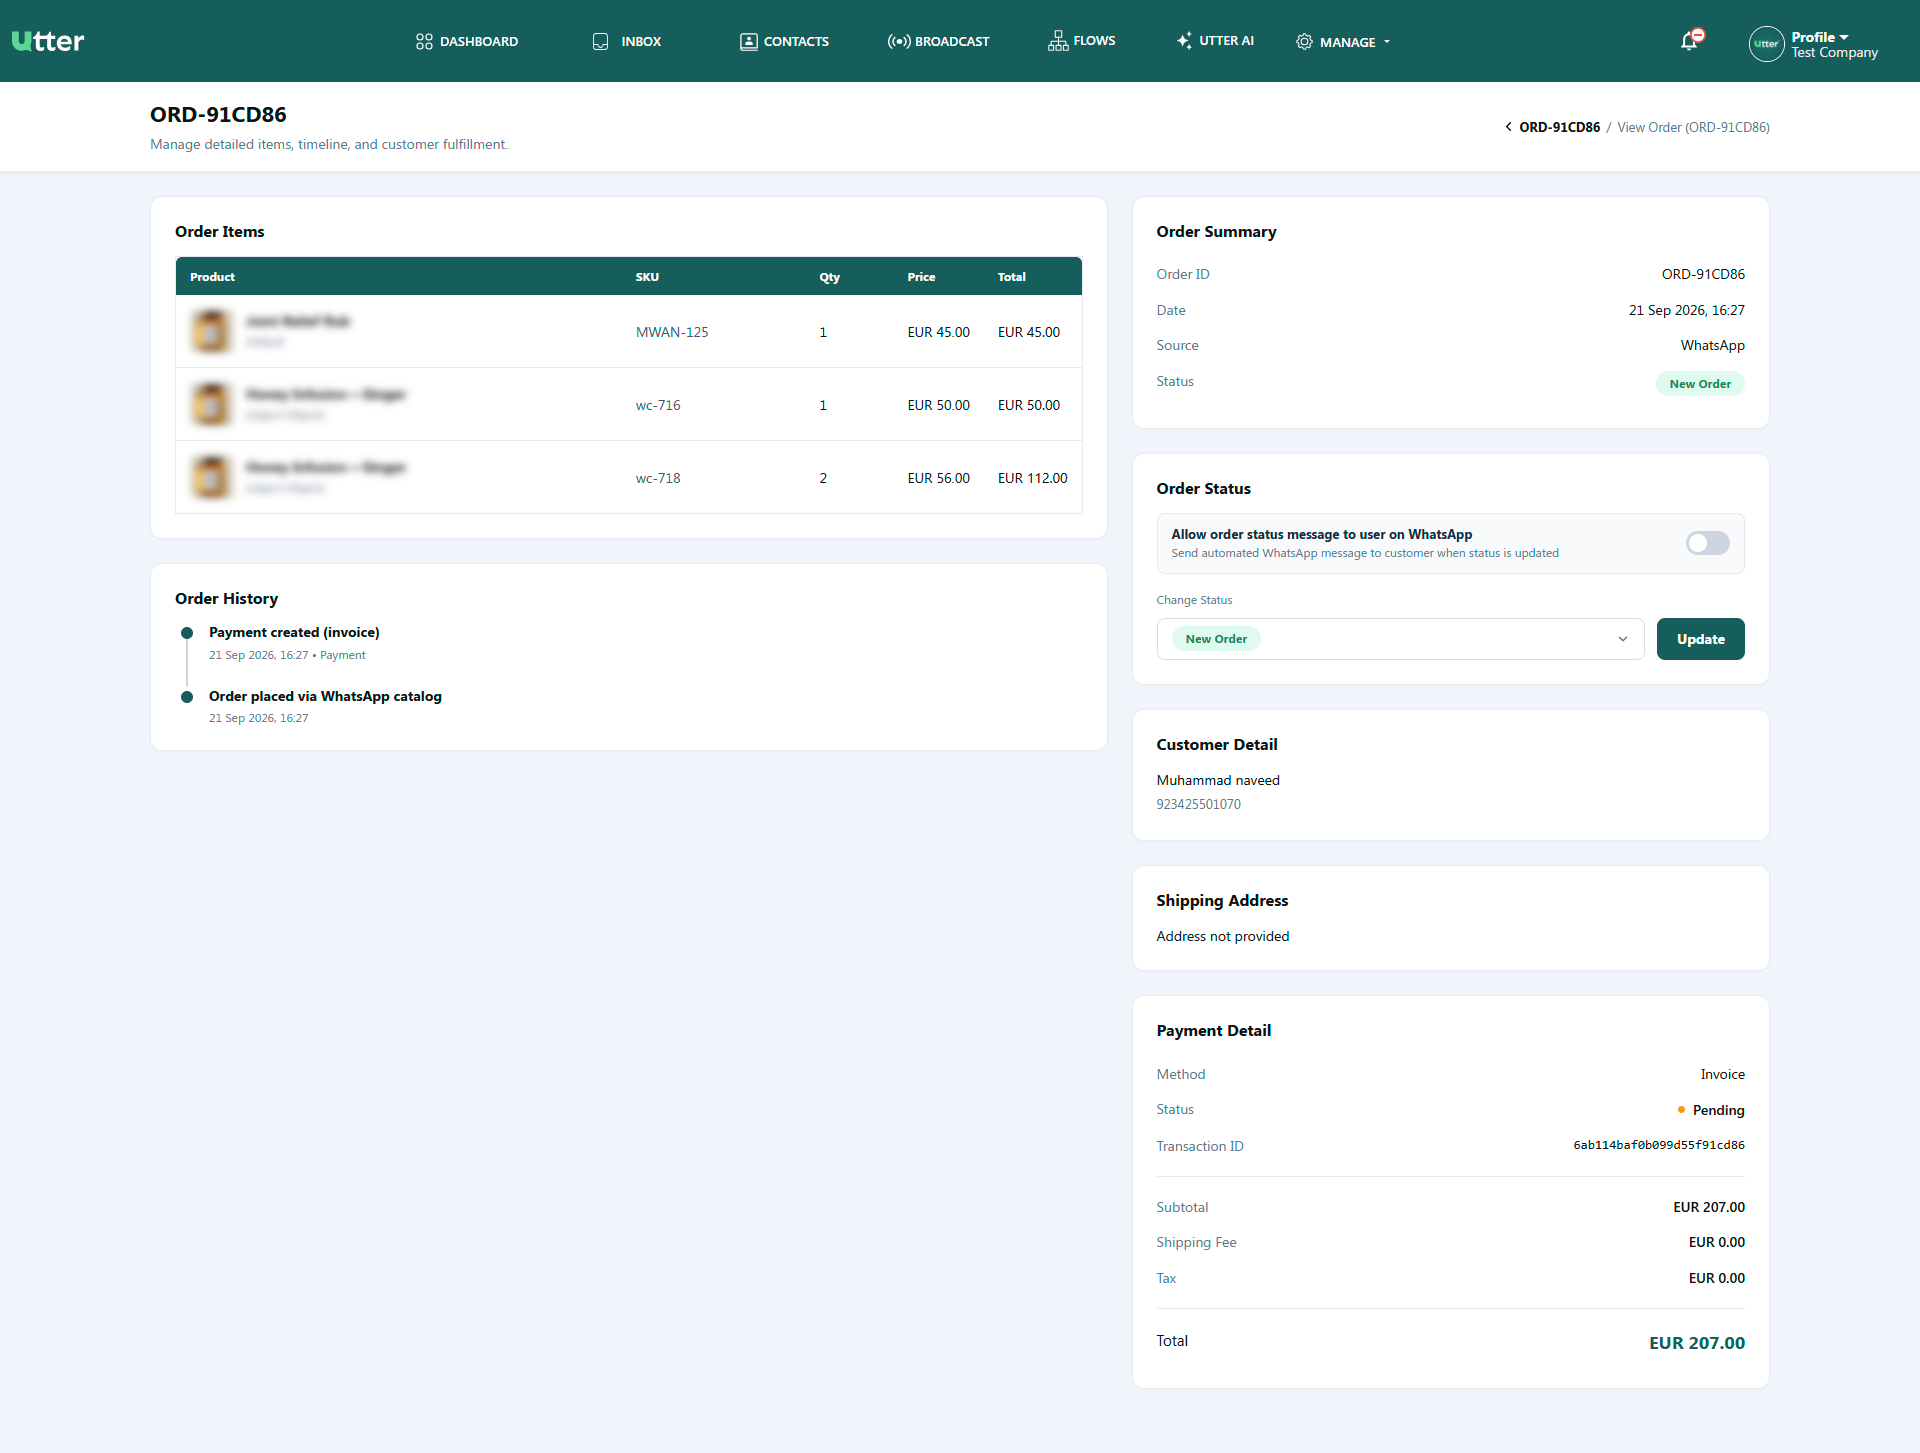
Clicking View under the Actions column opens the detailed management view for a specific order (/Orders/View/ORD-XXXXXX).
Page Components Breakdown
Order Items Table (Left Top Panel)
- Product thumbnail image.
- Product Name, SKU code (e.g.,
MWAN-125), Quantity (Qty), Unit Price, and Item Total.
Order History Timeline (Left Bottom Panel)
- Chronological audit log tracking order progress (e.g., Order placed via WhatsApp catalog, Payment created invoice with precise timestamps).
Order Summary Card (Right Panel)
- Displays Order ID, Date, Source Channel (e.g.,
WhatsApp), and current lifecycle Status badge.
Order Status & Automated WhatsApp Updates
- Change Status Dropdown: Update order lifecycle state (
New Order,Confirmed,Shipped,Delivered,Cancelled). - Allow order status message to user on WhatsApp Toggle: Toggle switch to automatically send the corresponding mapped WhatsApp notification message to the customer upon status change.
- Update Button: Applies the new status and triggers WhatsApp notification if enabled.
Customer & Address Details
- Customer Detail Card: Displays customer name and contact phone number.
- Shipping Address Card: Displays delivery destination address.
Payment Detail & Pricing Breakdown
- Method: Payment gateway channel used (
Invoice,Stripe,Website). - Status: Settlement indicator (
Pending,Paid,Failed). - Transaction ID: Unique transaction reference ID.
- Financial Calculations: Displays Subtotal, Shipping Fee, calculated Tax, and final Total Amount.
Store Connections (WooCommerce & Shopify)
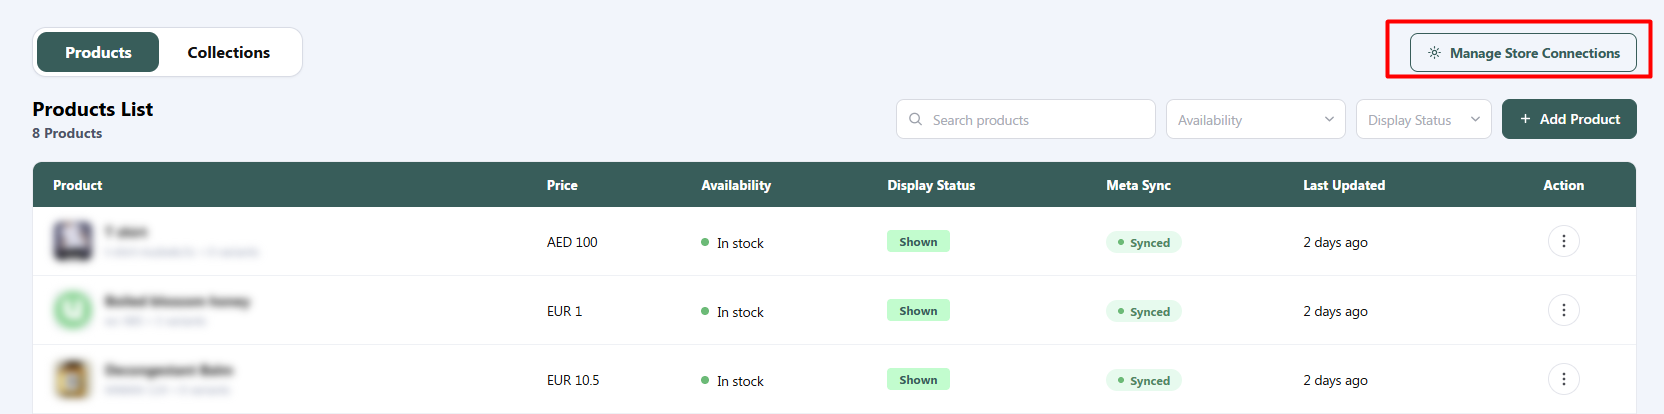
To automate catalog synchronization with an external e-commerce store, click Manage Store Connections at the top-right of the catalog view.
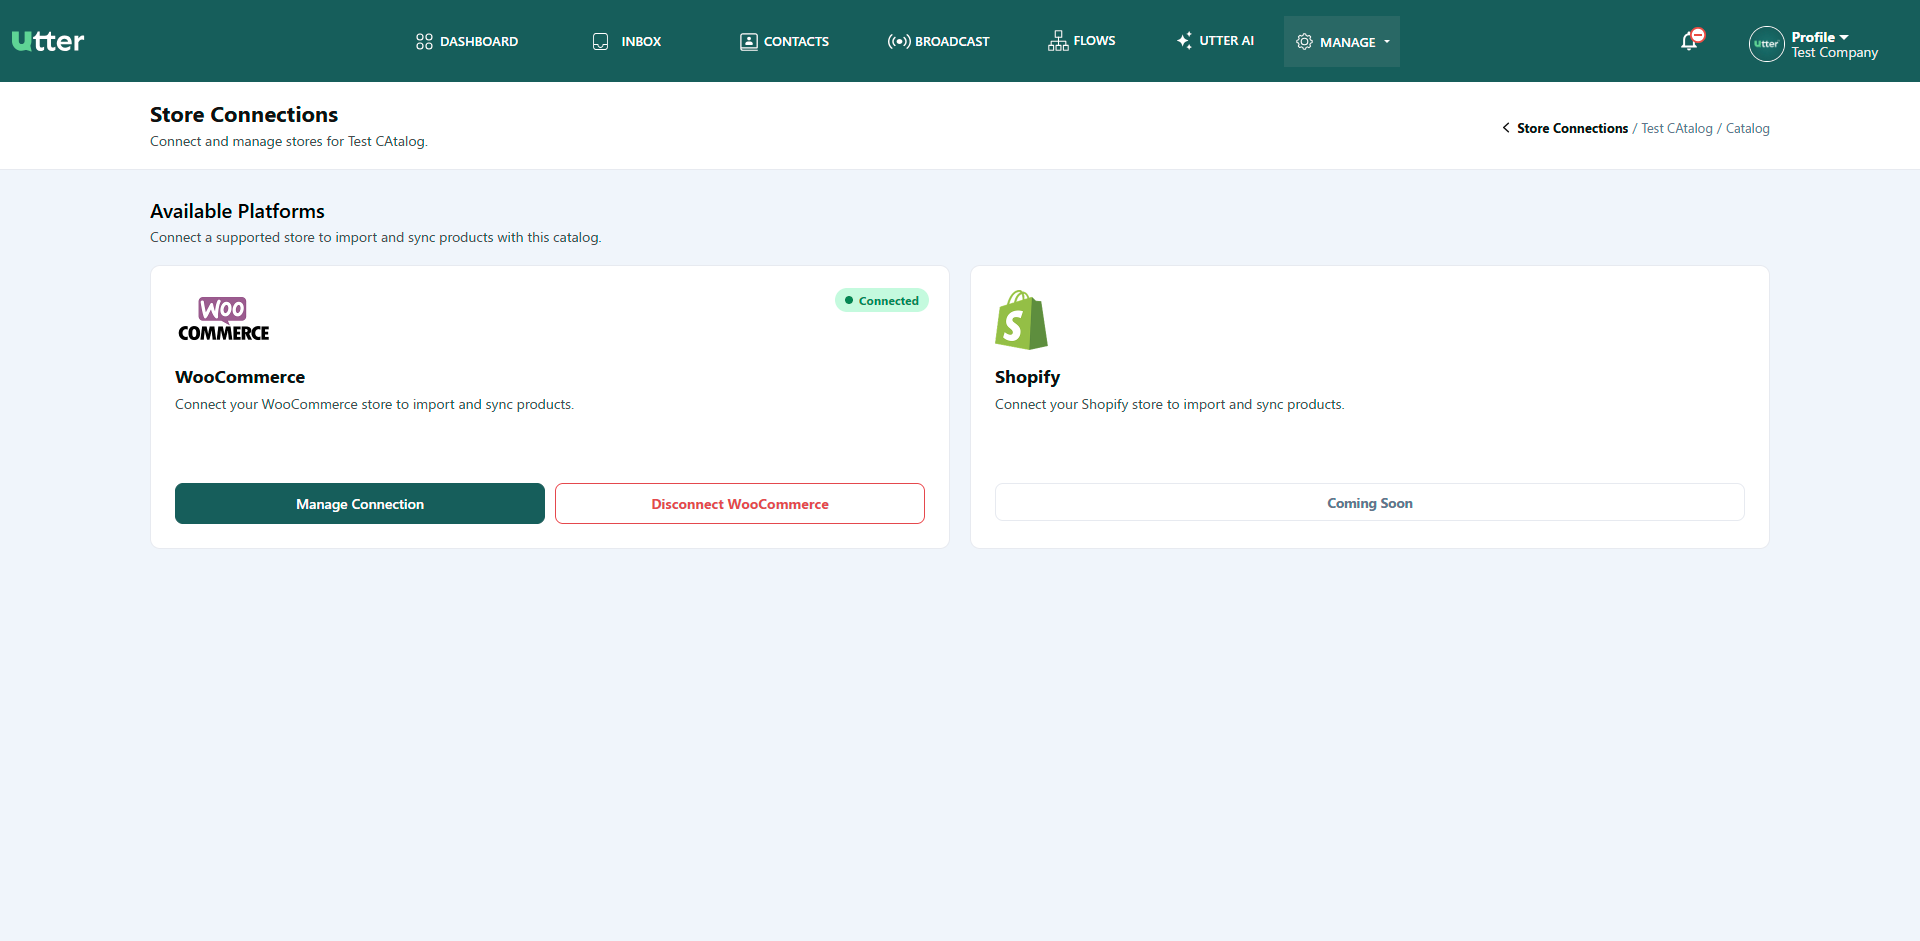
Supported Platforms
- WooCommerce: Fully supported for direct product import and continuous synchronization.
- Shopify: (Coming Soon).
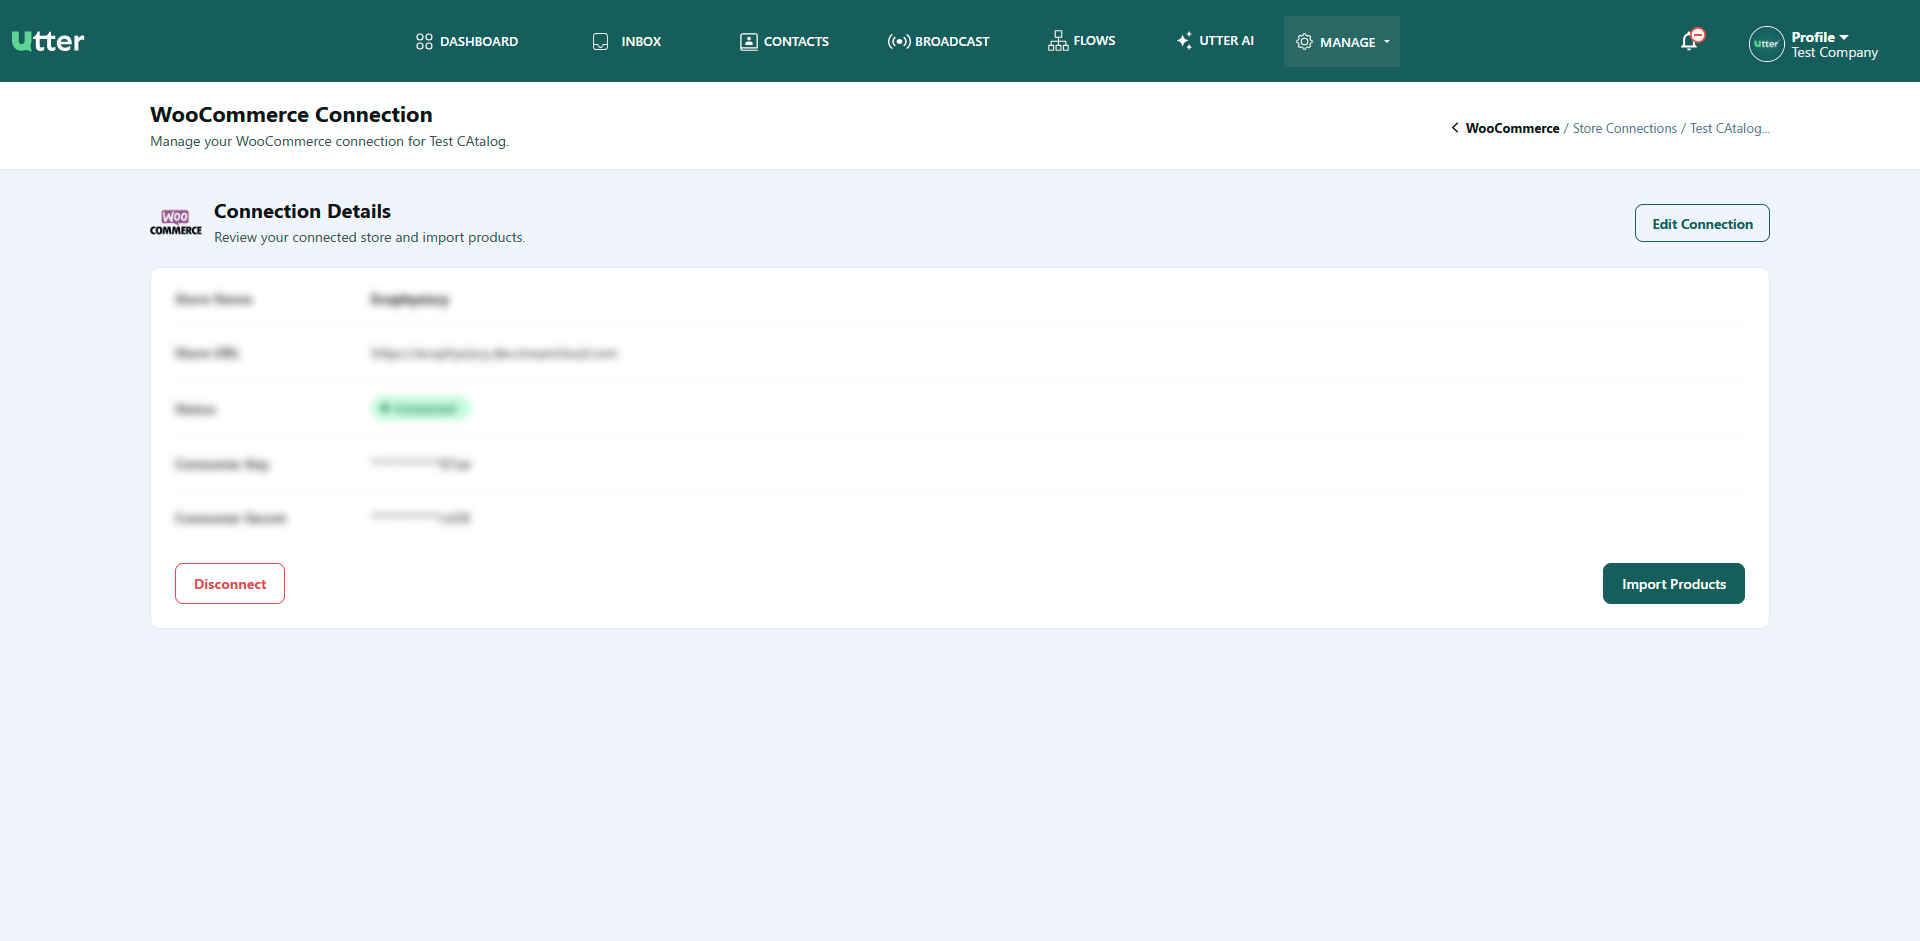
WooCommerce Integration Steps
- Navigate to Store Connections and click Manage Connection under WooCommerce.
- Review the Connection Details:
- Store Name: Unique name for your WooCommerce store (e.g.,
Ecophysiscy). - Store URL: Direct link to your e-commerce domain.
- API Keys: Provide your Consumer Key and Consumer Secret generated from WooCommerce settings (
WooCommerce > Settings > Advanced > REST API).
- Store Name: Unique name for your WooCommerce store (e.g.,
- Click Import Products to pull inventory, pricing, and variant data directly into your WhatsApp catalog.
- Use Edit Connection to update credentials or Disconnect to un-link the store.
Catalog Collections Management
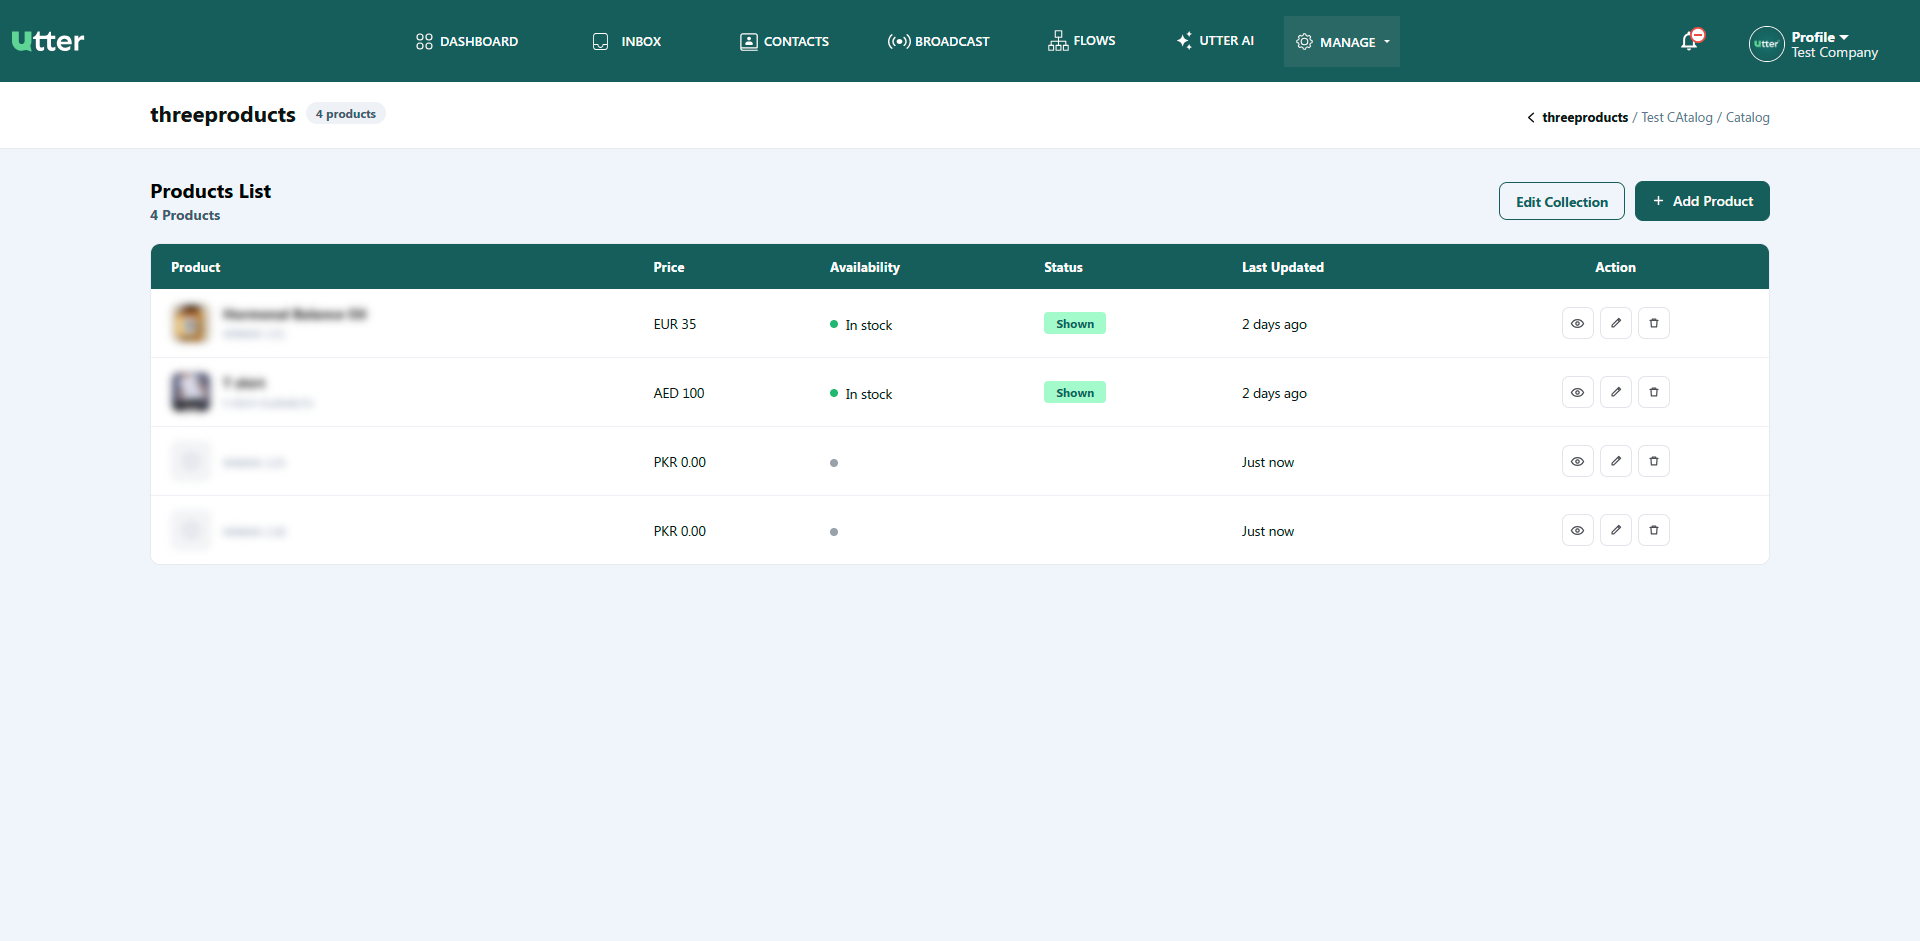
Switch to the Collections tab inside a catalog to organize products into custom groups (e.g., New Arrivals, Best Sellers).
Viewing Collections
The Collection List table displays:
- Collection Name & Description
- Products Count: Number of items currently linked to the collection.
- Last Updated: Timestamp of the latest modification.
Creating a New Collection
- Click + Create Collection from the Collections list view.
- Collection Information:
- Collection Name (*): Required title (e.g.,
New Arrivals). - Description: Optional short details describing the group.
- Collection Name (*): Required title (e.g.,
- Adding Products to Collection:
- Search or filter products from the All Products list on the right.
- Click + Add next to individual items, or click Add all to include all displayed products.
- Added products will appear in the Added Products panel on the left.
- Click Create Collection to save and publish the collection to your WhatsApp catalog.
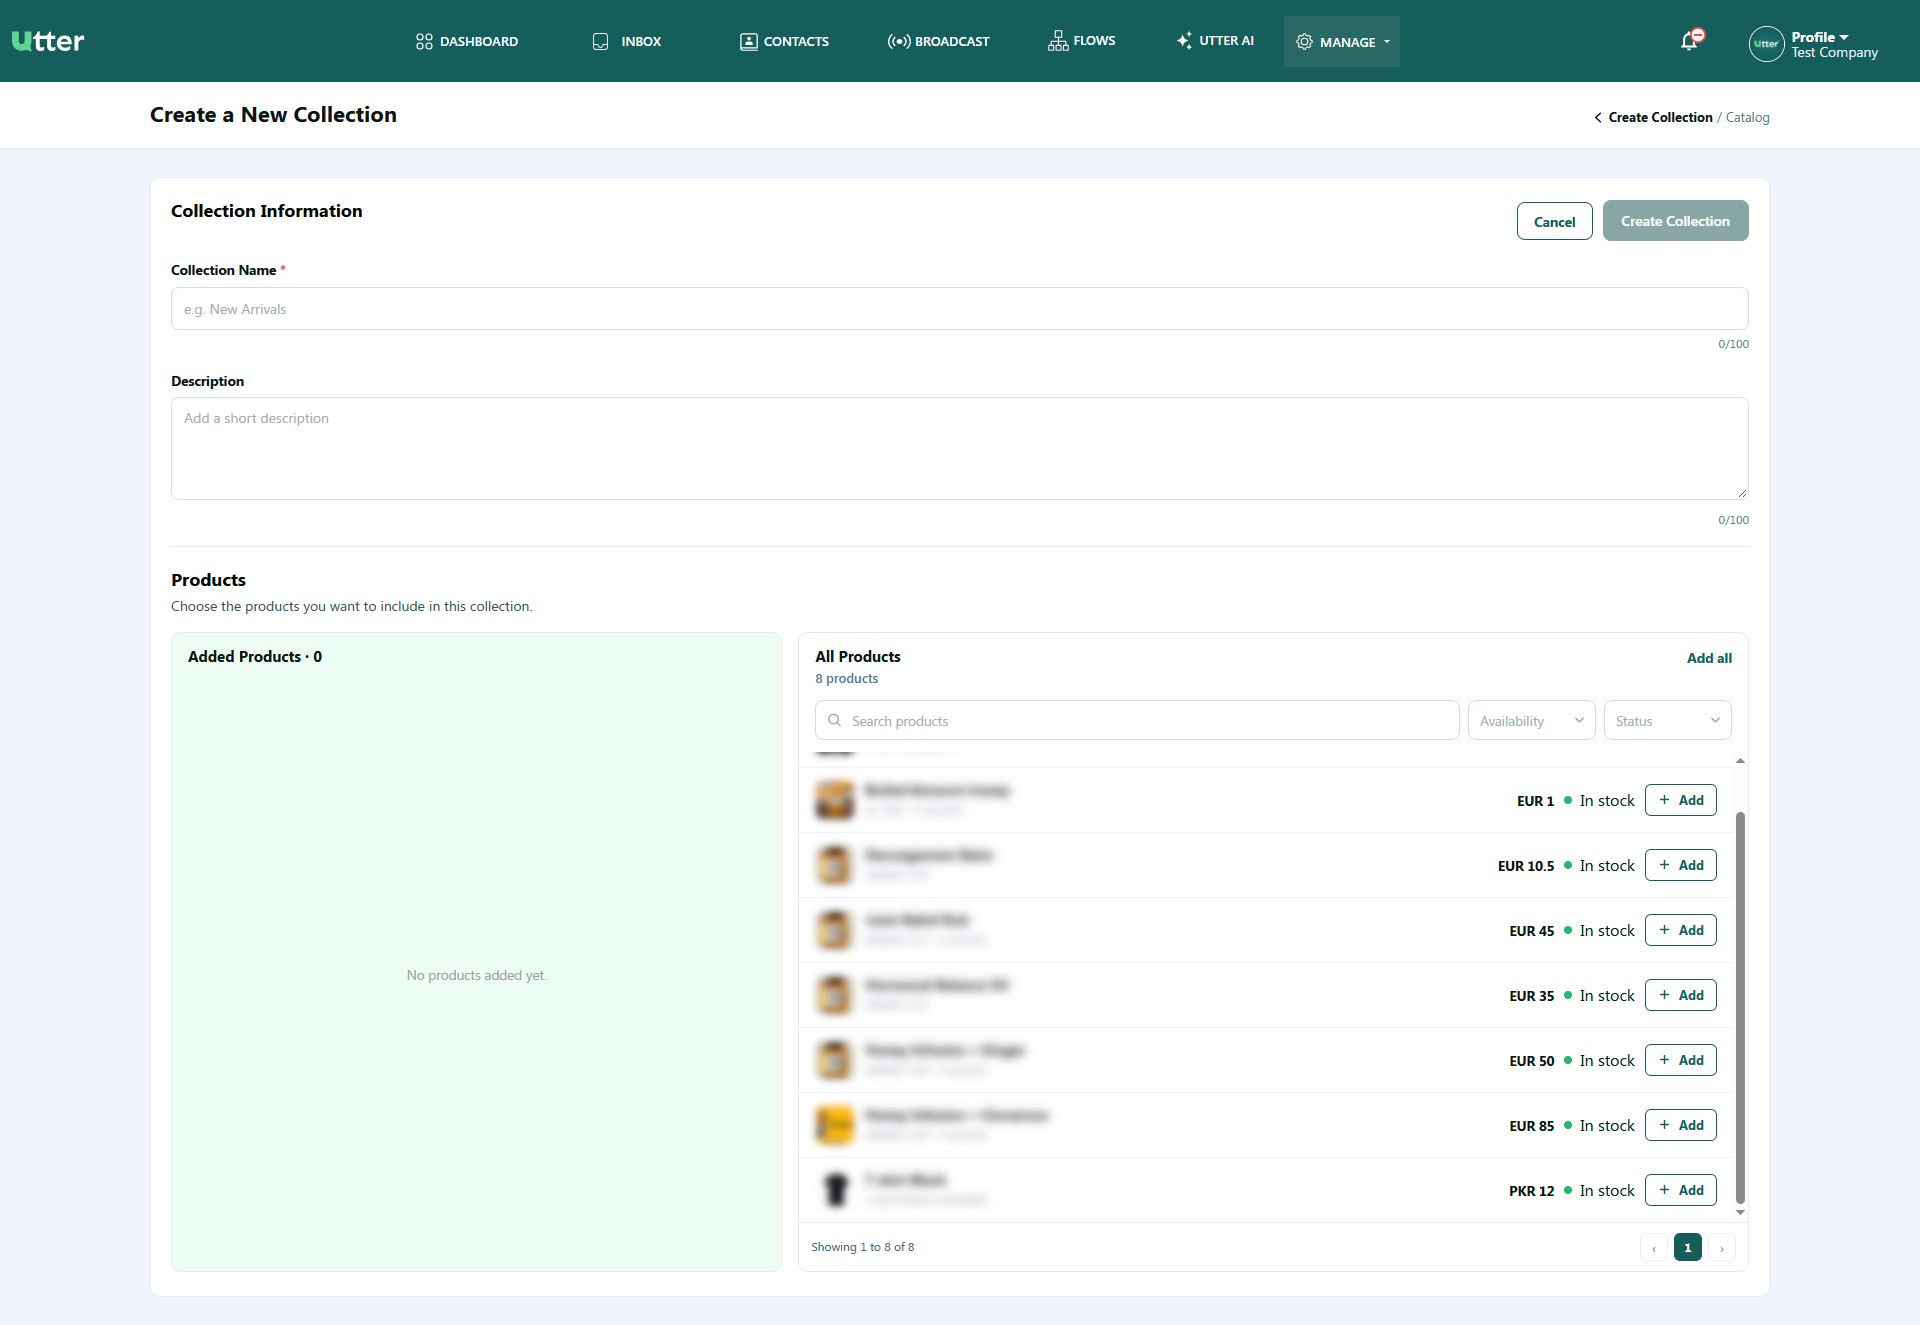
Commerce Message Template
You can create specialized Commerce templates (for both Catalogs and Collections) and send them directly to your customers via WhatsApp from the Inbox.
Step 1: Create a New Template
- Navigate to the Templates section and click on Create New Template.
- Select your desired Template Category (e.g., Utility, Marketing, or Authentication).
- Provide a unique name in the Template Name field and choose your preferred language under Languages.
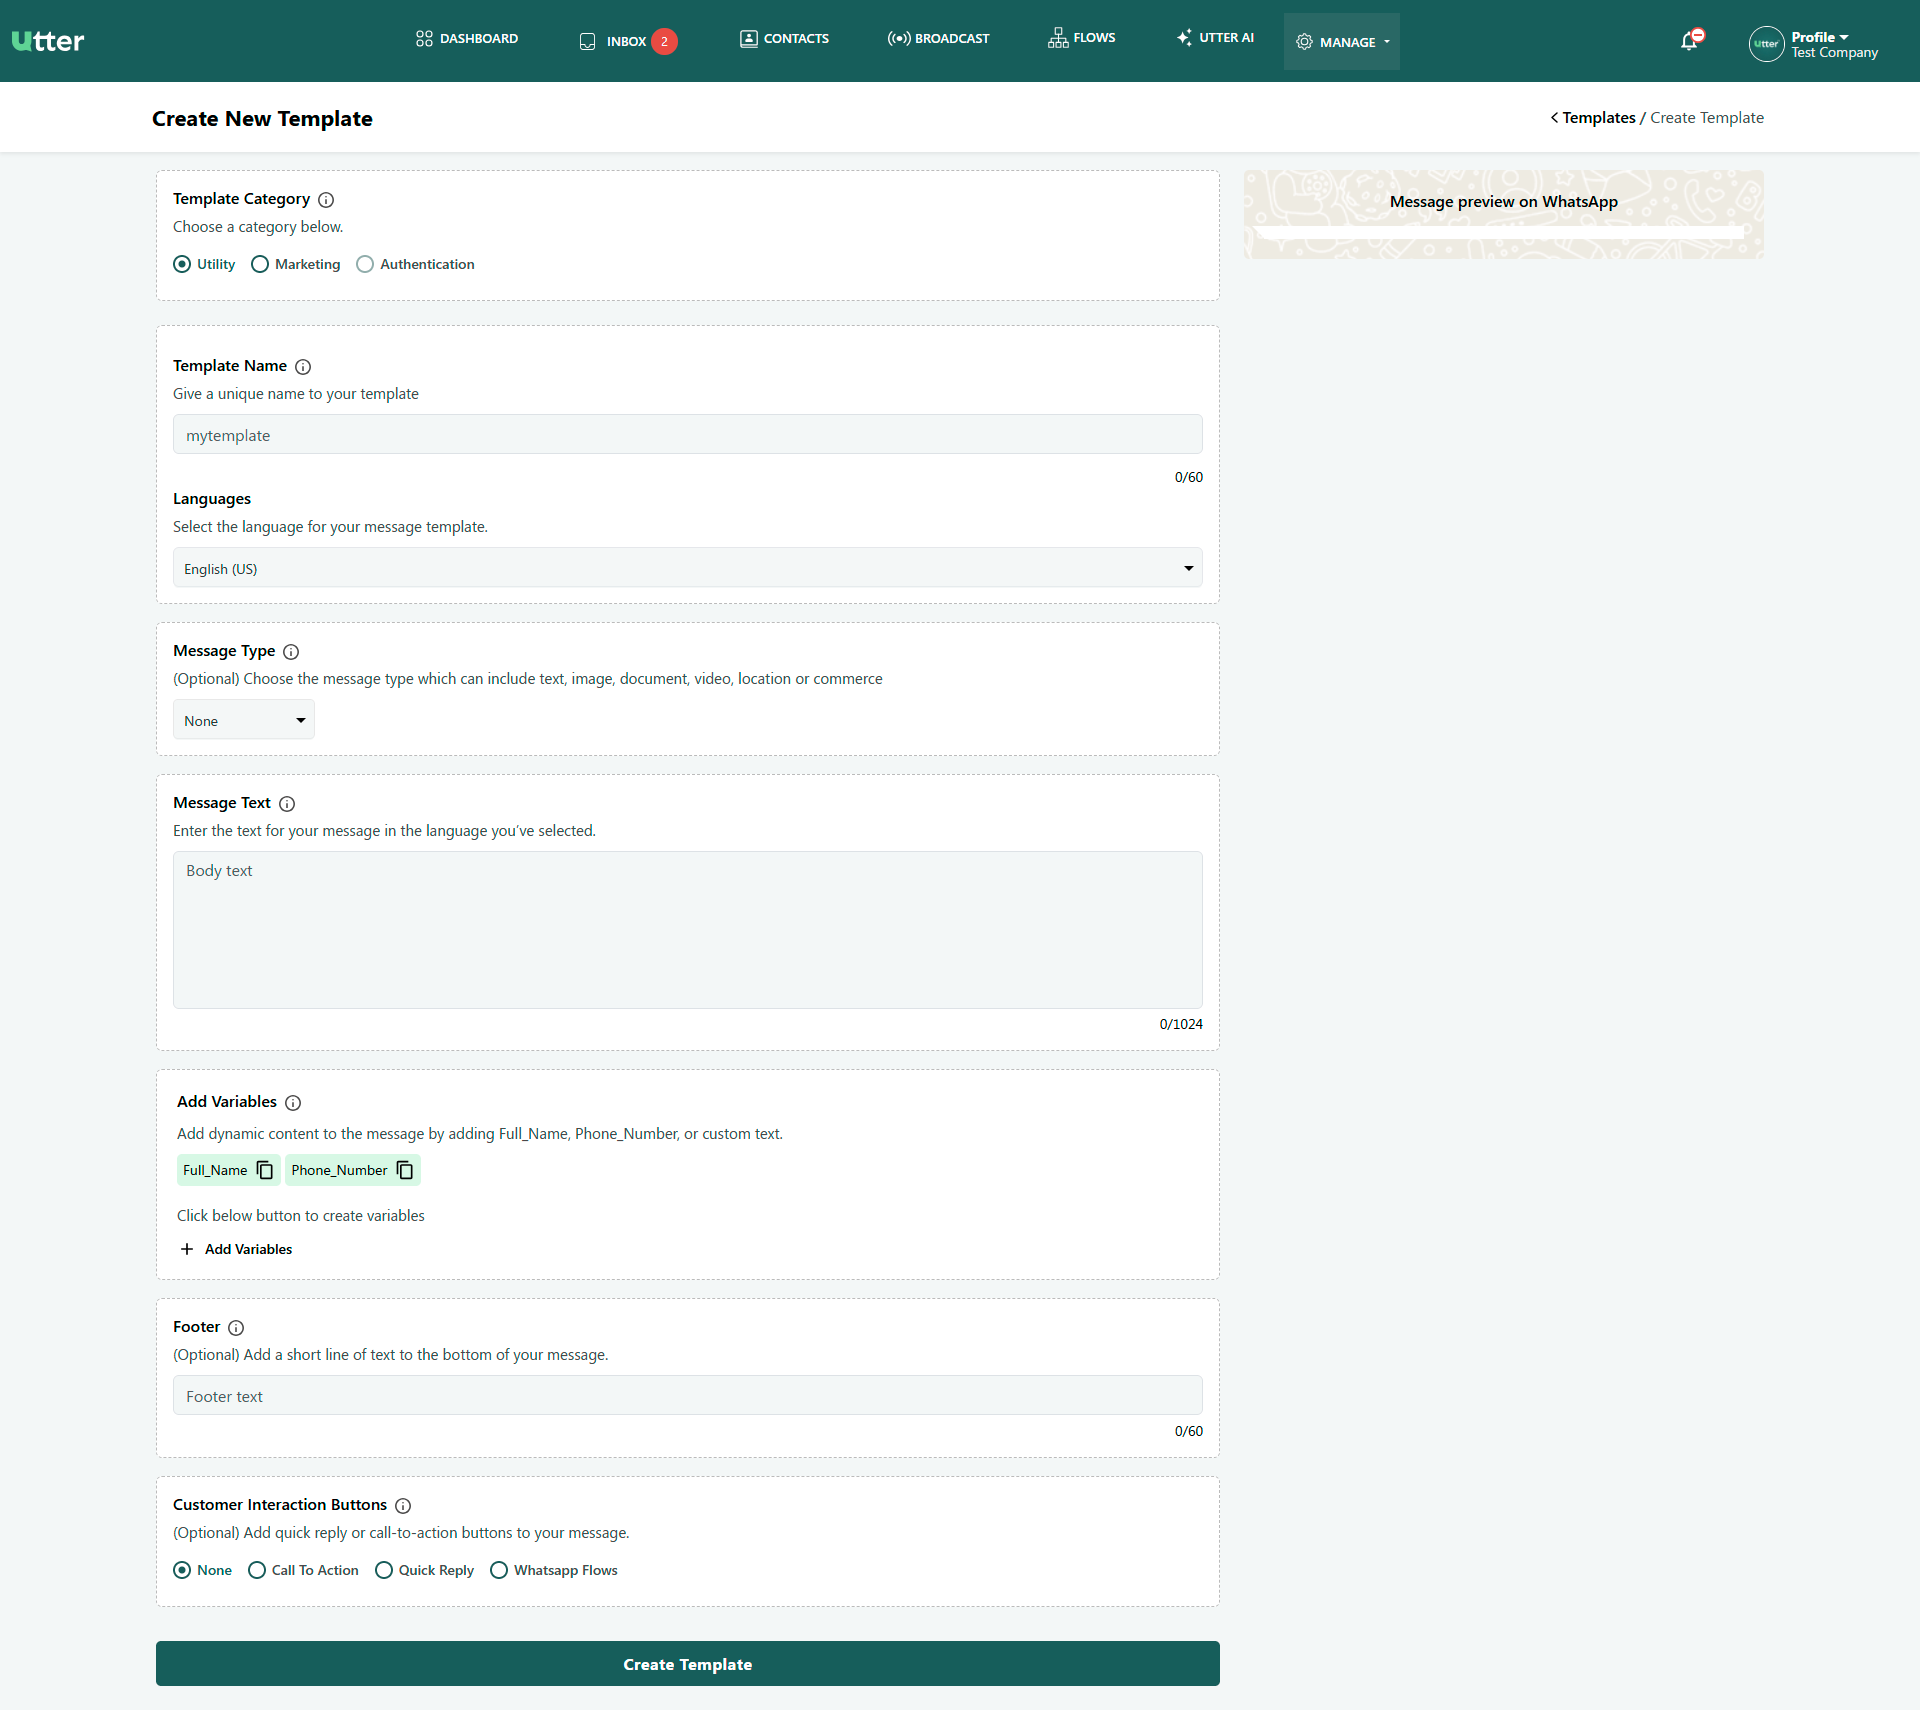
Step 2: Select Message Type as Commerce
- In the Message Type dropdown, select Commerce.
- Once selected, two options will appear below: Catalog and Collection.
- Catalog: Sends all products available within the selected catalog.
- Collection: Sends only the specific products included within the selected collection.
- Select Collection (or Catalog depending on your requirement), choose the specific collection/catalog you created beforehand, fill out your message text, and click Create Template at the bottom to save it.
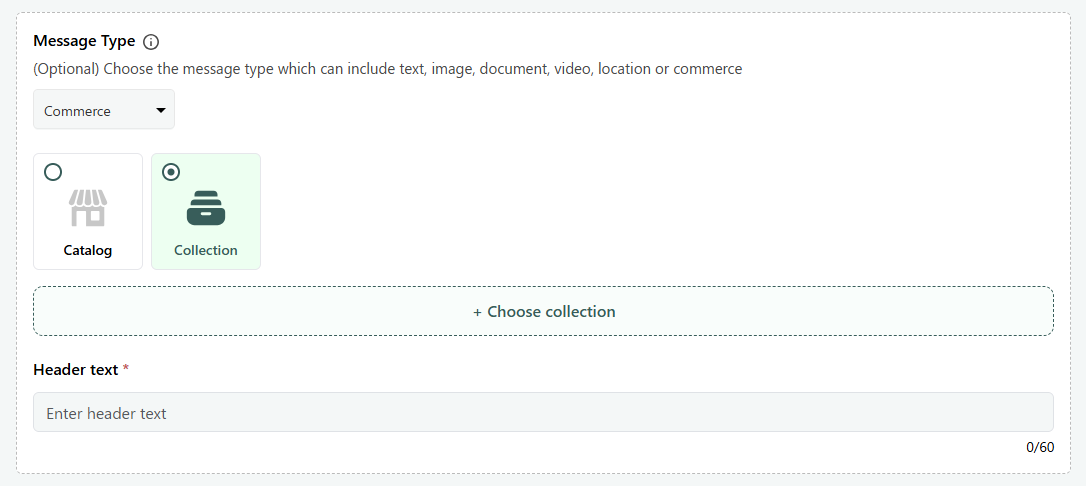
Step 3: Send the Template from Inbox
-
Go to the Inbox page and open a customer chat.
-
Click on the plus (+) button next to the message input box, and select the Template option from the popup menu.
-
A Select a Template popup will open showing your newly created templates (e.g.,
new_collection). -
Select your template, click Insert Template (or send directly), and it will be delivered straight to your user's WhatsApp!
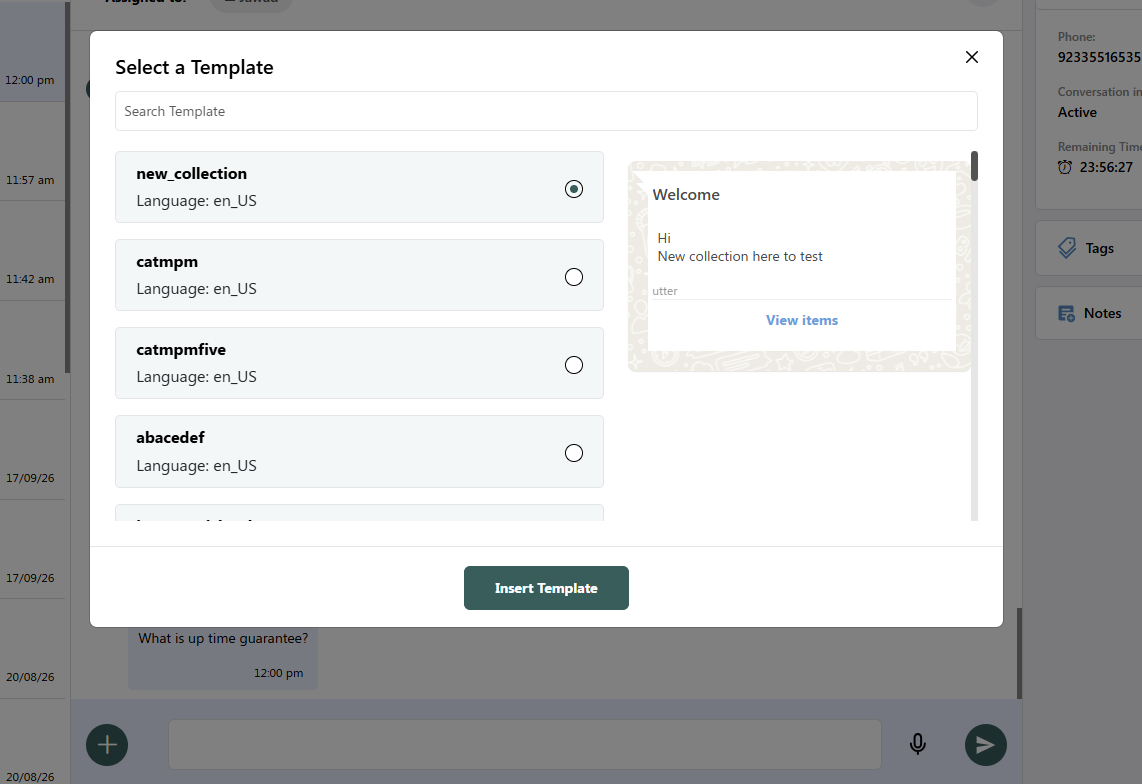
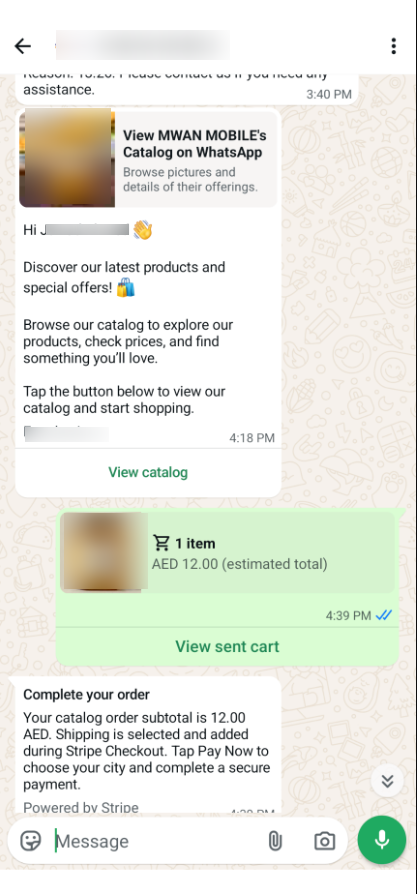
so after sending this message show on customer whatsapp chat
Enable/Disable Notification on diffirent Browser
To receive real-time updates and chat alerts from Utter, you need to allow desktop notifications in your browser. If you previously blocked them or want to turn them off, follow the step-by-step guide below for your specific web browser.
1. Google Chrome
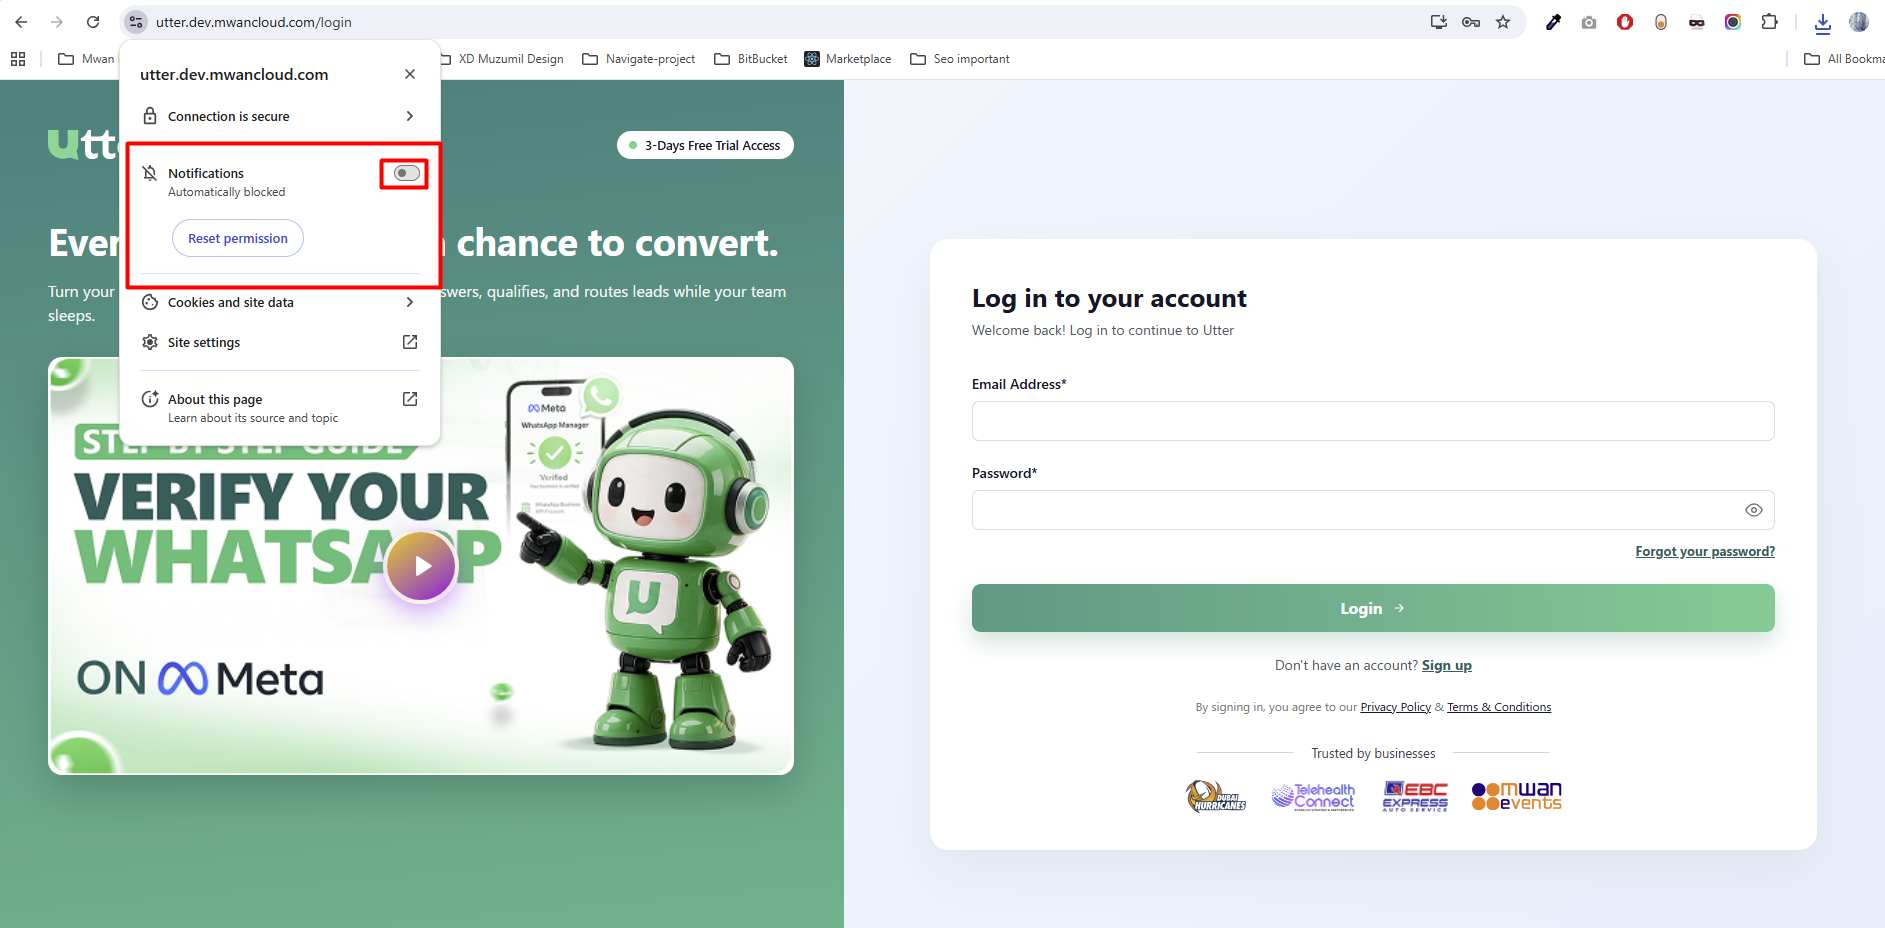
Quick Method:
- Open Utter in your browser.
- Click the Padlock (Lock) or Tune icon next to the URL in the address bar.
- Toggle the Notifications switch to Allow or Block.
Manual Settings Method:
- Click the three dots (⋮) in the top-right corner and select Settings.
- Go to Privacy and security > Site Settings.
- Under Permissions, click Notifications.
- Scroll to Allowed to send notifications or Not allowed to send notifications.
- Find Utter's URL, click the three dots, and choose Allow, Block, or Remove.
2. Mozilla Firefox
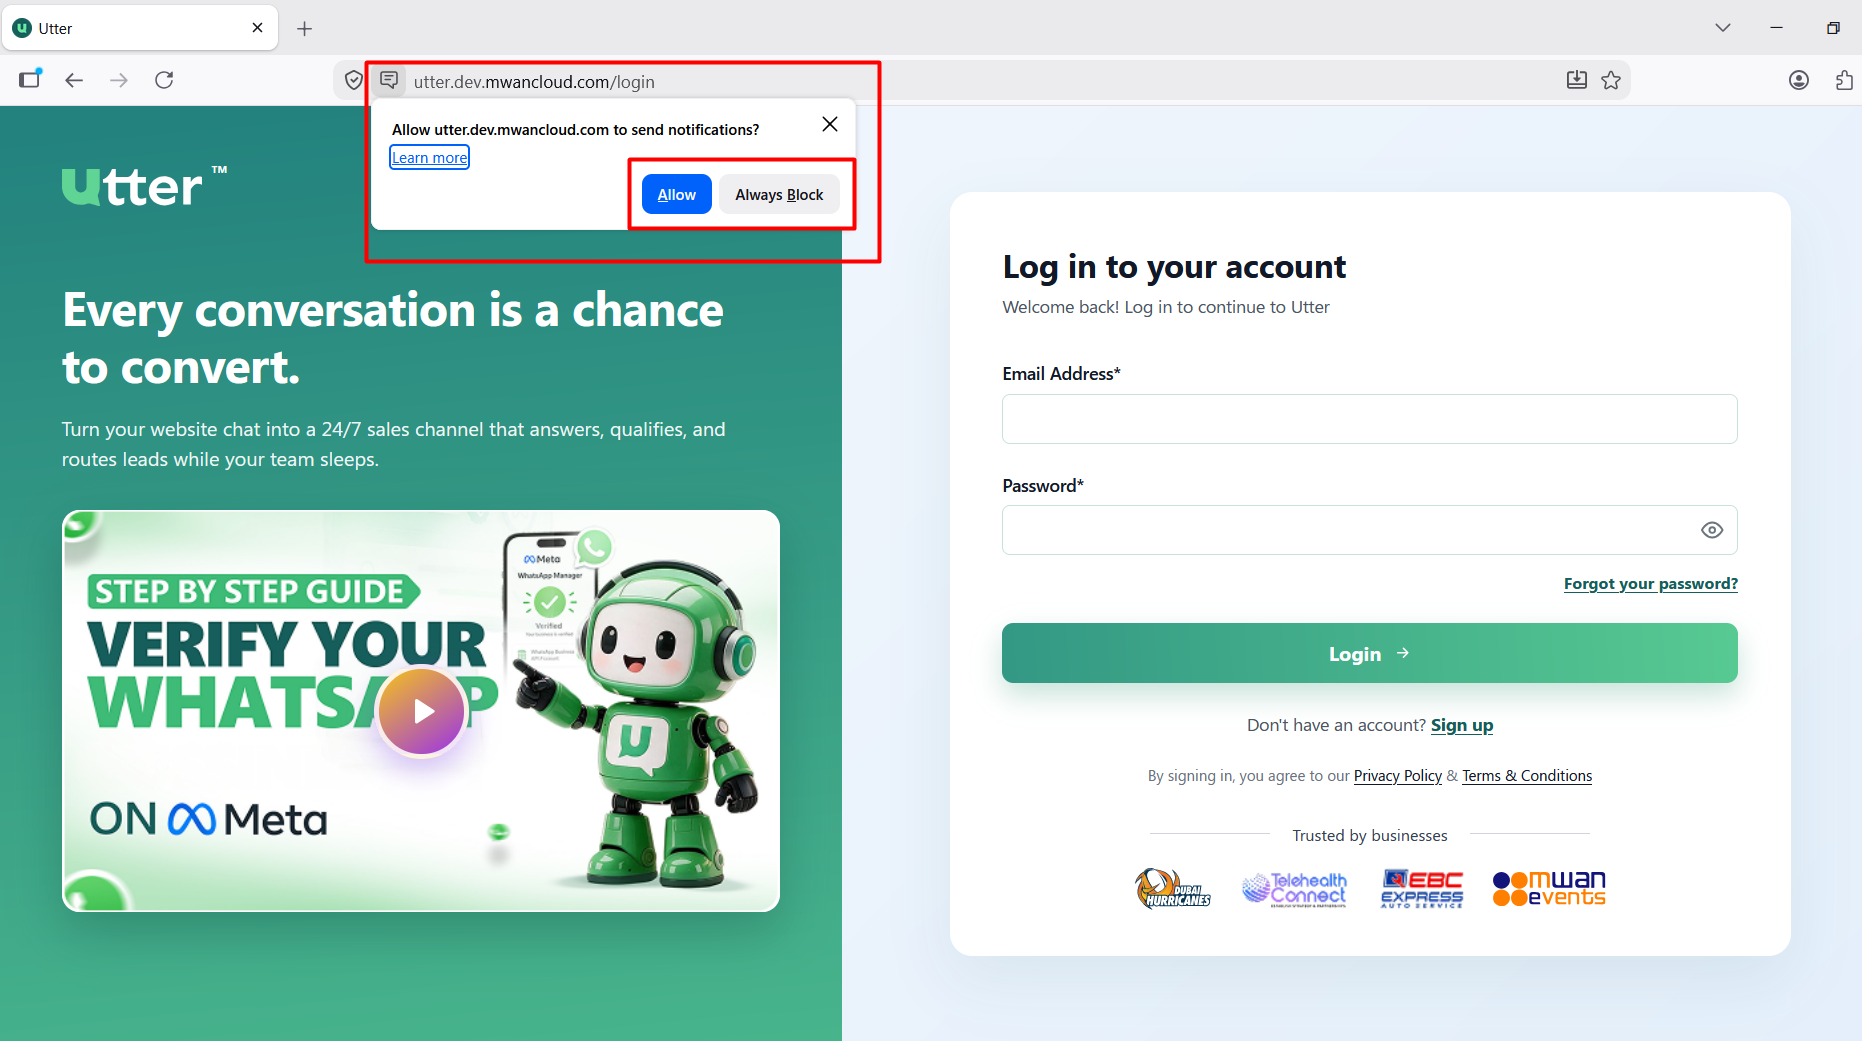
Quick Method:
- Open Utter in Firefox.
- Click the Padlock icon or Permissions icon to the left of the address bar.
- Next to Notifications, click Allowed or cross icon to remove the block.
Manual Settings Method:
- Click the hamburger menu (☰) in the top-right corner and select Settings.
- Select Privacy & Security from the left sidebar.
- Scroll down to the Permissions section and click Settings... next to Notifications.
- Search for Utter in the list.
- Change the Status to Allow or Block, then click Save Changes.
3. Microsoft Edge
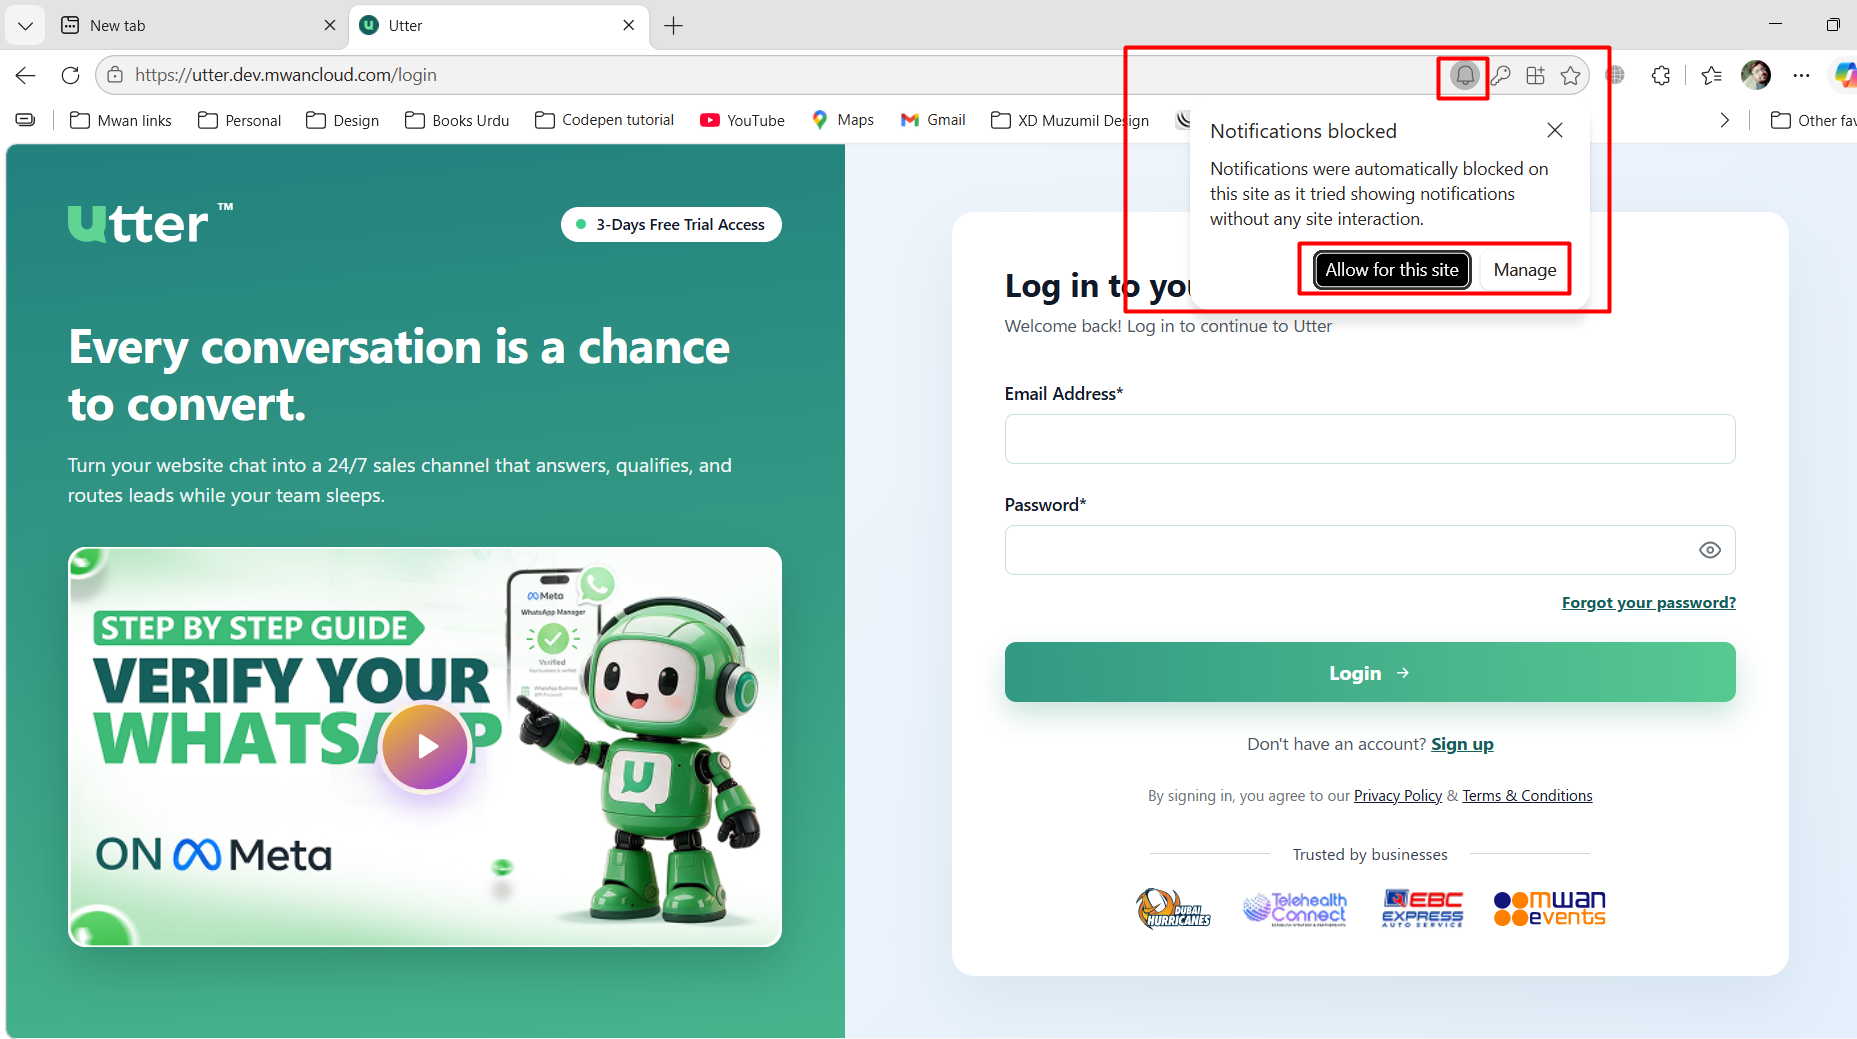
Quick Method:
- Open Utter in Microsoft Edge.
- Click the Padlock icon on the left side of the address bar.
- Click on Permissions for this site.
- Locate Notifications and select Allow or Block from the dropdown menu.
Manual Settings Method:
- Click the three dots (...) in the top-right corner and choose Settings.
- Select Cookies and site permissions from the left panel.
- Scroll down and click Notifications.
- Under Allow or Block, click Add to enter Utter's URL manually, or manage existing permissions.
4. Opera
Quick Method:
- Open Utter in Opera.
- Click the Padlock icon or Badge icon in the URL address bar.
- Go to Site settings.
- Find Notifications and set it to Allow or Block.
Manual Settings Method:
- Click the Easy Setup icon (top-right) or press
Alt + Pto open Settings. - Go to Privacy & security > Site settings.
- Click on Notifications.
- Adjust the permission for Utter under Allowed to send notifications or Not allowed to send notifications.
5. Apple Safari (macOS)
Quick Method:
- Open Safari and navigate to Utter.
- Click Safari in the top menu bar and select Settings for This Website...
- Choose Allow or Deny next to Notifications.
Manual Settings Method:
- Open Safari menu in the top bar and select Settings... (or
Preferences...). - Go to the Websites tab at the top.
- Click Notifications from the left sidebar.
- Find Utter in the list on the right and set the dropdown option to Allow or Deny.
:::tip Operating System Alert Permissions If notifications are enabled in your browser but you still don't receive alerts, ensure that Windows Focus Assist / Notification Settings or macOS Notification Center allows notifications for your browser app. :::