Utter AI Chat - woocommerce
Overview
Utter Chat Plugin adds the Utter AI live chat widget to your WordPress website. Once configured, visitors see the chat bubble on the front end and can start conversations through the Utter platform.
The plugin is intentionally lightweight and performant:
- Stores two settings: the Widget Script Source URL and your Widget ID.
- Injects the Utter chat script into every public page header (
<head>). - Does not create additional database tables, cron jobs, or communication logs.
- Works seamlessly on any WordPress site with no other plugins required.
System Requirements
| Requirement | Details |
|---|---|
| WordPress | 5.8 or higher |
| PHP | 7.4 or higher |
| Utter Account | Active Utter AI account with a chat widget provisioned |
| Credentials from Utter | Script source URL and Widget ID (provided by Utter / MwanMobile) |
| HTTPS | Strongly recommended for secure front-end script loading |
| Admin Access | User with manage_options capability (typically Administrator) |
Installation
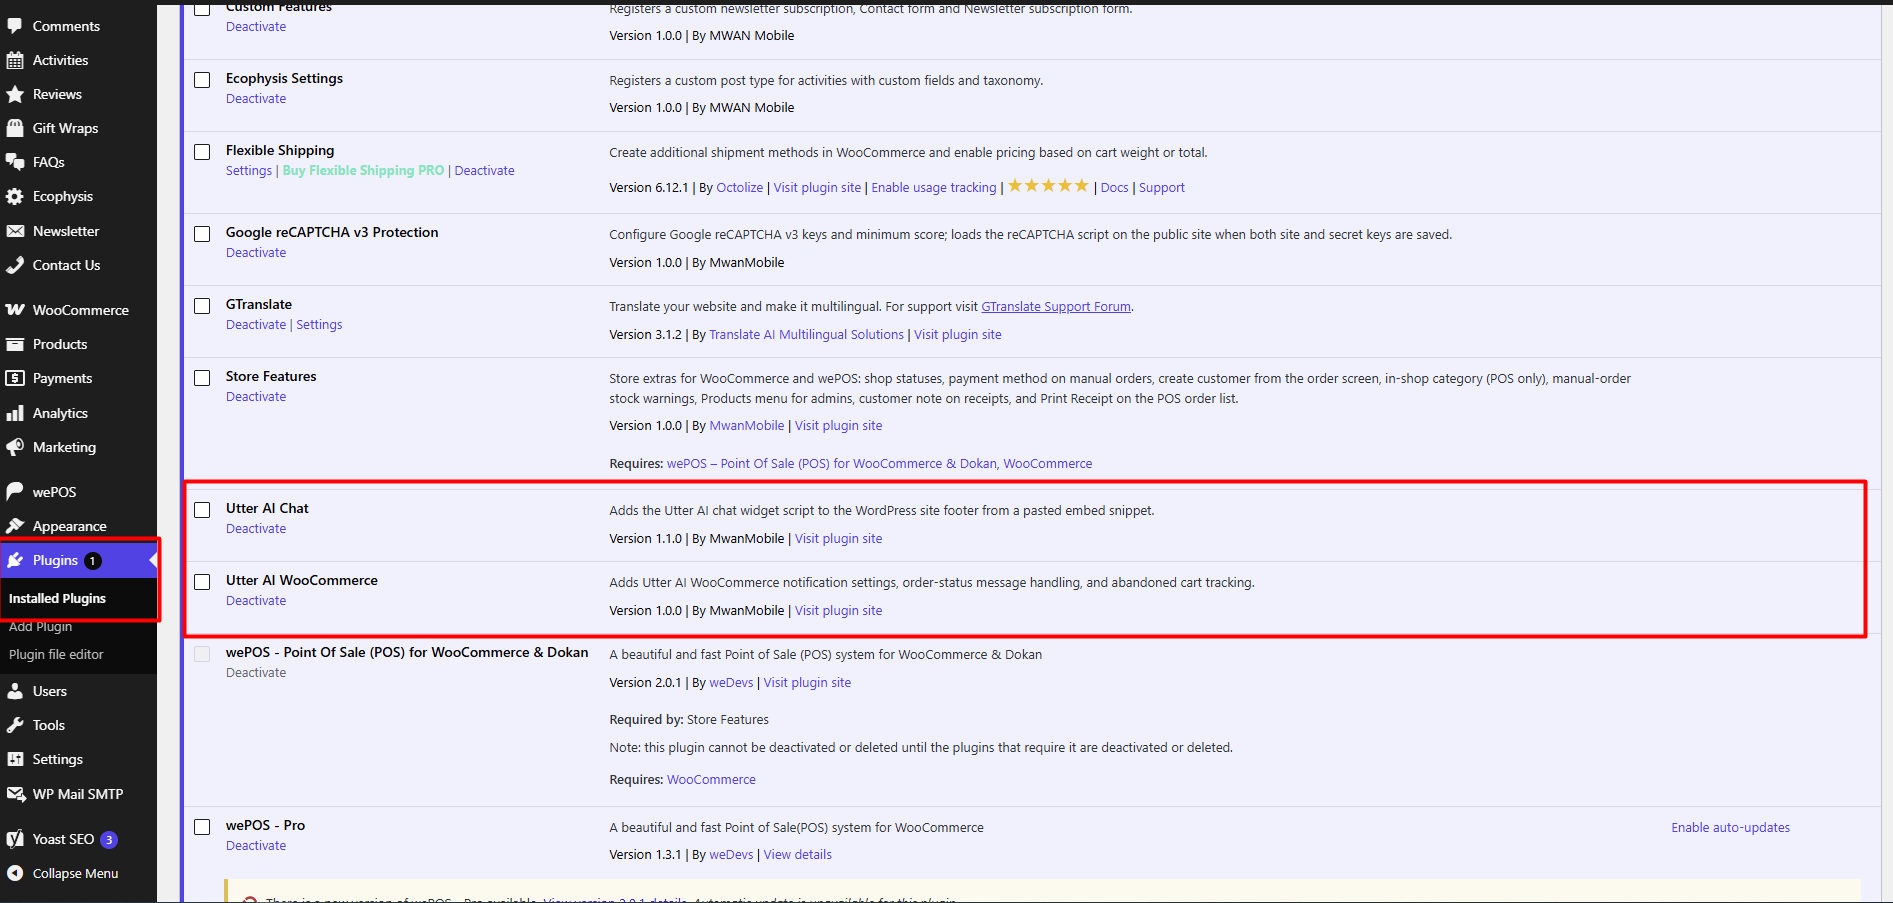
- Upload the
utter-ai-chatfolder to/wp-content/plugins/on your WordPress server (via FTP, SFTP, or your hosting File Manager). - Navigate to Plugins > Installed Plugins in your WordPress admin dashboard and click Activate under Utter AI Chat.
- Activation takes effect immediately. No database setup or permalink flush is required.
Utter AI & WooCommerce Integration Guide
This guide provides step-by-step instructions for integrating the Utter AI Portal with your WordPress/WooCommerce website. The setup process consists of two primary parts:
- Utter Portal Setup: Configuring the WhatsApp Chat Widget, API Keys, and Webhooks.
- WordPress / WooCommerce Setup: Configuring credentials within WordPress Admin and managing automated WooCommerce notifications.
Utter Portal Setup
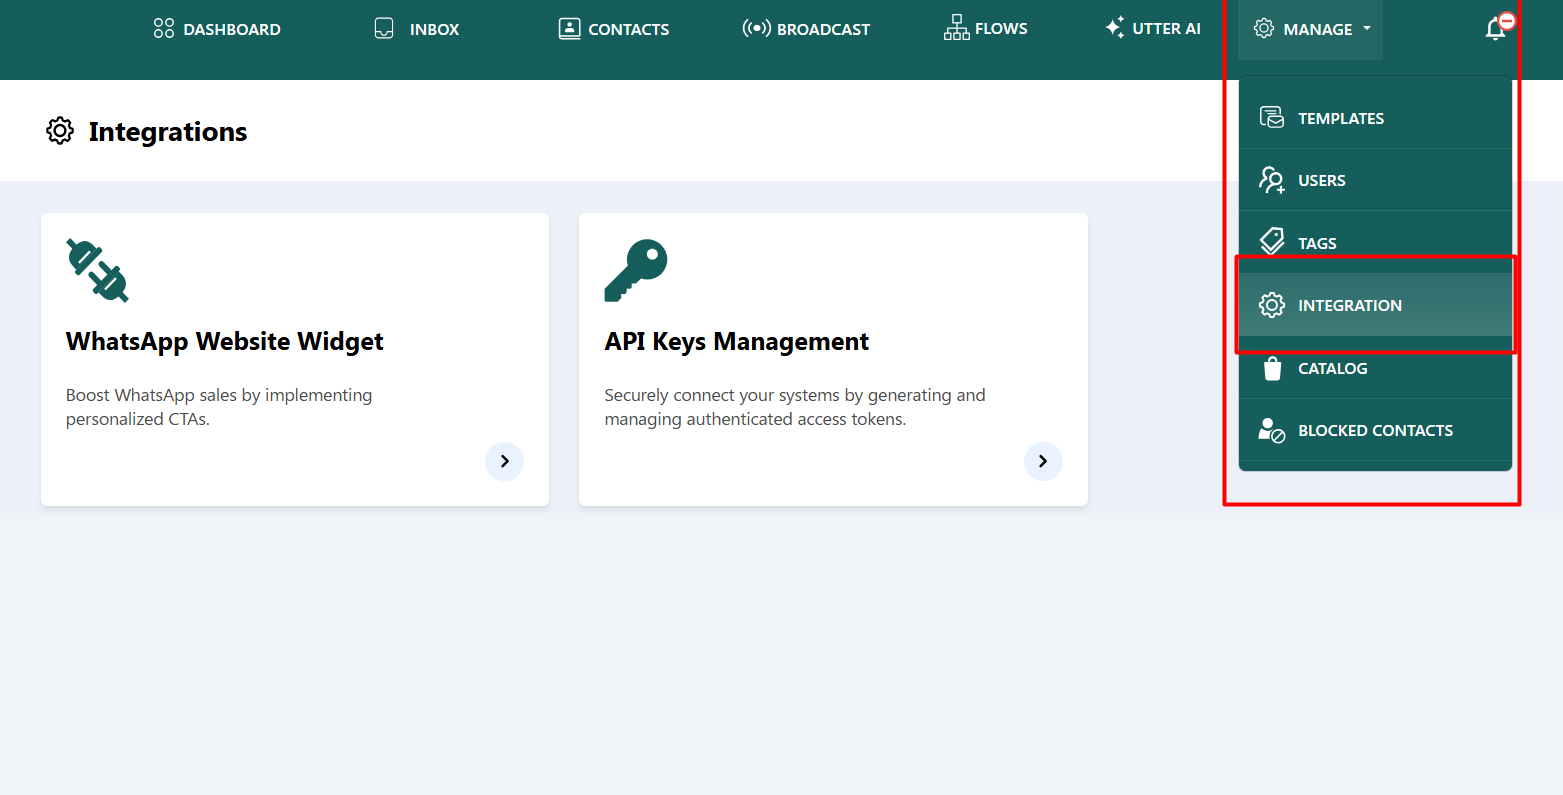
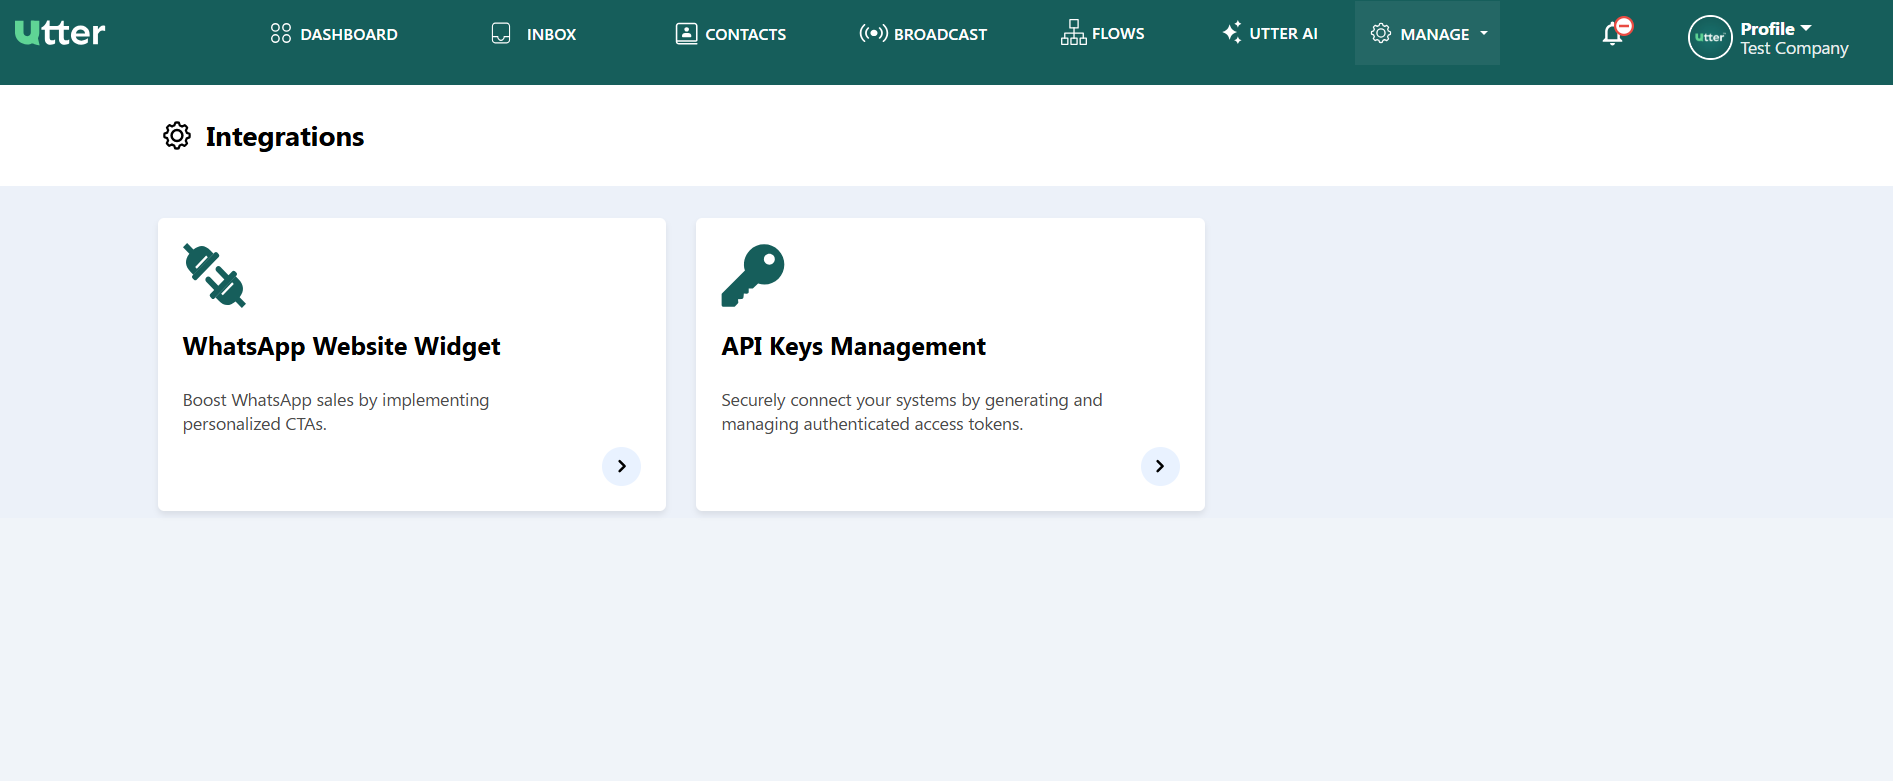
Log in to the Utter Portal, navigate to the top navigation bar, and select Manage > Integration. You will see two options:
- WhatsApp Website Widget
- API Keys Management
WhatsApp Website Widget
Click on the WhatsApp Website Widget card.
Widget Listing Table
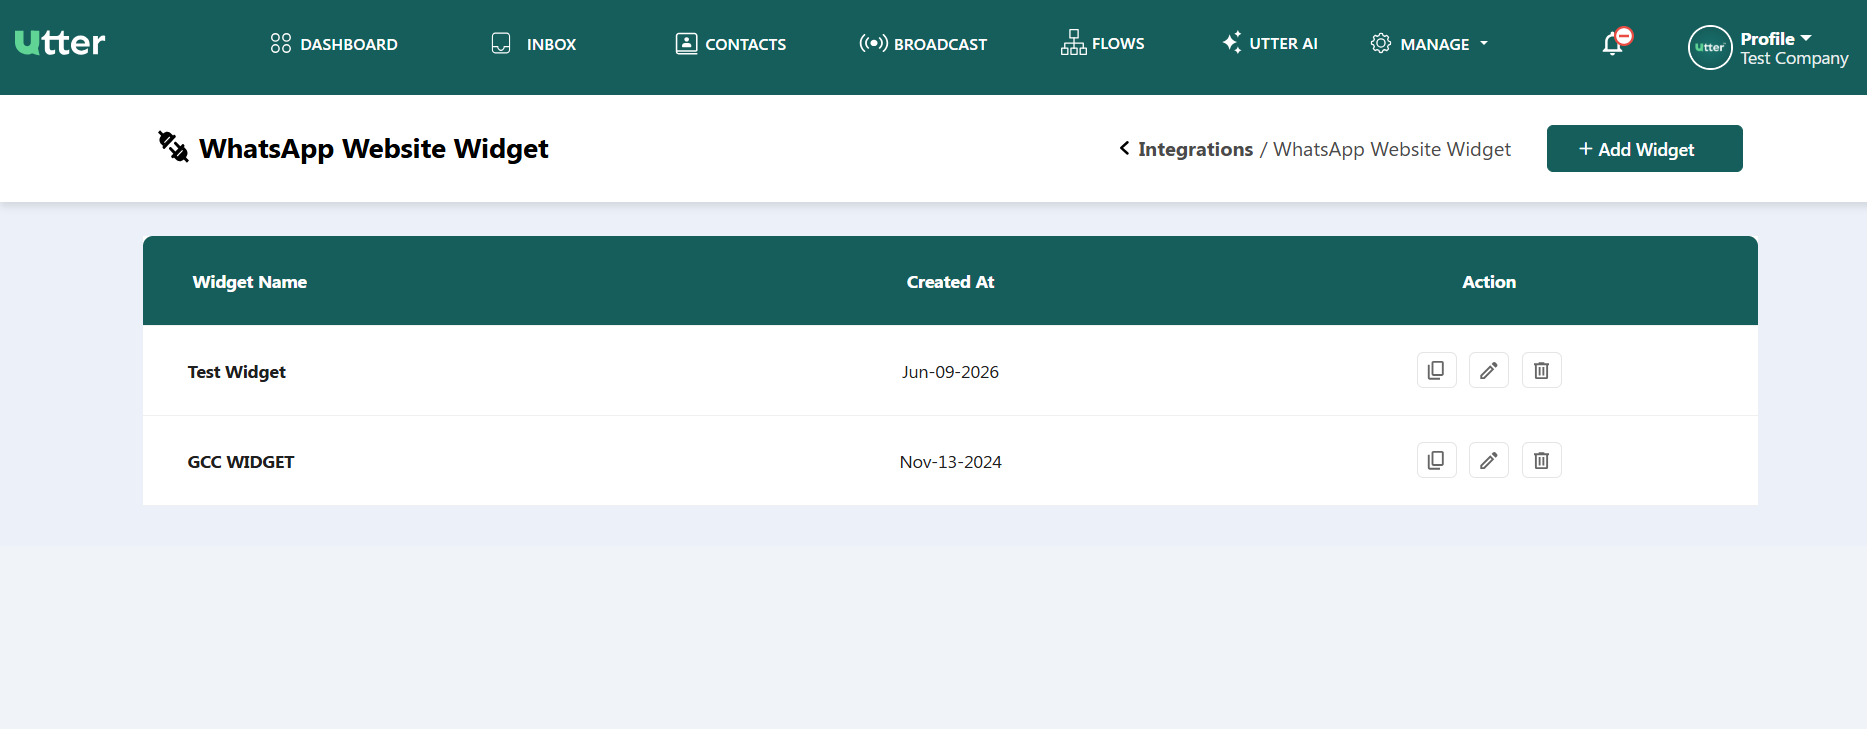
Upon opening the Widget page, a table displaying your existing widgets will appear:
- Widget Name & Created At: Displays the widget identifier and its creation date.
- Actions Column:
- Copy Button: Copies the JavaScript snippet code (to be pasted into WordPress later).
- Edit Button: Opens the widget editor to update configuration settings.
- Delete Button: Prompts a confirmation popup to safely delete the widget.
Add & Edit Widget
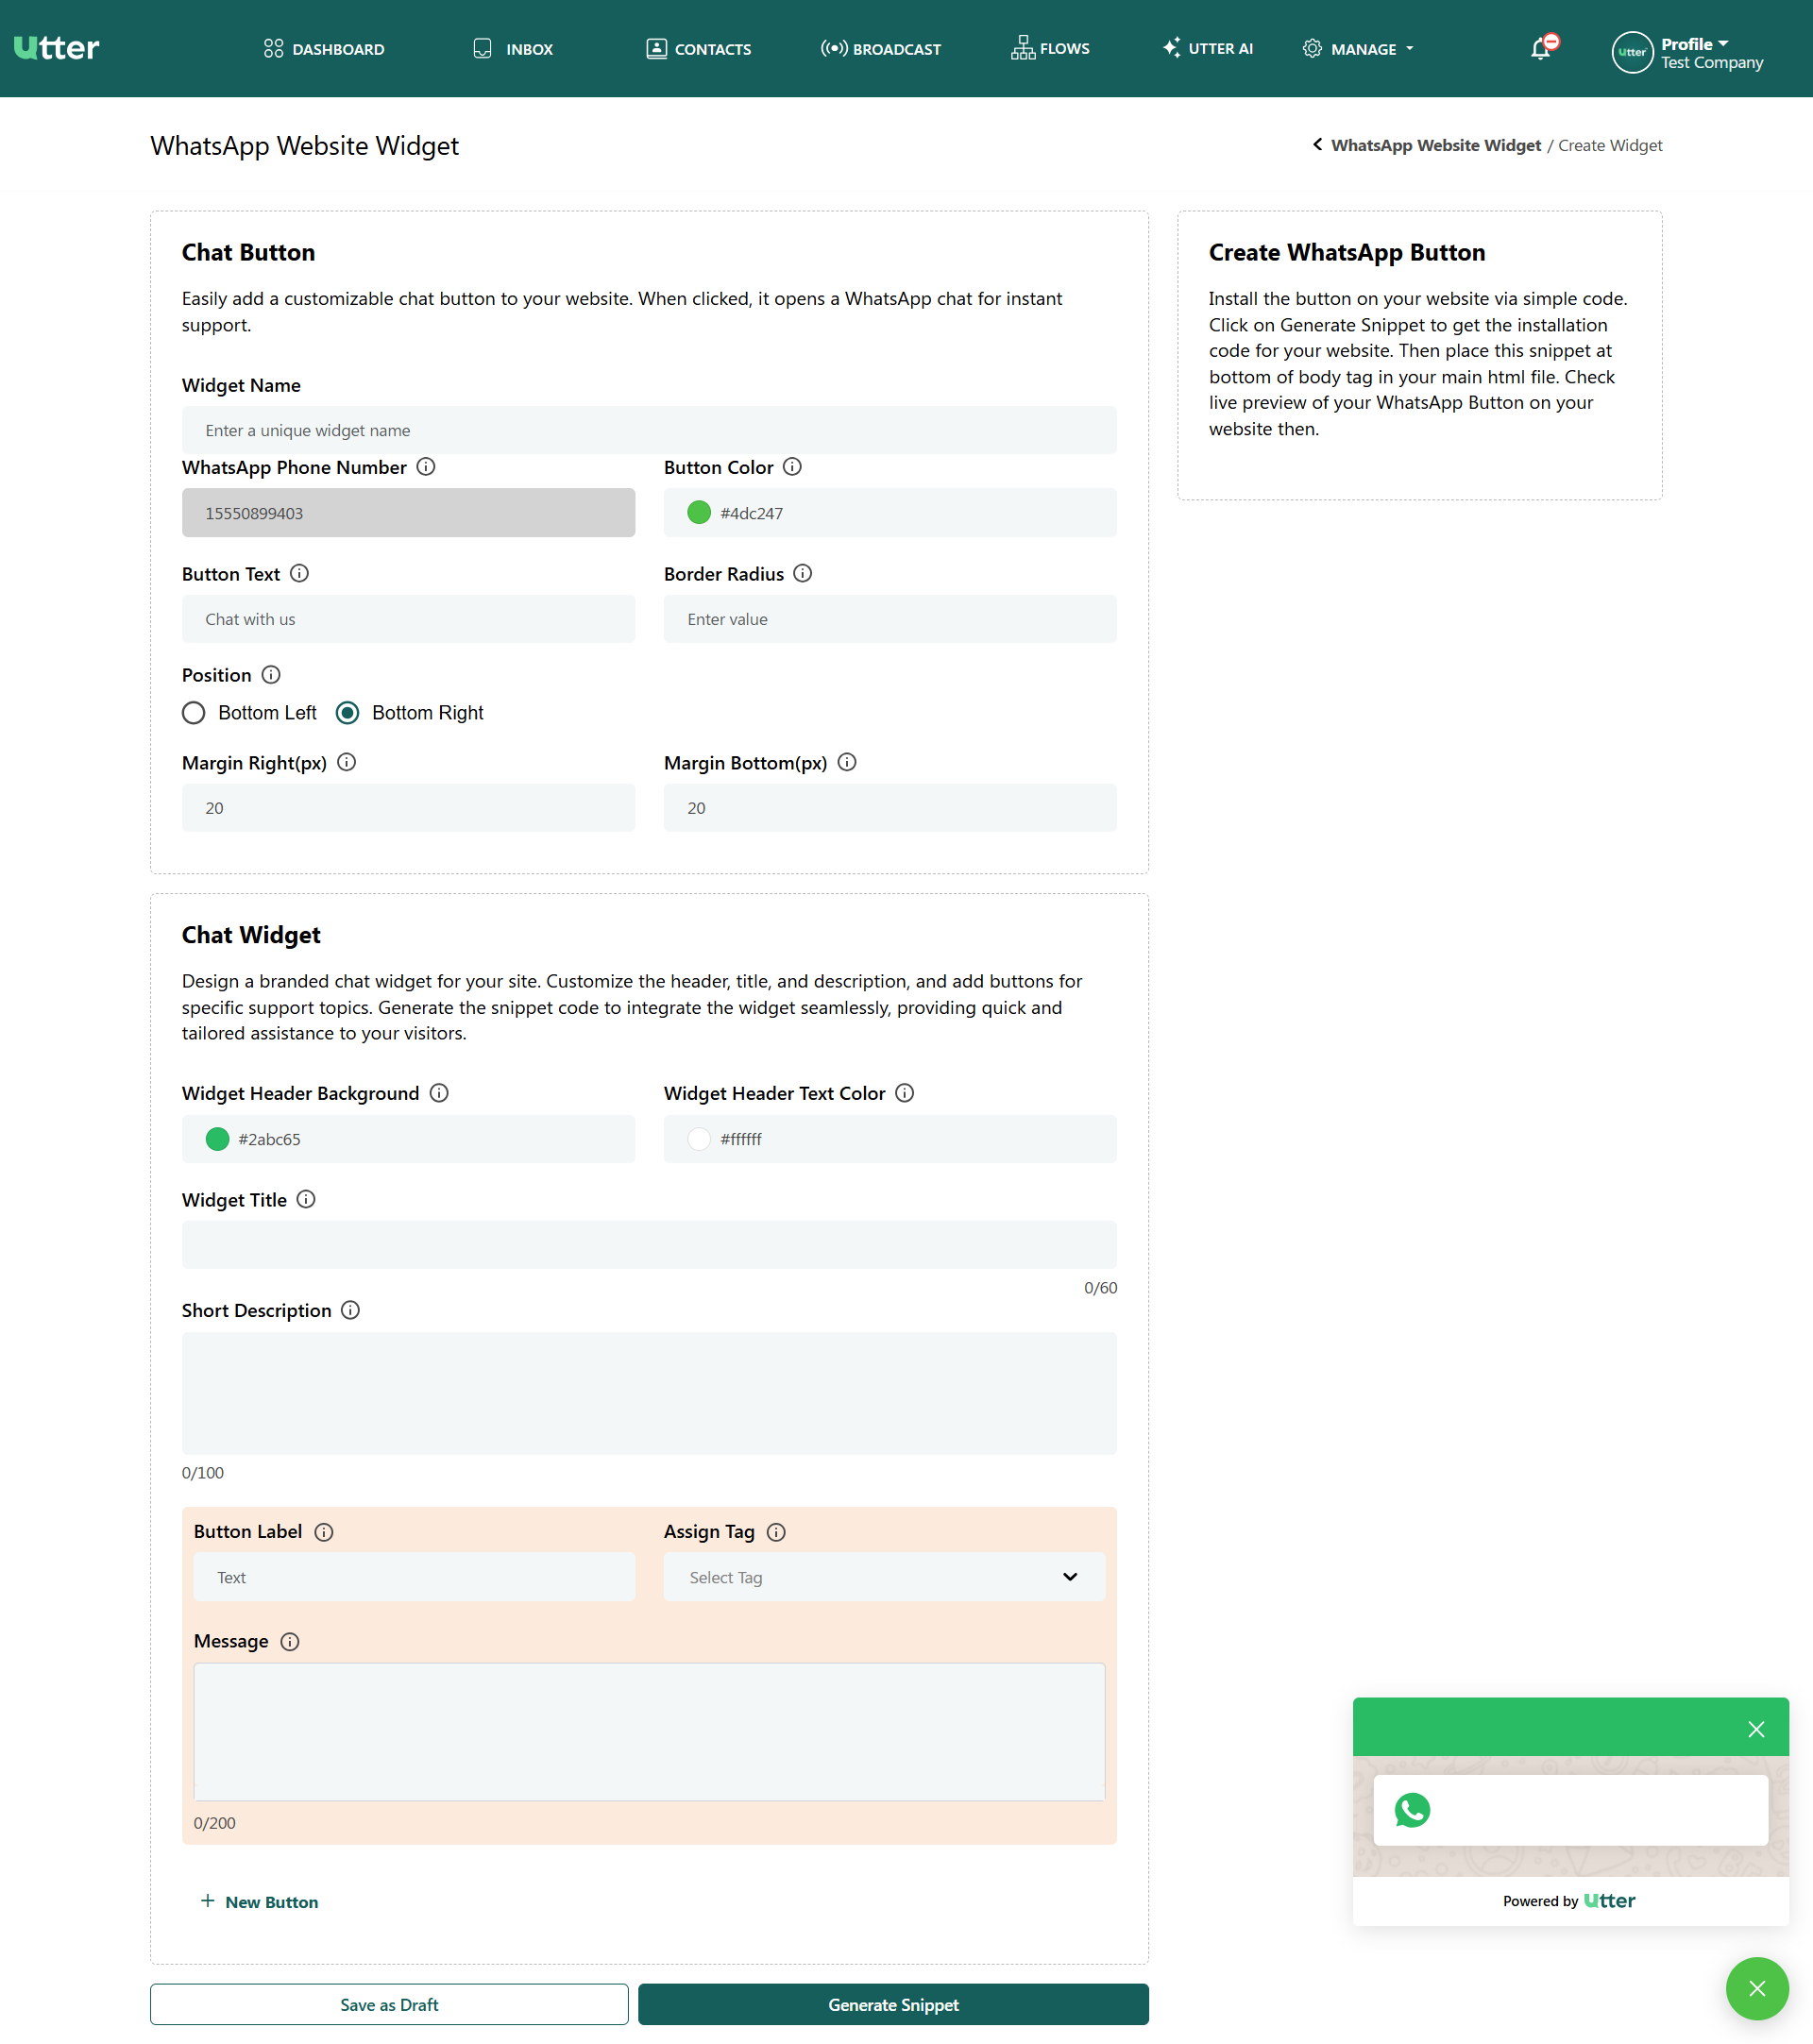
To create a new widget, click the + Add Widget button in the top-right corner. Clicking the edit button on an existing widget opens the same form populated with saved settings.
Configuration Fields:
- Chat Button Settings: Configure Widget Name, Phone Number, Button Color, Button Text, Position (Bottom Left/Right), and Margins.
- Chat Widget Customization: Set Header Background Color, Text Color, Title, Short Description, and add dynamic CTAs (Labels, Tags, Messages).
- Save / Generate Snippet: Once configured, click Generate Snippet to generate the code.
Copy Script Snippet
Click the Copy icon in the widget listing table to copy your script link:
Configuration
Open the Settings Page
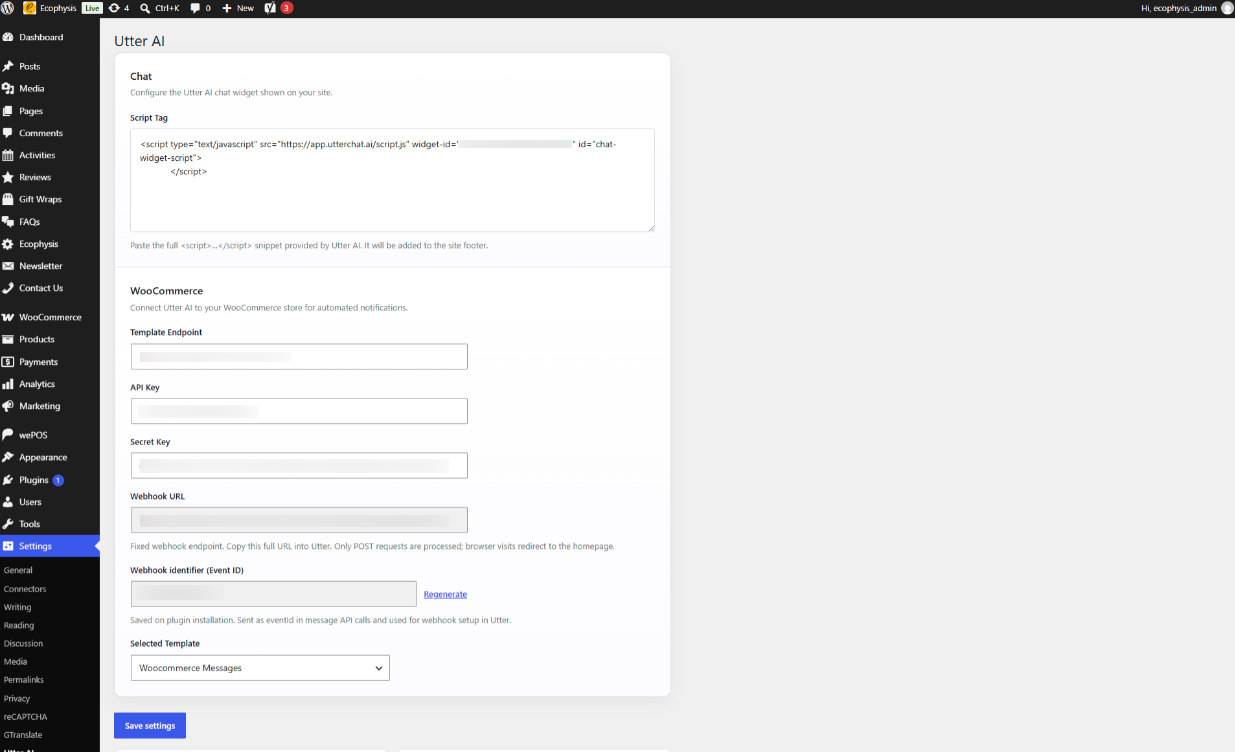
- Go to WP dashboard Settings > Utter AI in your WordPress admin menu.
- Source: Enter the full URL of the Utter chat widget JavaScript file (e.g.,
https://utter.mwancloud.com/script.js). - Widget ID: Enter the unique identifier assigned to your chat widget in Utter.
- Click Save Settings.
Settings Reference
| Field | Description | Example |
|---|---|---|
| Source | URL of the external script that loads the Utter chat widget. Must be a valid HTTP/HTTPS URL. | https://utter.mwancloud.com/script.js |
| Widget ID | Your widget identifier, passed to the script as the widget-id attribute. | abc123-widget-id |
:::warning Required Fields Both fields are required. If either Source or Widget ID is left empty, the plugin will not output any script on the front end, and the chat widget will not appear. :::
Verifying the Chat Widget
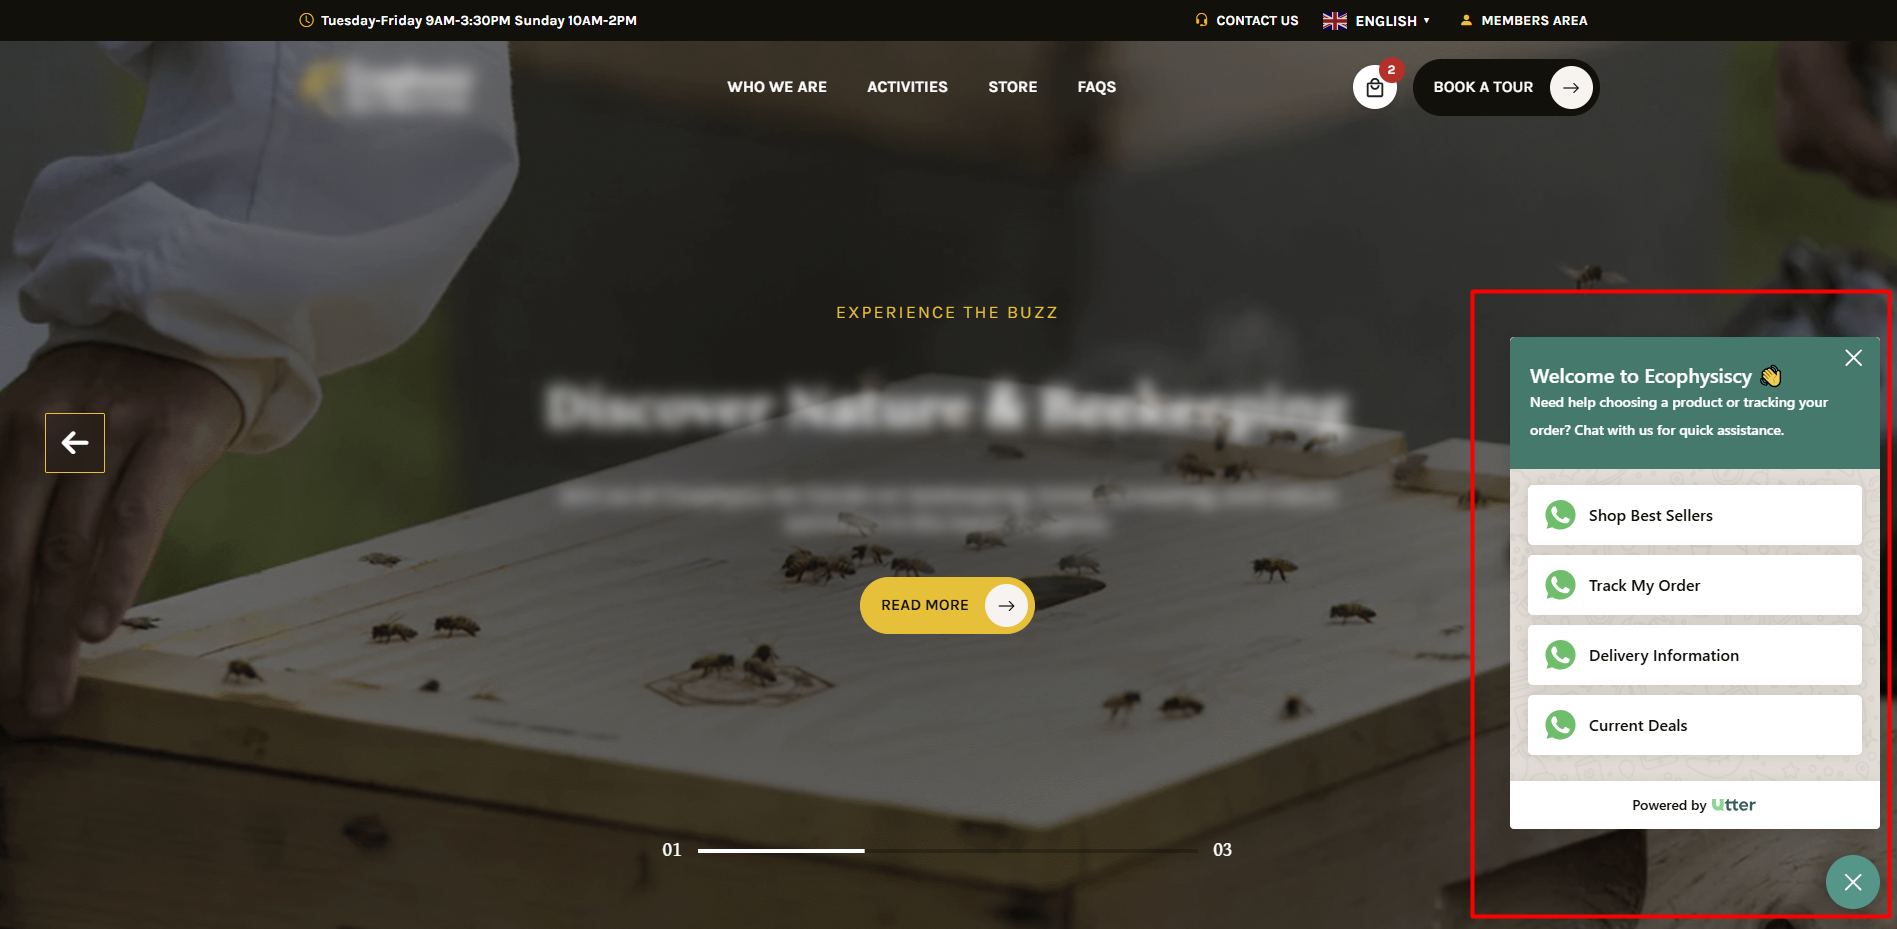
- Open your website homepage in a browser (use a private/incognito window for an accurate test).
- Confirm that the Utter chat bubble or launcher appears (typically at the bottom-right of the page).
- Open browser developer tools (
F12) and inspect the<head>section under Elements or Sources. Look for:- HTML comment:
<!-- Utter AI Chat --> - Script tag with
id="chat-widget-script"and yourwidget-id
- HTML comment:
- Click the chat widget and send a test message to verify connectivity with your Utter dashboard.
Troubleshooting
Chat Widget Does Not Appear
| Possible Cause | Resolution |
|---|---|
| Source or Widget ID is empty | Navigate to Settings > Utter AI, fill in both fields, and click Save. |
| Plugin not activated | Verify the plugin status under Plugins > Installed Plugins and click Activate. |
| Incorrect Script URL | Verify the Source URL with Utter / MwanMobile support. Ensure it loads without HTTP errors. |
| Wrong Widget ID | Confirm the Widget ID matches the exact identifier shown in your Utter account. |
Theme removes wp_head | Ensure your active theme calls wp_head() inside header.php before the closing </head> tag. |
| Script blocked by browser/extension | Test in a clean browser window or temporarily disable ad-blocker extensions. |
| Caching plugin serving stale HTML | Purge your WordPress page cache and server cache after saving settings. |
Settings Page Not Visible
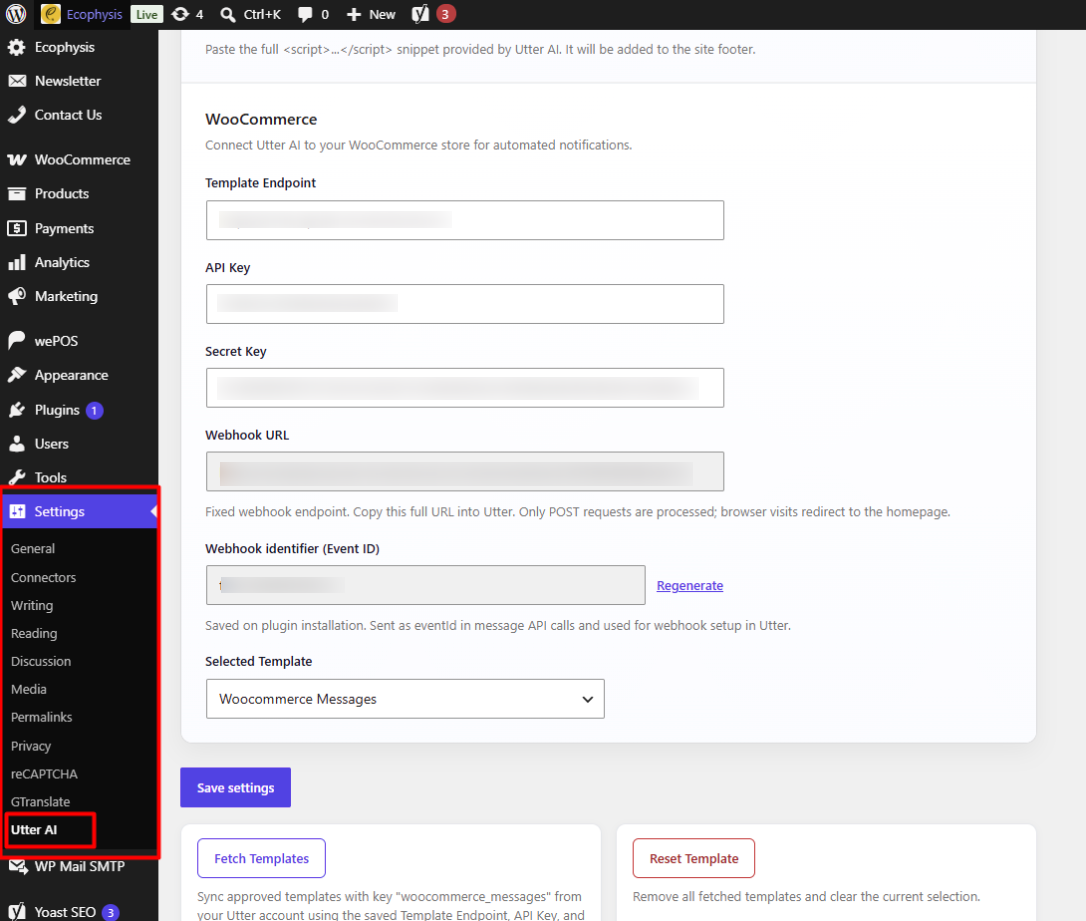
The settings page is located at Settings > Utter AI. If missing, ensure you are logged in as an Administrator (or a account with manage_options permissions).
Widget Visible to Admins but Missing for Visitors
The plugin injects the script on all public front-end pages via wp_head. If it appears while logged in but disappears for guests, a caching layer is serving cached guest HTML. Purge your site cache and re-test in Incognito.
Frequently Asked Questions (FAQ)
What does this plugin do?
It embeds the Utter AI live chat widget on your website, allowing visitors to launch the chat bubble and message your team directly via the Utter platform.
Can I show the widget on specific pages only?
Version 1.0.0 outputs the script across all front-end pages when both settings are populated. Page-specific display control requires a custom code snippet or a future plugin update.
Where are the settings stored?
Settings are stored in the standard WordPress options table under the key utter_ai_chat_settings as a serialized array containing source and widget keys.
Plugin Path: wp-content/plugins/utter-ai-chat/
API Keys Management
From the Integrations page, click on the API Keys Management card. This section allows you to manage authentication tokens and webhook configurations using two primary tabs: APIs and Webhooks.
APIs Tab
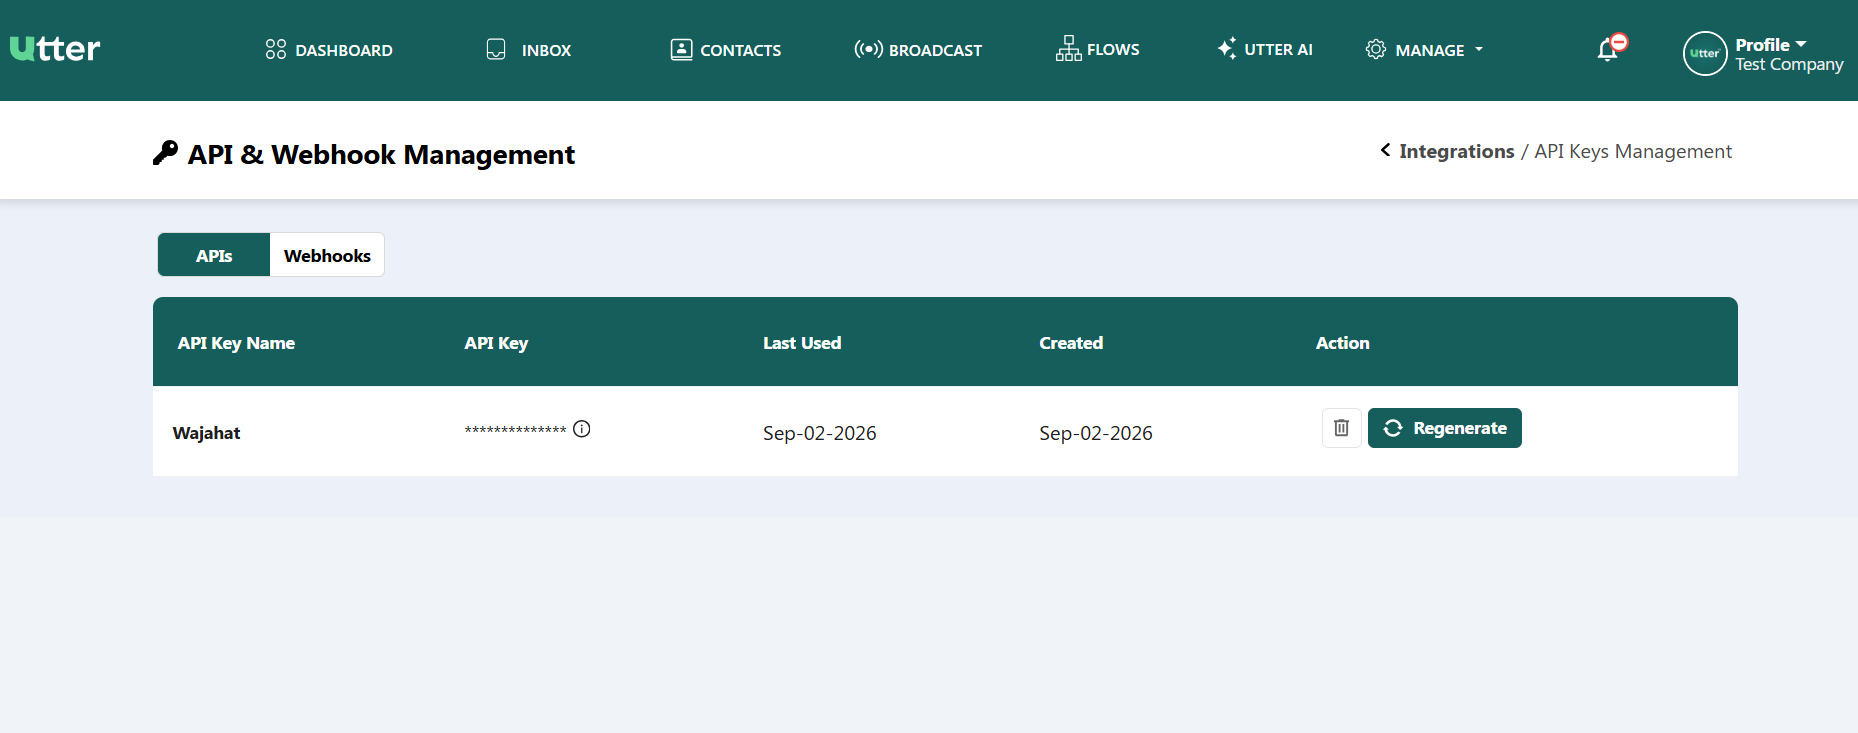
The APIs tab displays a management table containing all generated API keys used to securely connect external systems (like WooCommerce) with Utter AI.
- Table Columns:
- API Key Name: The label assigned to the key for easy identification (e.g., Wajahat).
- API Key: The masked access token for security (
**************). - Last Used: Displays the date when the API key was last active.
- Created: Displays the creation date of the key.
- Actions Available:
- Delete (Trash Icon): Permanently revokes and removes the API key.
- Regenerate Button: If you forget or lose your API key, or need to refresh security credentials, click Regenerate. This instantly revokes the old key and produces a new API Key without requiring you to re-create the entire entry.
Webhooks Tab
The Webhooks tab handles real-time event notifications between Utter AI and your WordPress store.
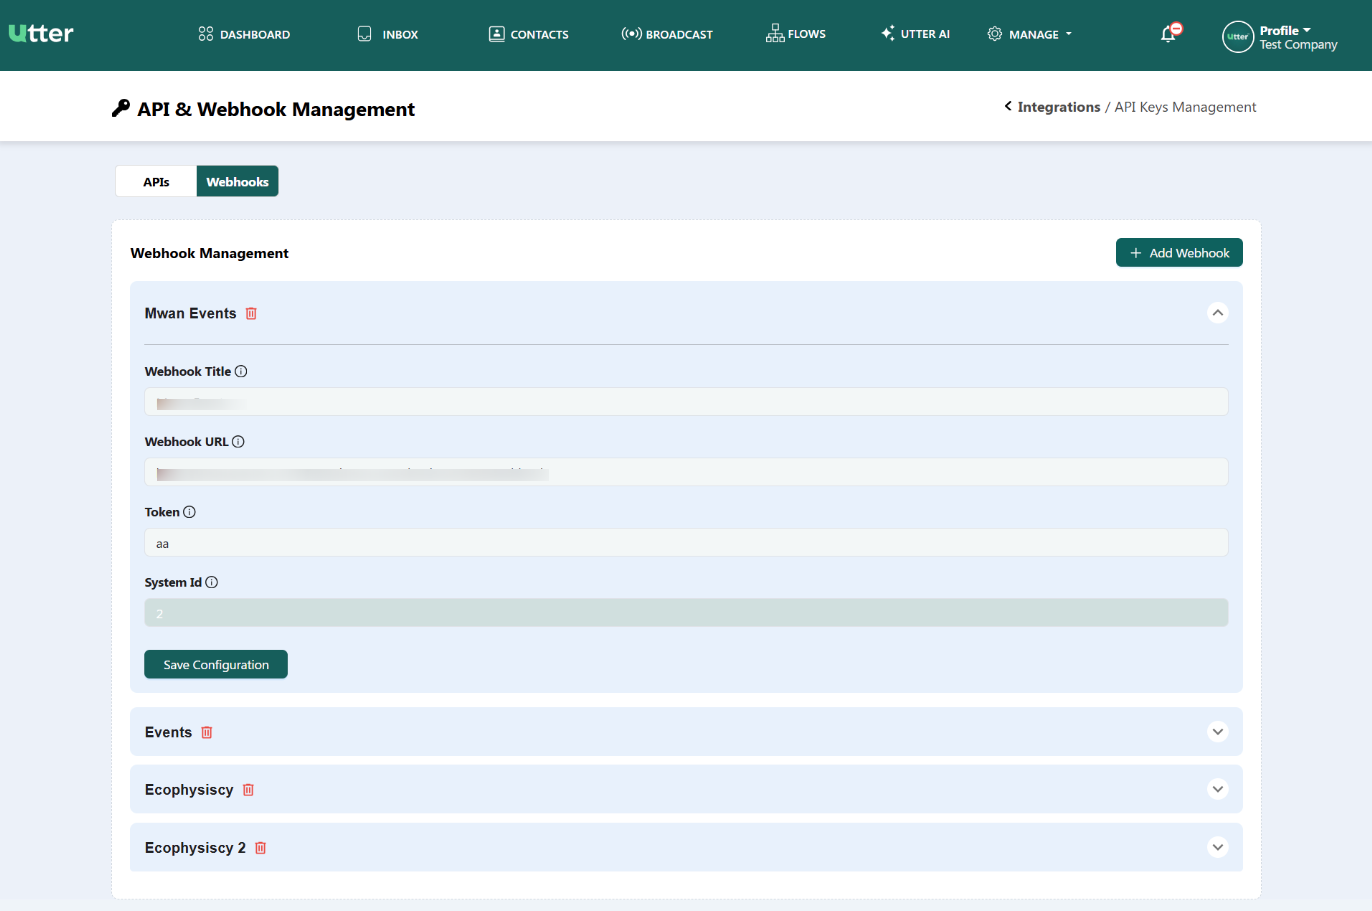
- Webhook Listing: Displays all existing webhooks in an accordion-style collapsible list.
- Viewing Webhook Details: Click on any webhook row in the list to expand it and reveal its configuration parameters:
- Webhook Title: The assigned title (e.g., Ecophysiscy).
- Webhook URL: The active target endpoint URL generated for receiving event payloads.
- Token: The unique security token assigned to authorize requests.
- System ID: The unique system identifier linked to the integration instance.
- Save Configuration: Modify any existing fields and click Save Configuration to apply updates.
Adding a New Webhook
To register a new webhook endpoint:
- Click the + Add Webhook button located at the top-right of the Webhook Management screen.
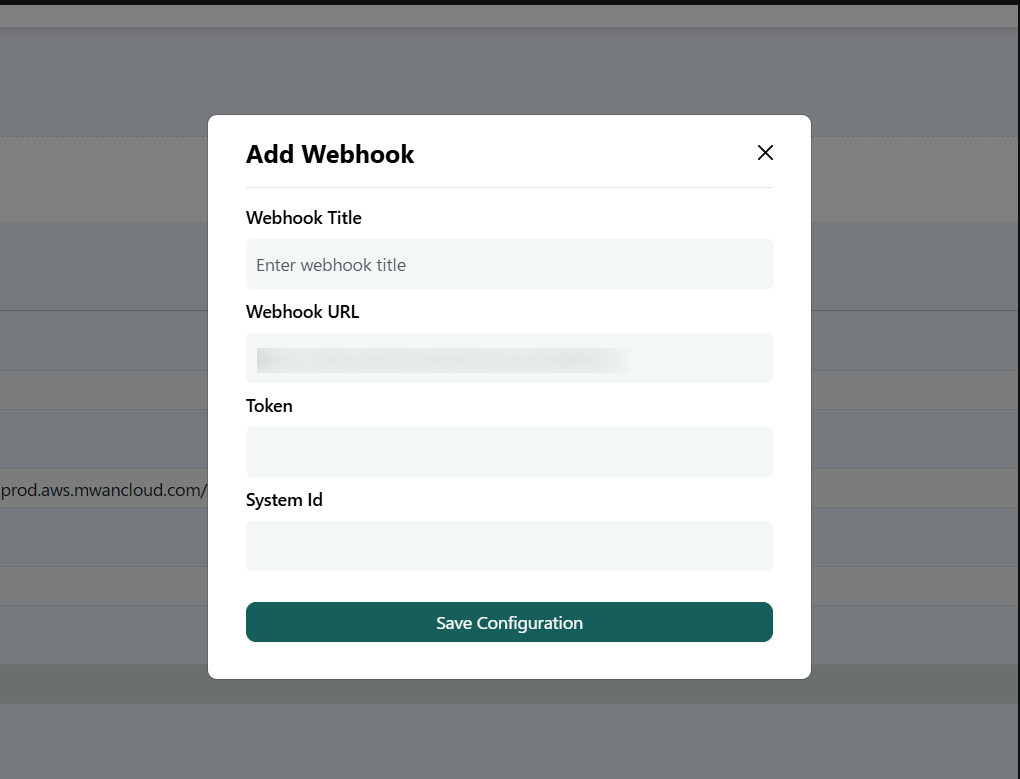
- An Add Webhook modal overlay will appear with the following fields:
- Webhook Title: Enter a descriptive name for your webhook endpoint.
- Webhook URL: Input the target destination URL where event payloads should be delivered.
- Token: Input your integration authentication token.
- System Id: Input your assigned system identifier.
- Click Save Configuration to finalize and save the webhook.
Configure API Key on WordPress
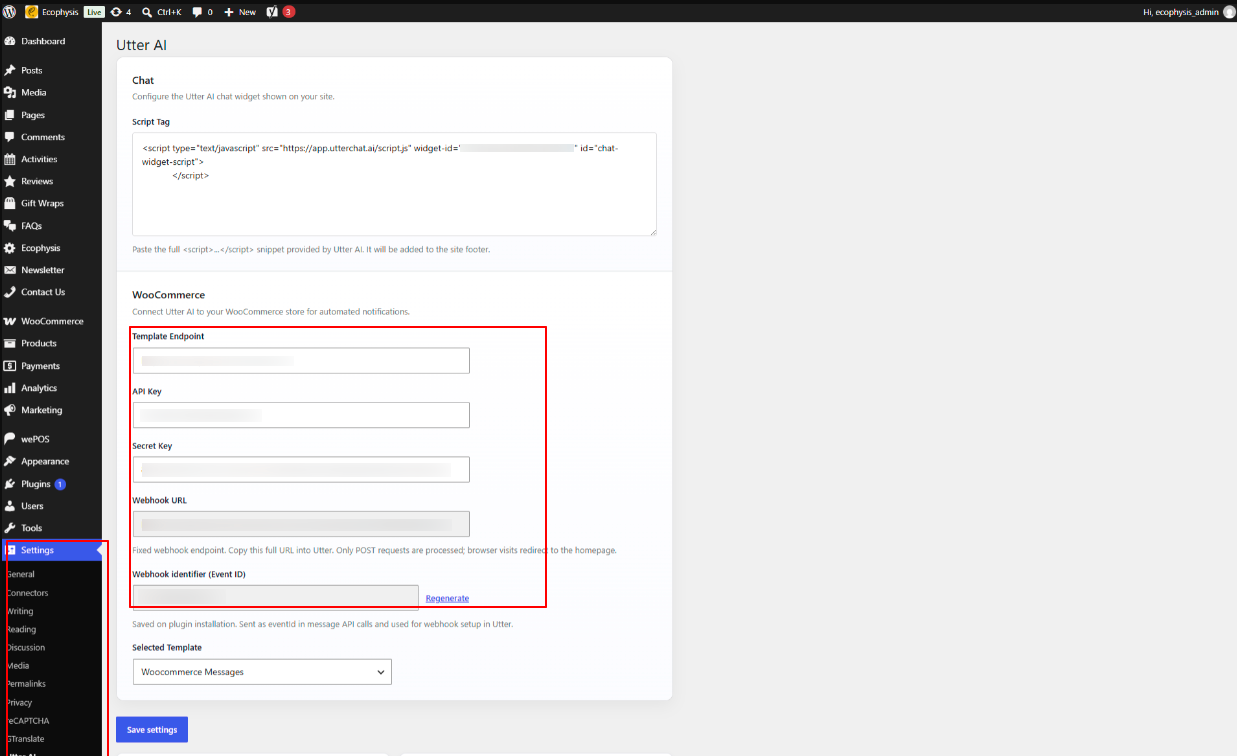
After creating you API Keys on utter App you need to go to you WordPress dashboard with admin login and above created API keys and other information in Utter AI plugin settings.
Go to Setting > Utter AI on you WordPress dashboard Add all your above created information into the specific input
- Template Endpoint
- API Key
- Secret Key
- Webhook URL
- Webhook Identifier (Event ID)
Template Management Guide
This guide covers the WhatsApp Message Template Management module within the Utter Portal. Templates allow you to send structured, pre-approved messages (such as WooCommerce order updates, utility alerts, and marketing messages) to your customers.
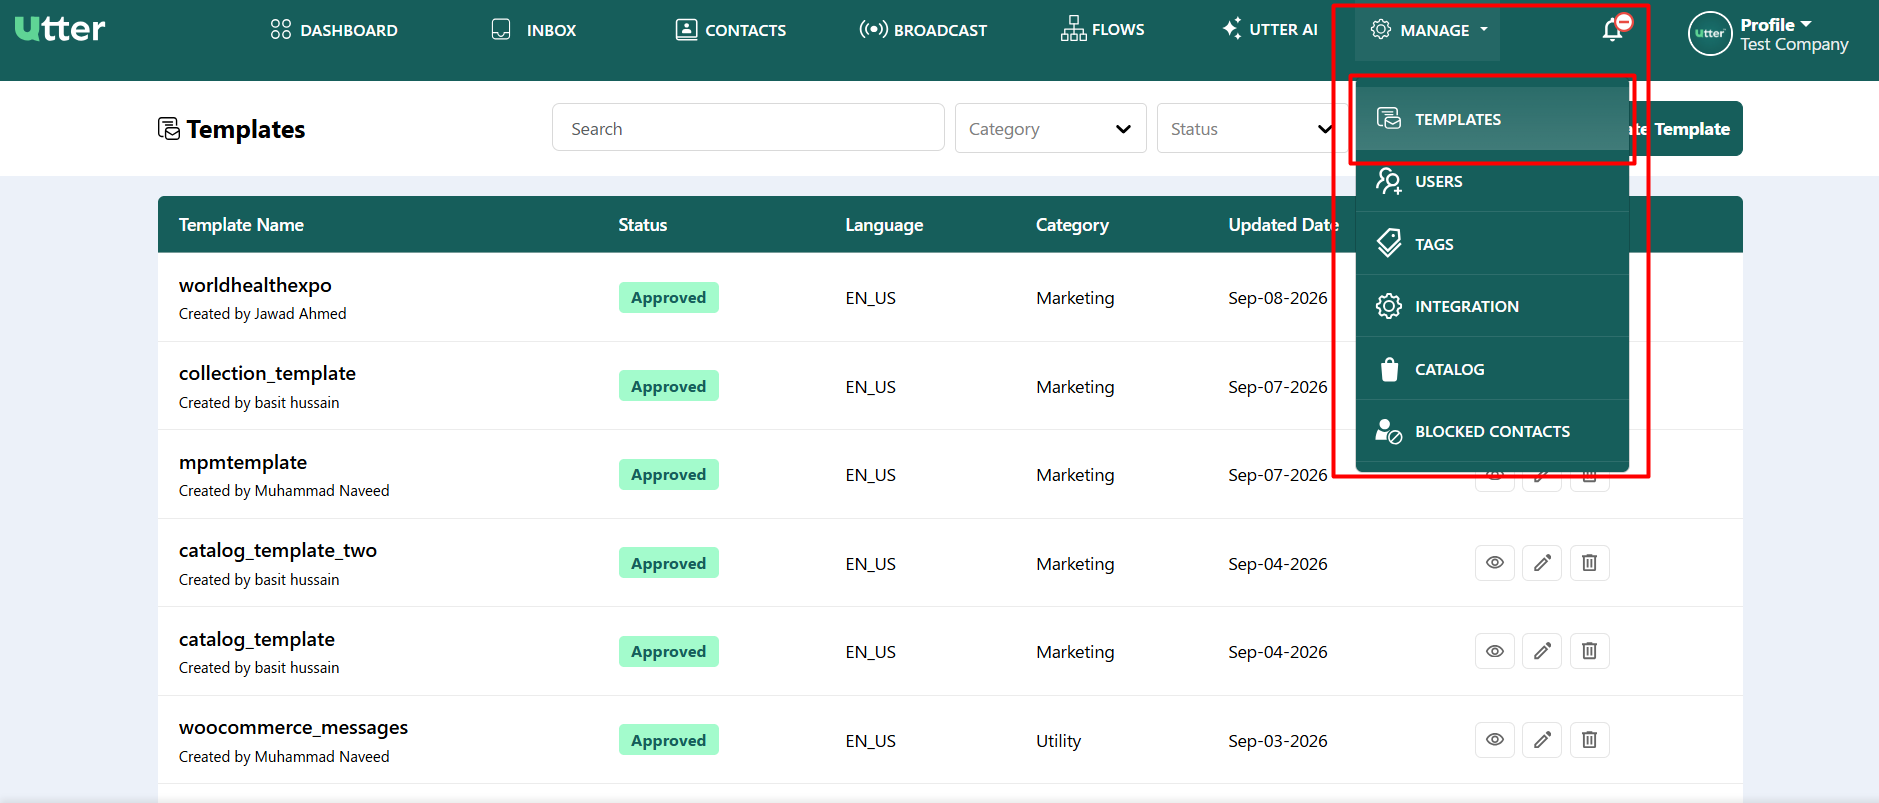
To access Template Management, log in to the Utter Portal, navigate to the top header menu, select Manage, and click Templates from the dropdown menu.
Templates Listing Overview
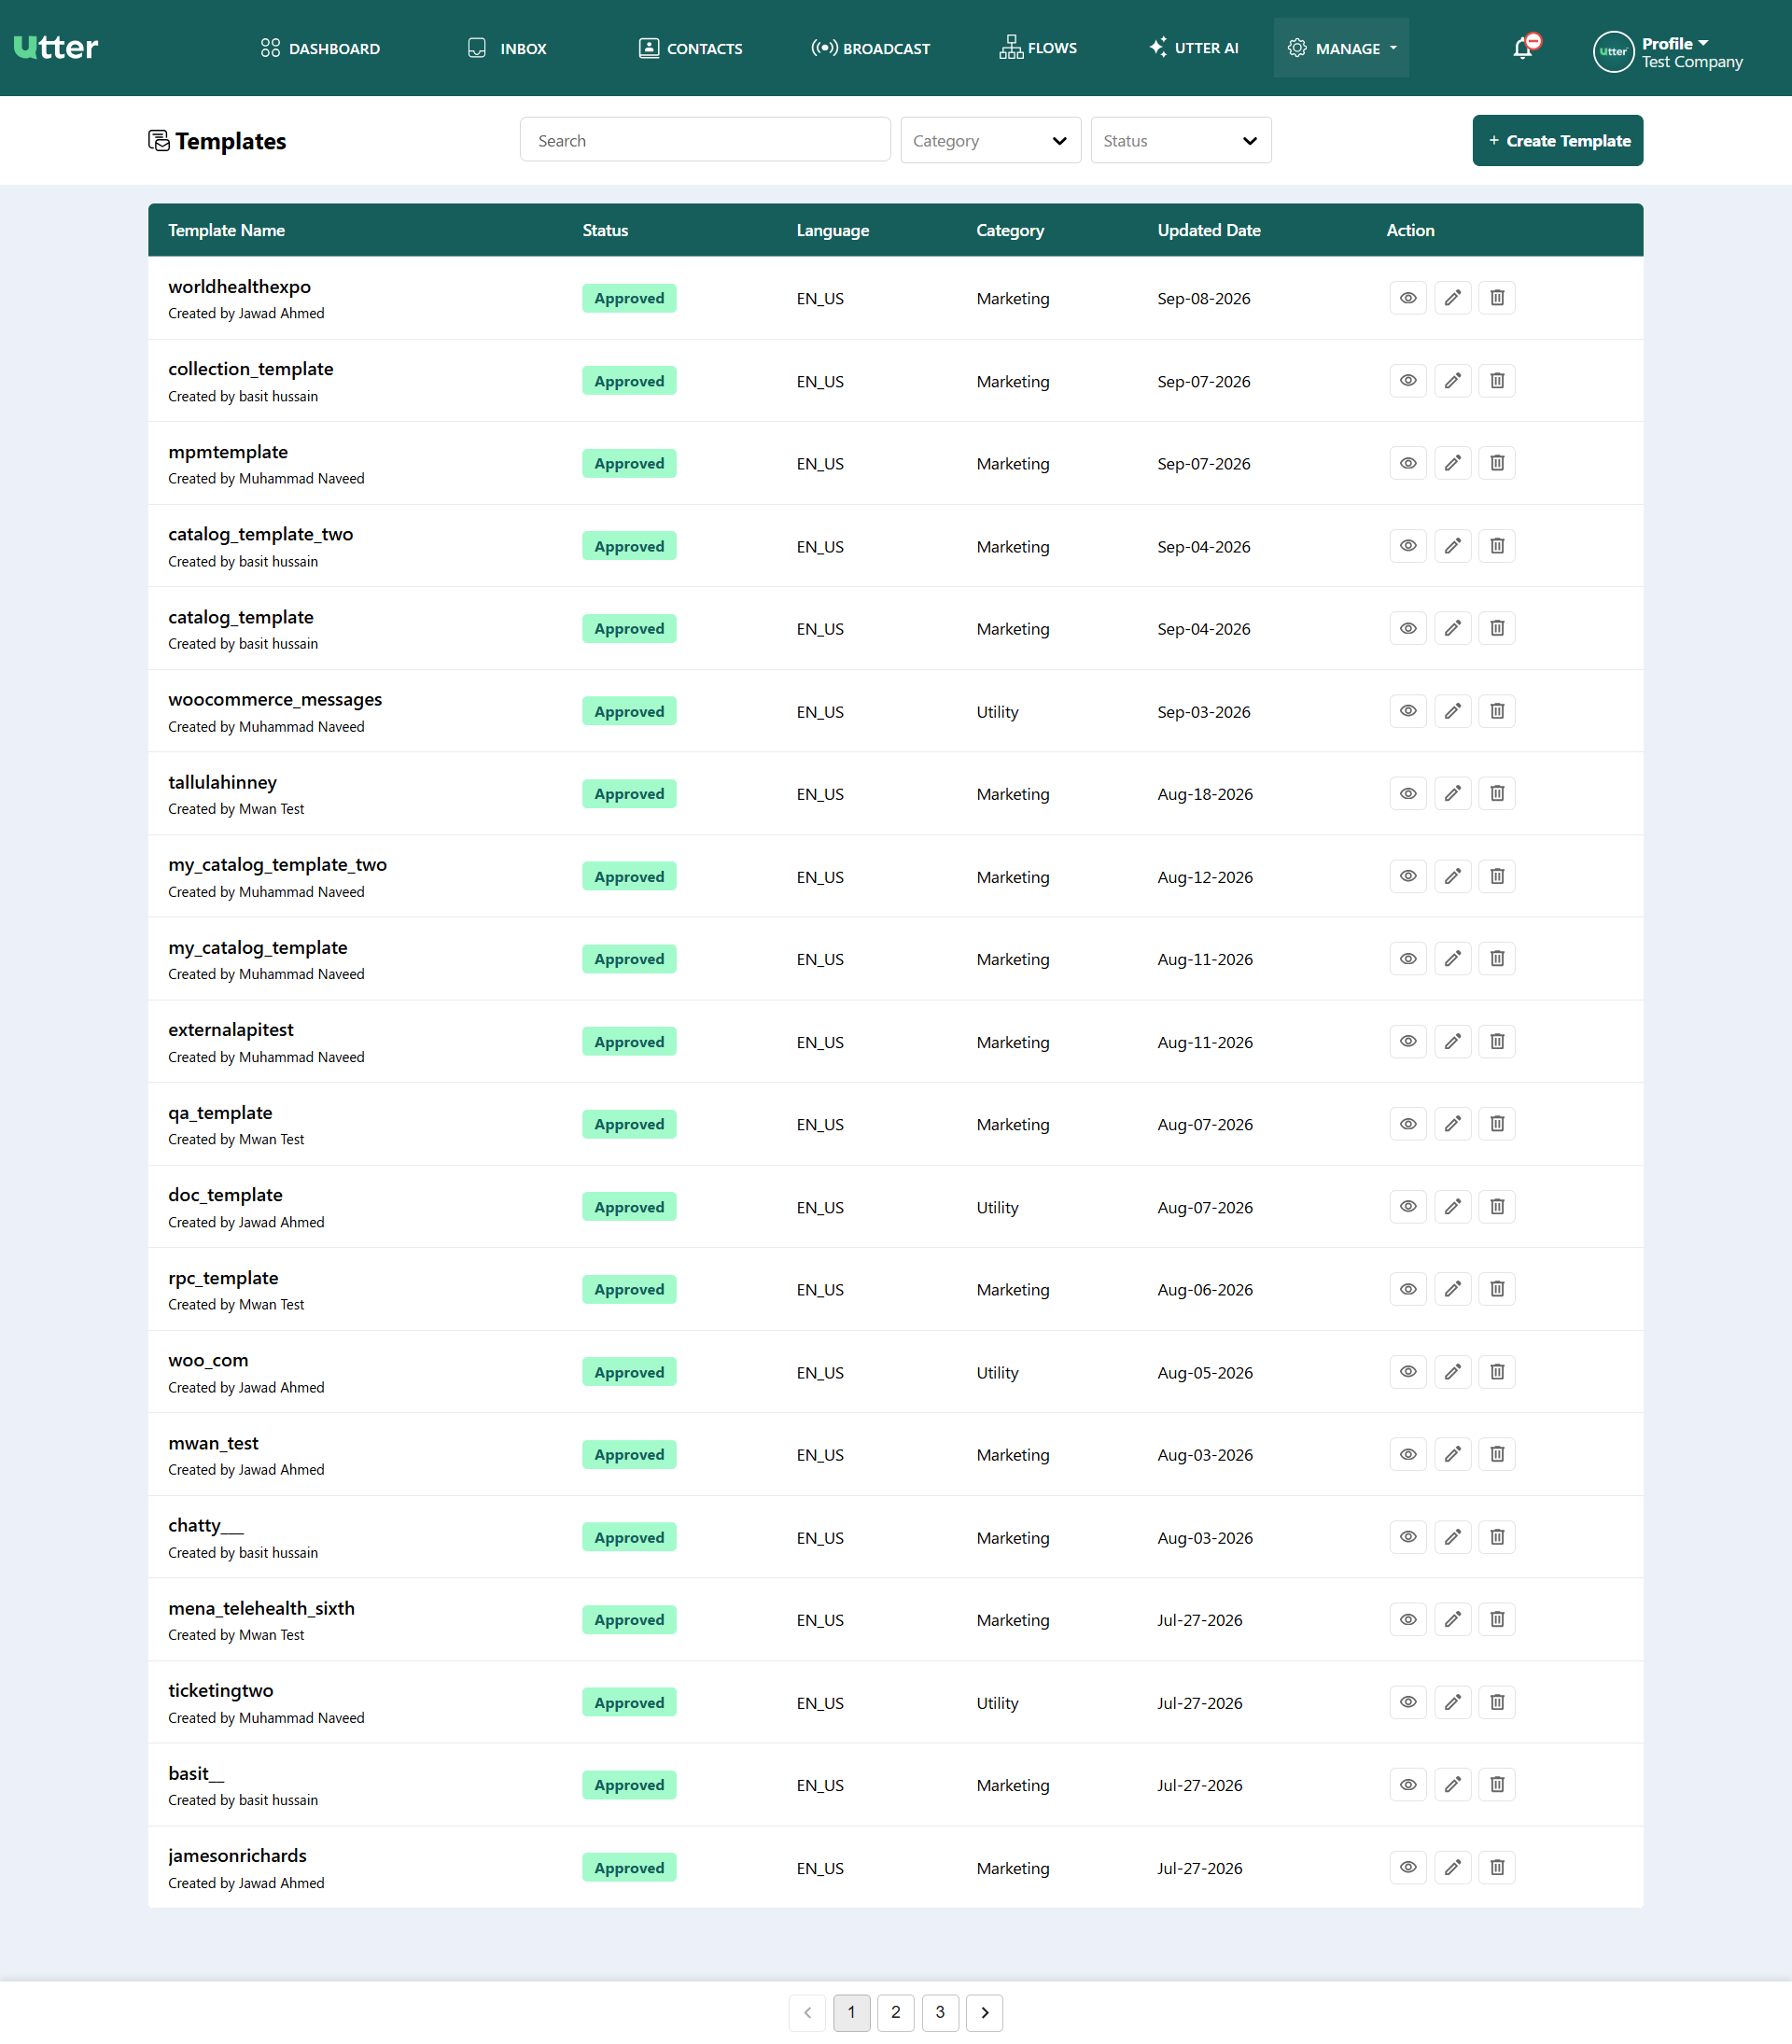
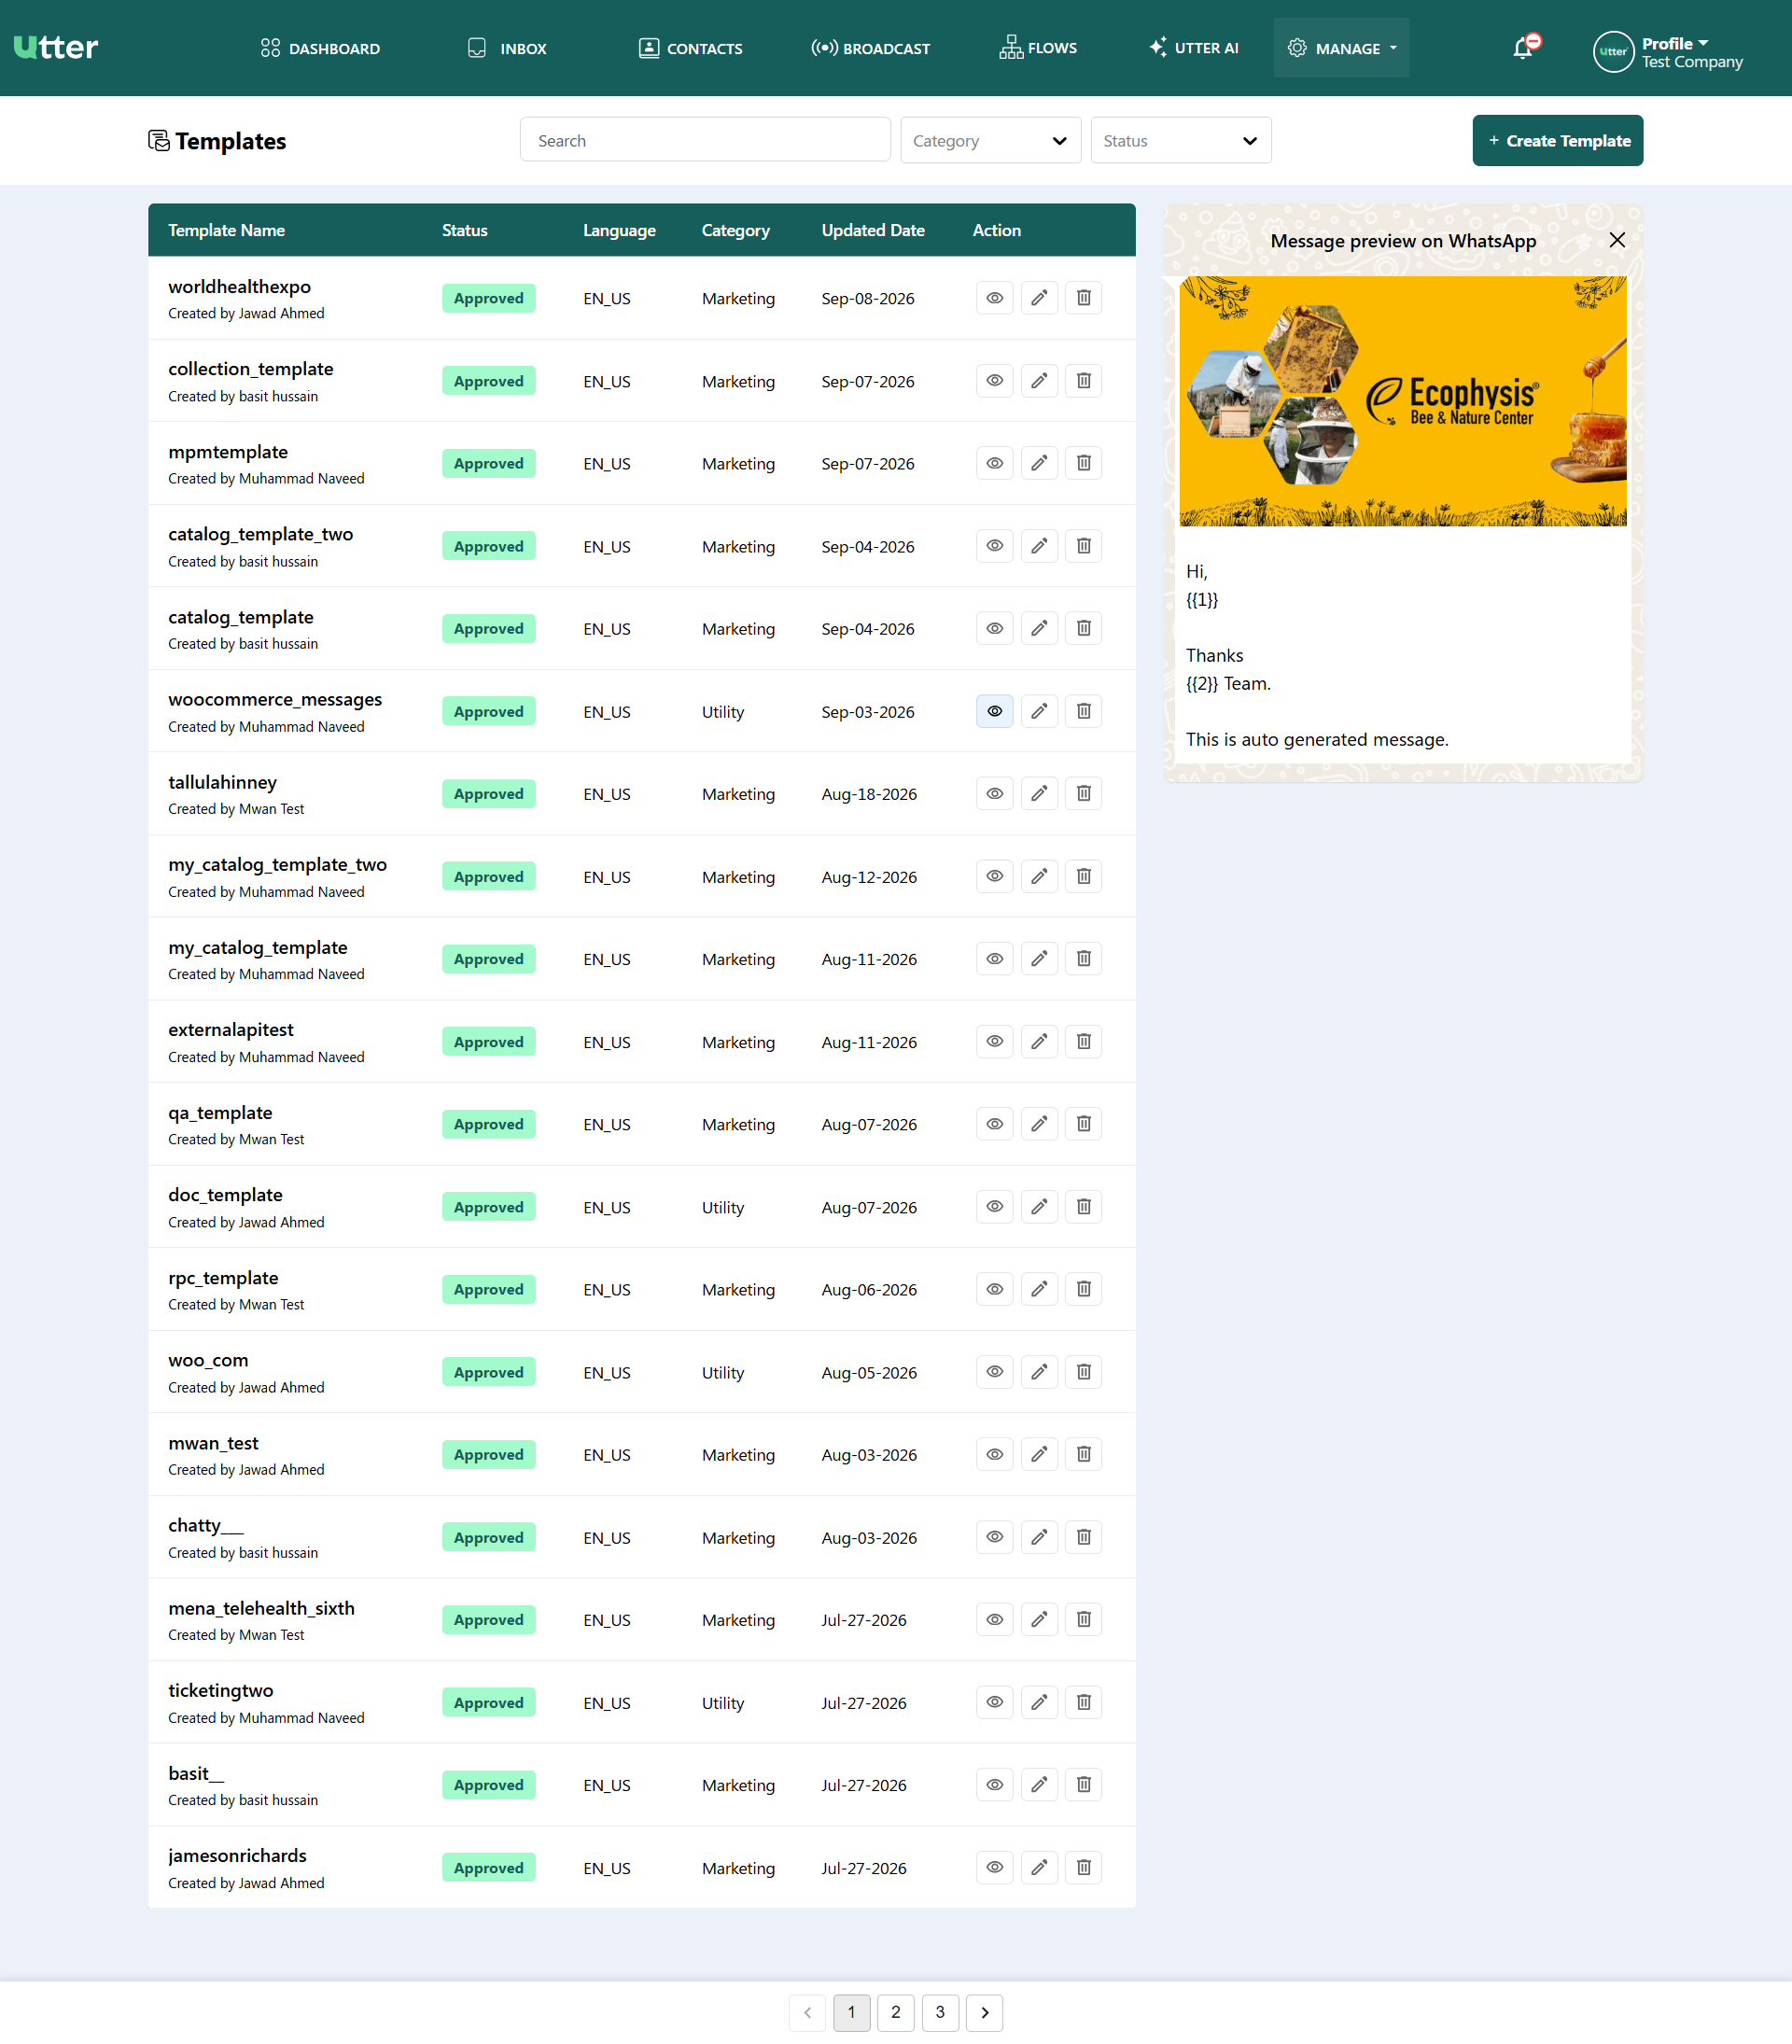
Upon navigating to the Templates page, a comprehensive list of all existing message templates is displayed in a structured table.
Filter & Search Options
- Search Bar: Quickly locate specific templates by typing their name.
- Category Dropdown: Filter templates by type (Utility, Marketing, or Authentication).
- Status Dropdown: Filter templates by approval state (Approved, Pending, or Rejected).
Table Columns
- Template Name: The unique identifier of the template alongside creator details.
- Status: Current WhatsApp Meta approval status (e.g., Approved).
- Language: The designated language code (e.g., EN_US).
- Category: Classification of the template (Marketing, Utility, Authentication).
- Updated Date: The timestamp of the last modification.
- Action:
- View (Eye Icon): Displays an instant live preview panel of the WhatsApp message.
- Edit (Pencil Icon): Opens the template editor screen to update fields.
- Delete (Trash Icon): Prompts a confirmation popup to delete the template.
Creating a New Template
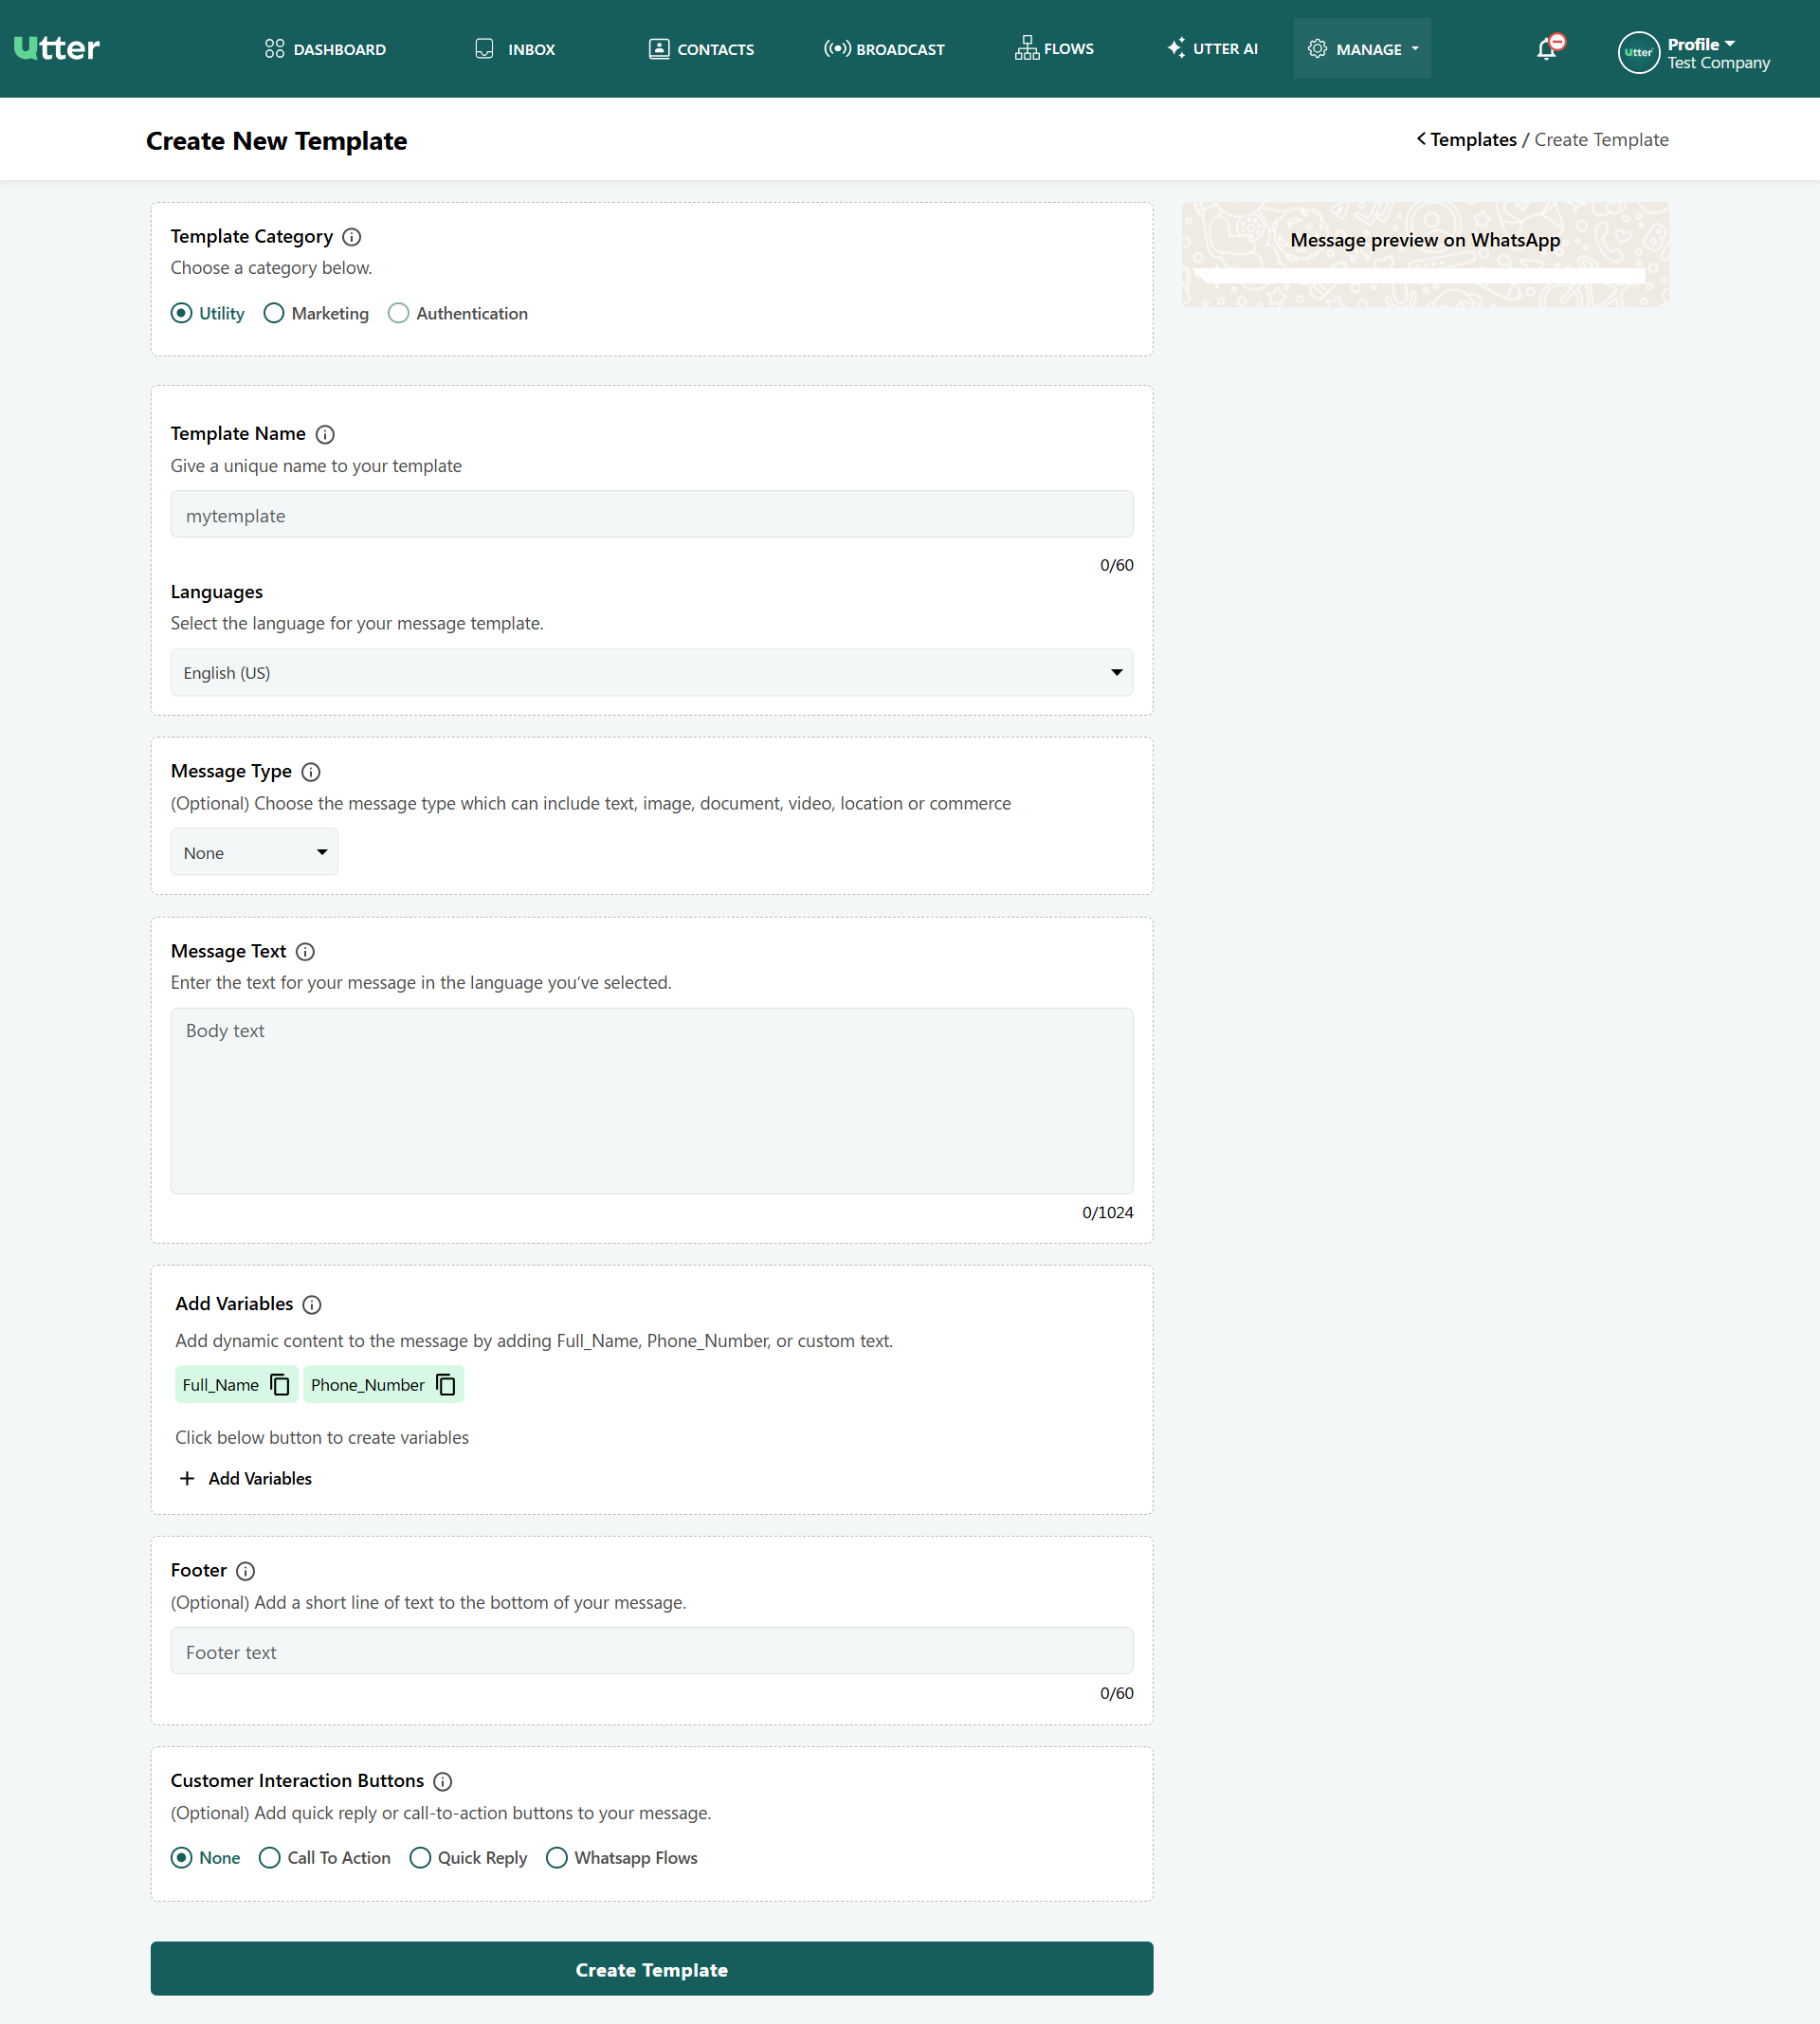
Click the + Create Template button at the top-right corner of the Templates screen to open the creation builder.
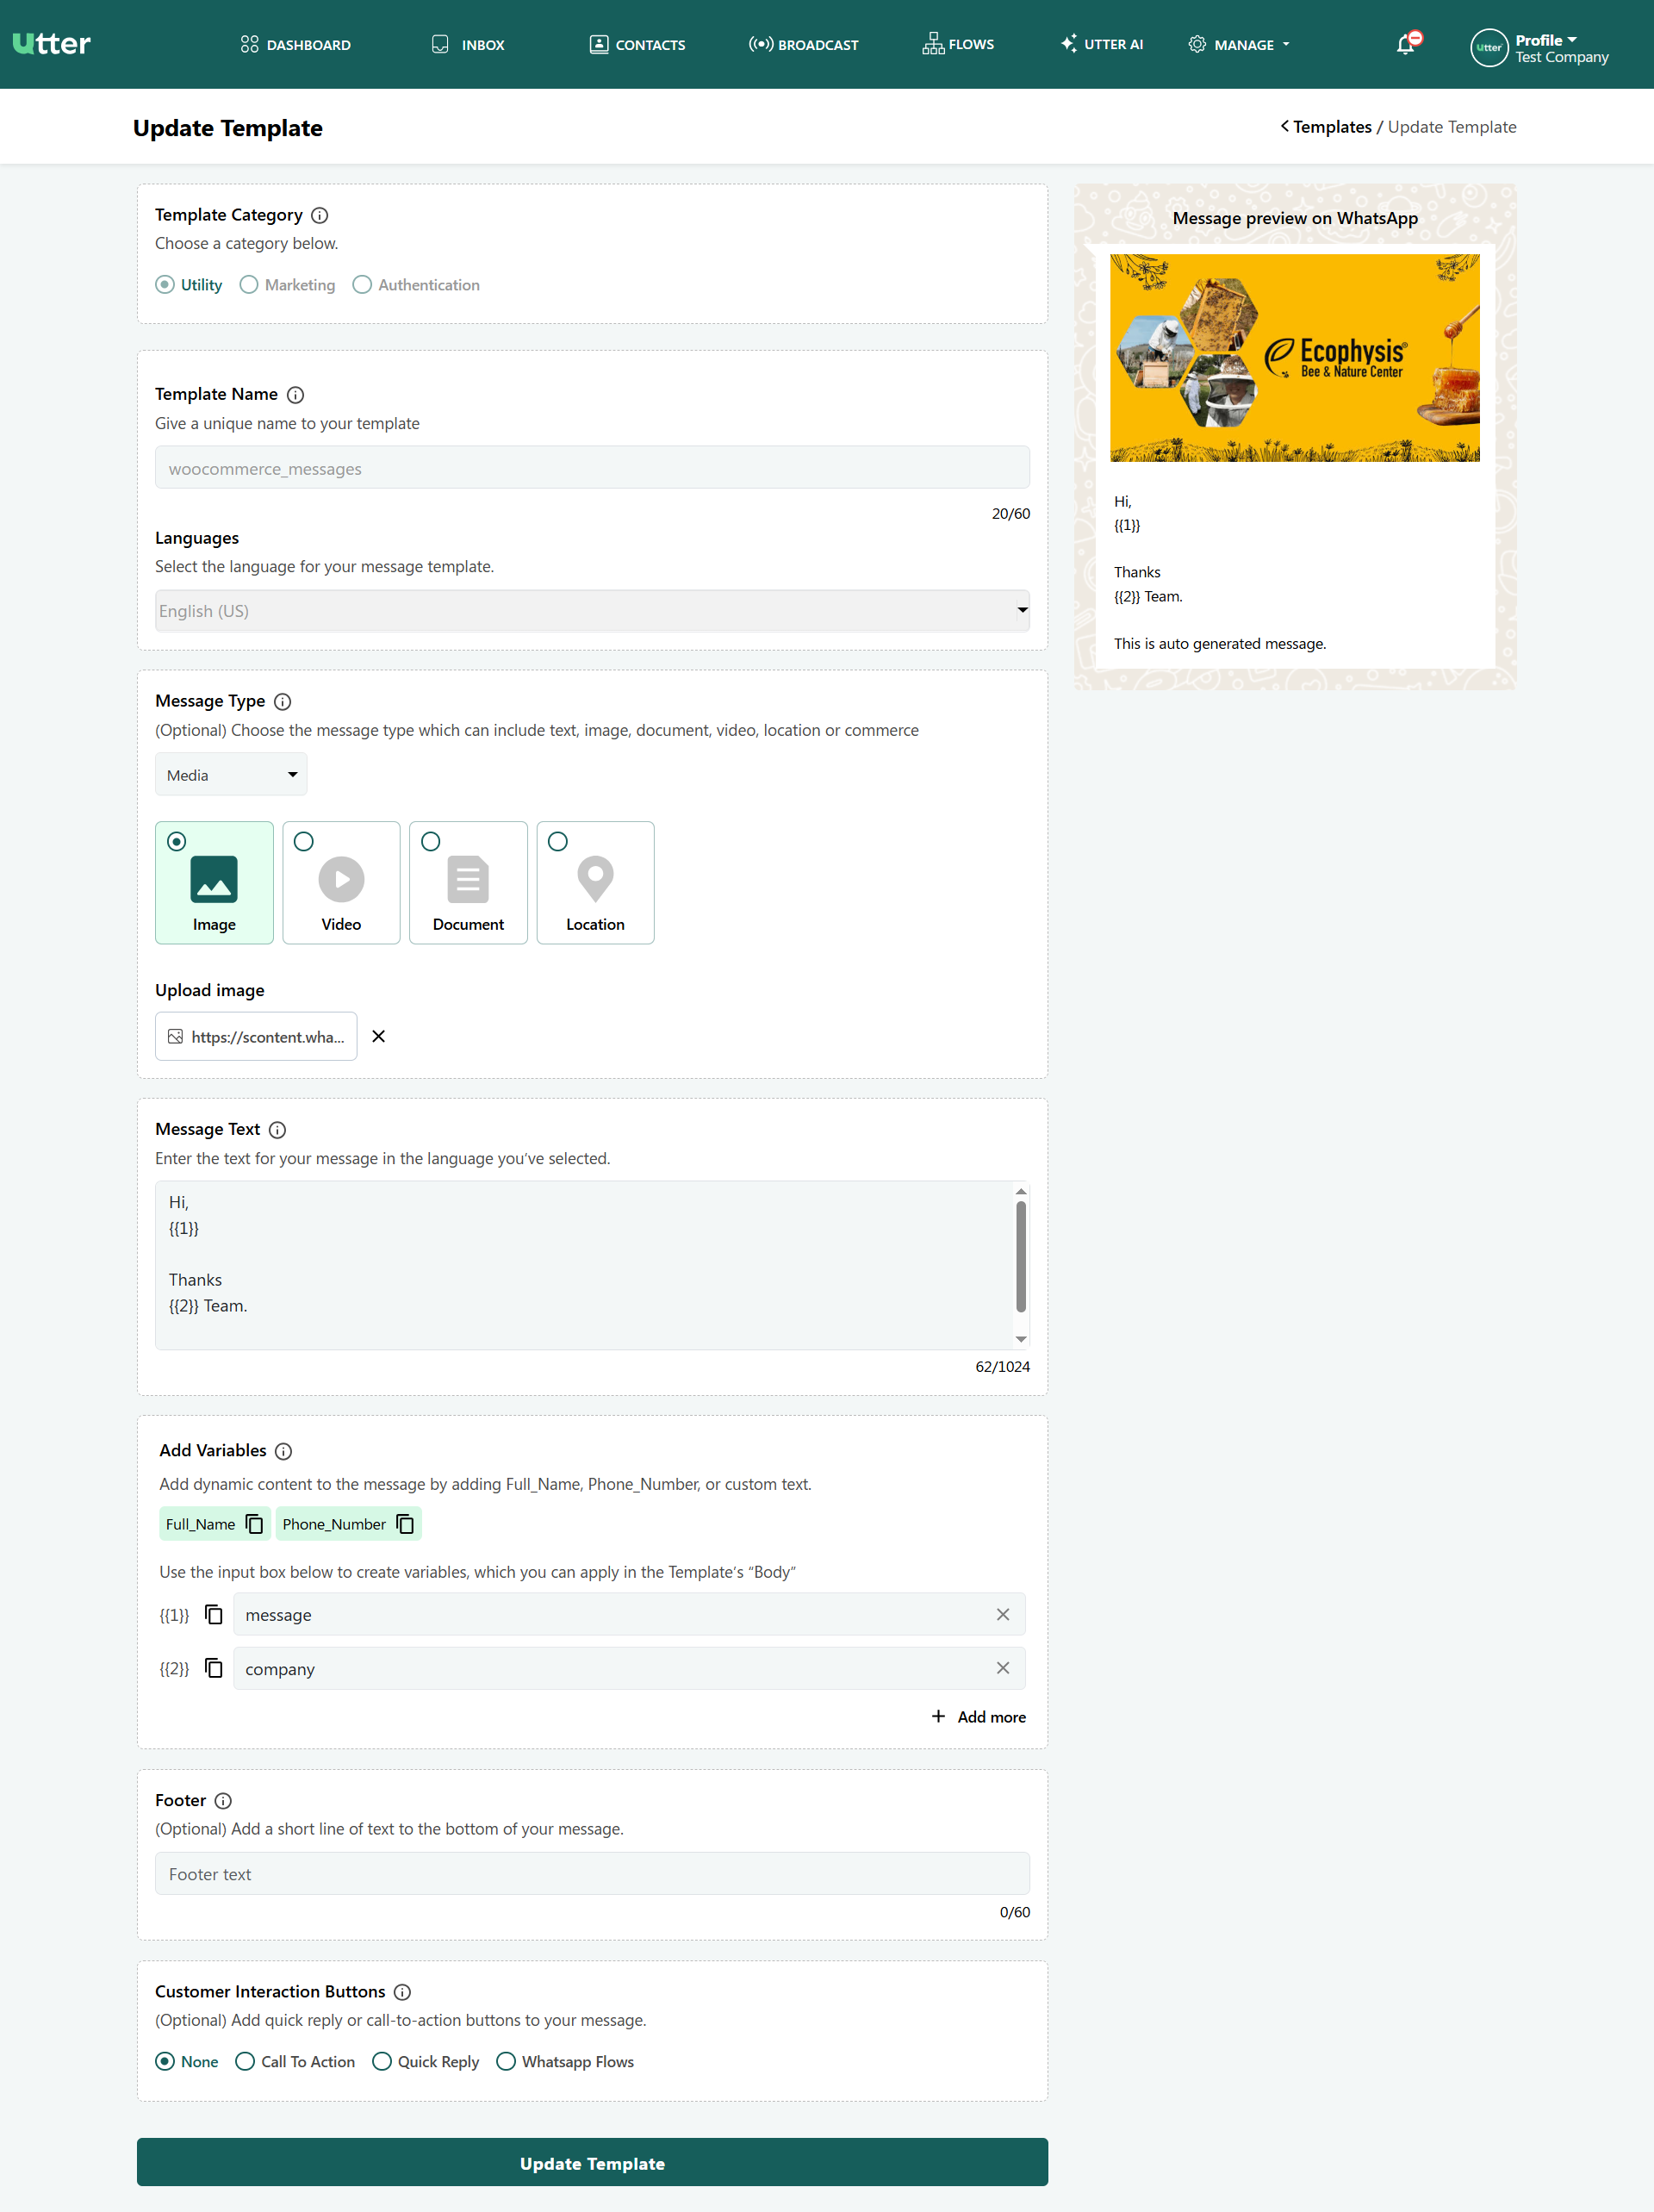
Configuration Fields
- Template Category: Select one category:
- Utility: Transactional messages, order updates, and account notifications.
- Marketing: Promotional offers, product announcements, and sales campaigns.
- Authentication: Passcodes and OTP verification messages.
- Template Name: Enter a unique lowercase name using letters, numbers, and underscores (e.g.,
my_template). - Languages: Choose the primary language for your message text (e.g., English (US)).
- Message Type (Header): Choose an optional header type:
- None, Text, Image, Video, Document, Location, or Commerce.
- Message Text (Body): Input the core message text (up to 1,024 characters).
- Add Variables: Insert dynamic placeholders (such as
Full_Name,Phone_Number, or custom dynamic parameters like{{1}},{{2}}) into your message body text. - Footer (Optional): Add a light-grey footnote text at the bottom of the message (up to 60 characters).
- Customer Interaction Buttons (Optional): Attach interactive actions:
- None
- Call To Action: Phone number or website URL buttons.
- Quick Reply: Preset response buttons for quick customer interaction.
- WhatsApp Flows: Trigger custom interactive workflows.
Once configured, click Create Template to submit the template for approval.
Previewing a Template
To inspect how a template appears on a customer's device:
- Locate the desired template row (e.g.,
woocommerce_messages). - Click the Eye (View) icon under the Action column.
- A Message preview on WhatsApp panel slides in on the right side of the screen, showing the exact layout, media attachments (images/header media), body text with dynamic place-holders (e.g.,
{{1}},{{2}}), and interactive buttons.
Updating an Existing Template
To modify an existing template:
- Click the Pencil (Edit) icon next to the template in the listing table.
- The Update Template builder will open, pre-populated with all existing parameters and dynamic variables.
- A real-time Message preview on WhatsApp panel remains visible on the right sidebar, automatically updating as you edit header media, body text, dynamic variables, and footer fields.
- After making the necessary modifications, click Update Template at the bottom of the form to save changes.
WooCommerce Notification Settings
Once you have created your Message Templates, API Keys, and Webhooks in the Utter Portal—and saved your credentials under WordPress Settings > Utter AI—your synced templates will automatically map to WooCommerce order events.
This guide details how to access, view, and manage automated WhatsApp notifications directly from your WooCommerce settings.
Accessing Utter AI in WooCommerce
- Log in to your WordPress Admin Dashboard.
- From the left sidebar navigation, click on WooCommerce > Settings.
- In the top navigation tab bar, click on Utter AI.
Notification Providers Overview
The Notification Providers panel displays all synced message templates mapped to specific WooCommerce order lifecycle events and abandoned cart reminders.
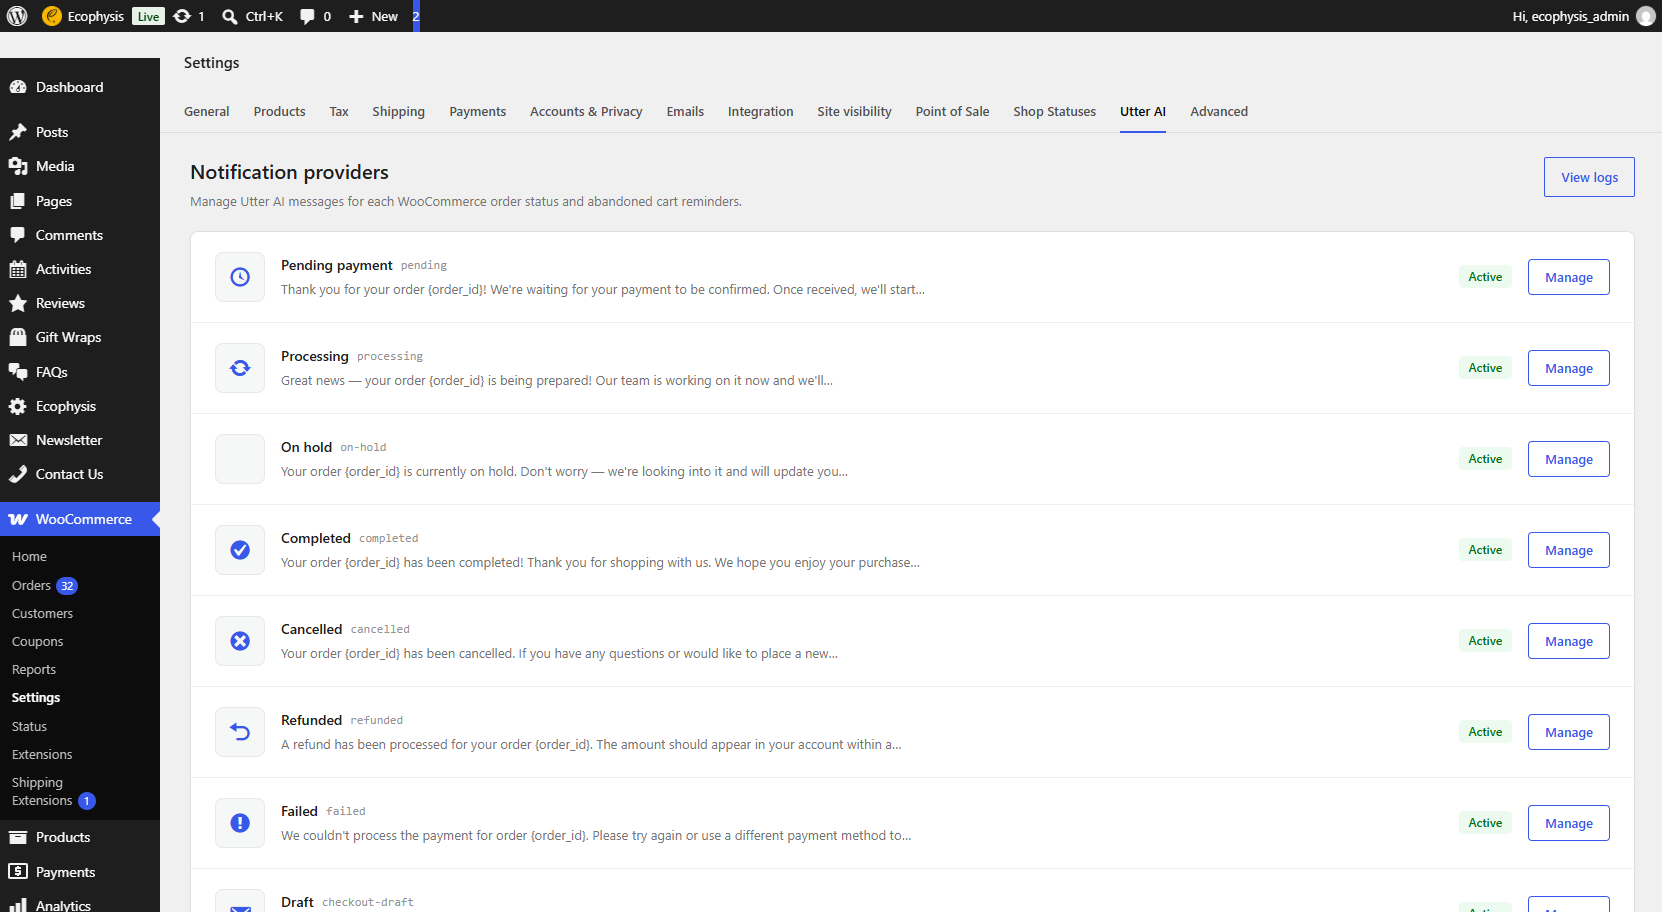
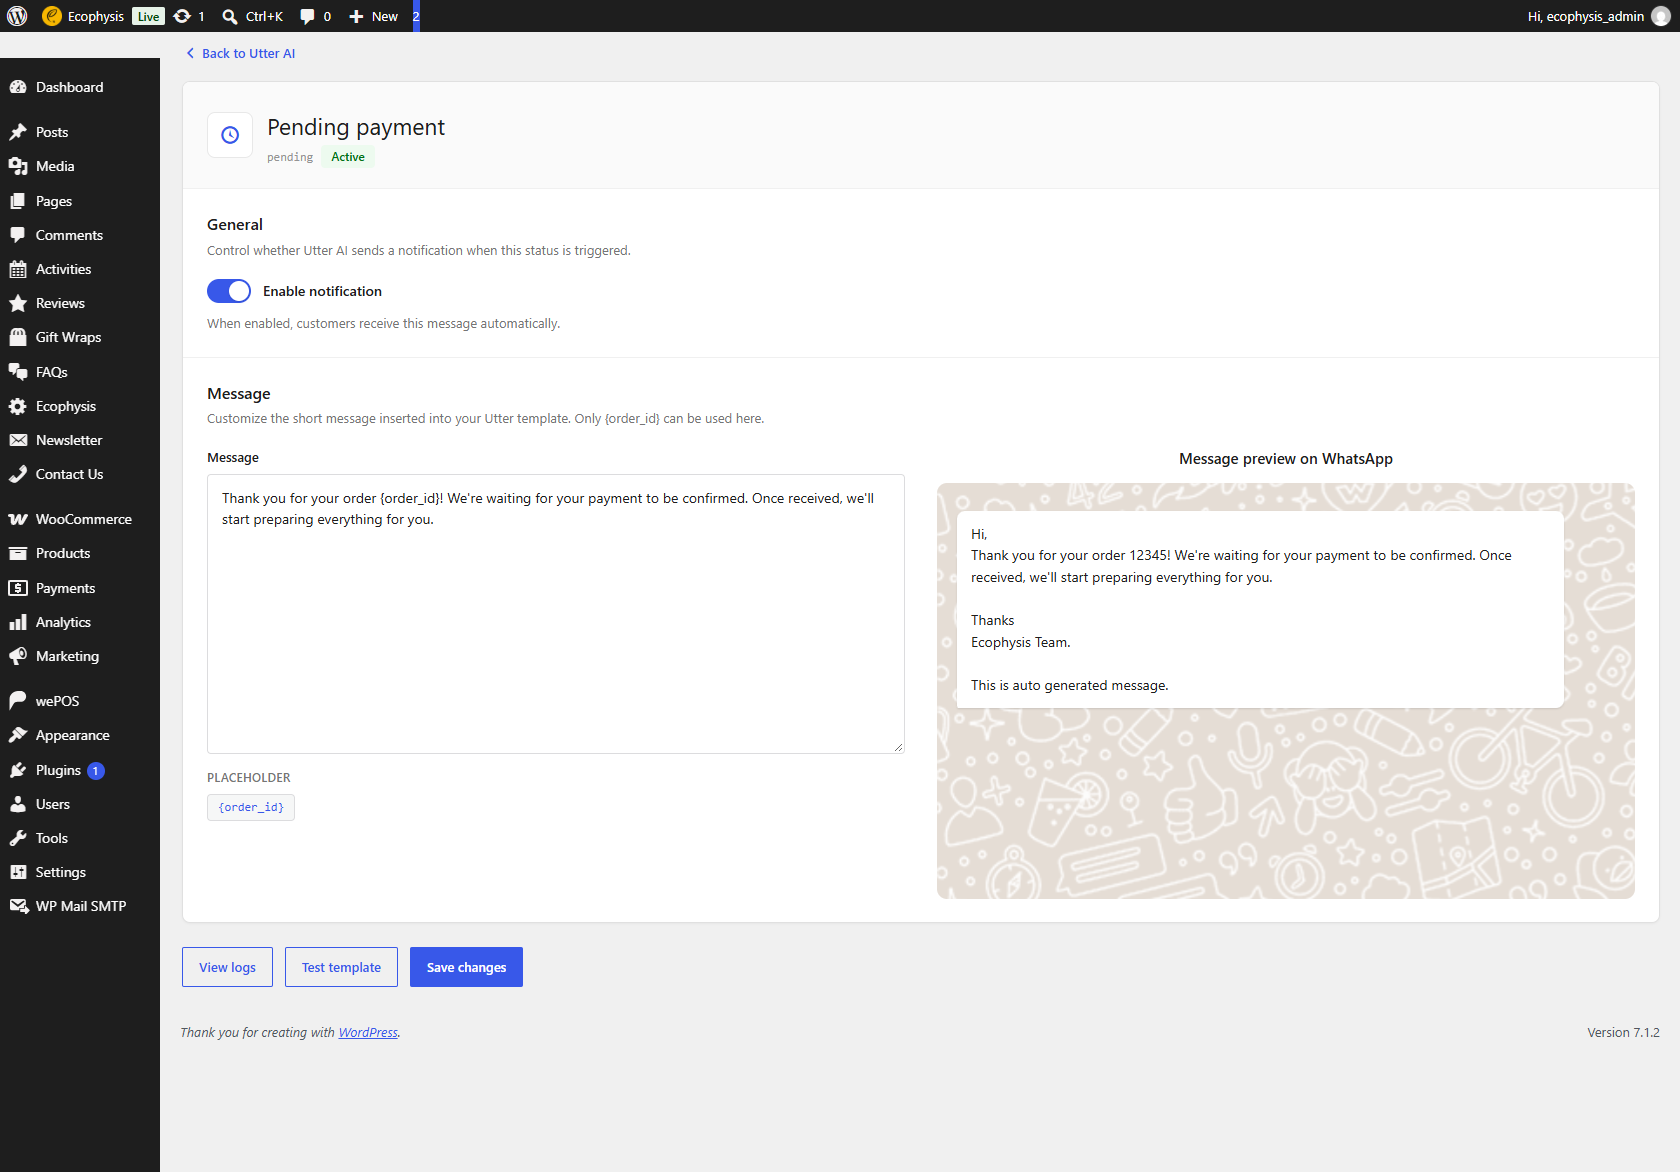
Manage Notification
You can manage you WooCommerce Message Notification clicking on the Manage button on the right side the every notification message in Notification Provider listing..
You can do following inside Manage option
- General Setting: Enable and Disable Notification seding.
- Update Message: You can update you sending message text to customer
- on the right side of Message text box you can see the updated template view .
Click the Save Changes button in button of page to save you updates ..